Xamarin.Forms: Infinite Scroll ListView (Lazy Loading)
Introduction
In this blog, we are going to learn how to design an Expandable Infinite Scroll ListView in Xamarin Forms Application. This Infinite scroll function not there in default Xamarin Forms, so we need to add the plugin for this. Here, we need to know, how infinite scroll works, First, we are going to show fixed no of data. Once the user scrolls to reach in the end, we can add more data at the end of the list, so that list will continuously scroll until the data end. Examples, Facebook Feed, and Twitter Feed.
Let’s start
Step 1
Create a new Xamarin. Forms project by going to open Visual Studio and click New => Project => In the dialog selects Mobile App (Xamarin.Forms) and click Next

Step 2
Next, another dialog will appear, here give your Application, Solution name and Location, then click Create.

Step 3
After that, the new dialog window, select your Xamarin. Forms application template type and Platforms then click OK, here, I’m selecting Blank template and Android, iOS platform only.

Step 4
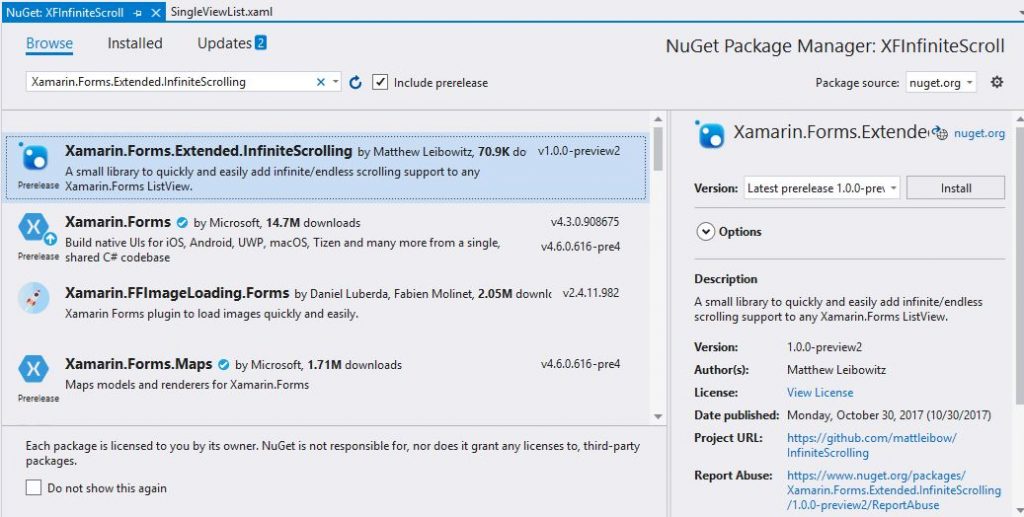
After the project creation, install “Xamarin.Forms.Extended.Infinitescrolling” NuGet package. For that, go to Solution Explorer and right-click Solution and select Manage NuGet Package option, In the window, move to browse tab and search “Xamarin.Forms.Extended.InfiniteScrolling” and install it.

Step 5
Now, add a new model class named “Item.cs”. For that, create a Model folder in the shared project, under the Models folder, add Item.cs class and write the below-given code.

C# Code:
public class Items
     {
         public string Id { get; set; }
         public string Text { get; set; }
         public string Title { get; set; }
         public string Description { get; set; }
     }
Step 6
Next, create a dummy data class named “DataItems.cs” and paste the below-given code.

Step 7
Now, add the new Tabbed Page. For that, open Solution Explorer => right-click the shared project => select Add => in the dialog window, left plane selects Xamarin. Forms and center plane select Tabbed Page and give the name as “MainPage” and click Add.
As well as, add two new content page, names are “SingleViewList” and “GroupViewList”


Step 8
Open the SingleViewList.xaml page and write the below-given code. In the code, we designed simple ListView and setting up the list view behavior as infinite scroll and ListView Footer design.
XAML:
<?xml version="1.0" encoding="utf-8" ?>
<ContentPage xmlns="http://xamarin.com/schemas/2014/forms"
             xmlns:x="http://schemas.microsoft.com/winfx/2009/xaml"
             xmlns:d="http://xamarin.com/schemas/2014/forms/design"
            xmlns:scroll="clr-namespace:Xamarin.Forms.Extended;assembly=Xamarin.Forms.Extended.InfiniteScrolling"
             xmlns:mc="http://schemas.openxmlformats.org/markup-compatibility/2006"
             mc:Ignorable="d"
             x:Class="XFInfiniteScroll.Views.SingleViewList">
    <ContentPage.Content>
        <ListView x:Name="ListsingleItems" HasUnevenRows="True" VerticalOptions="FillAndExpand" HorizontalOptions="FillAndExpand" >
            <ListView.Behaviors>
                <scroll:InfiniteScrollBehavior IsLoadingMore="{Binding IsWorking}"/>

            </ListView.Behaviors>
            <ListView.ItemTemplate>
                <DataTemplate>
                    <ViewCell>
                        <Grid Padding="12">
                            <Grid.RowDefinitions>
                                <RowDefinition Height="20" />
                                <RowDefinition Height="20" />
                            </Grid.RowDefinitions>
                            <Label  Grid.Row="0"   Text="{Binding Text}" />
                            <Label Grid.Row="1" Text="{Binding Description}" />
                        </Grid>
                    </ViewCell>
                </DataTemplate>
            </ListView.ItemTemplate>
            <ListView.Footer>
                <Grid Padding="6">
                    <Label Text="Loading..." IsVisible="{Binding IsWorking}" VerticalOptions="Center" HorizontalOptions="Center" />
                </Grid>
            </ListView.Footer>

        </ListView>
    </ContentPage.Content>
</ContentPage>
Code Behind of SingleViewList.cs. We are just binding the data and setting the page size.
C# Code:
private const int PageSize = 20;
        public SingleViewList()
        {
            InitializeComponent();
            Items = new InfiniteScrollCollection<Items>
            {
                OnLoadMore = async () =>
                {
                    // load the next page
                    var page = Items.Count / PageSize;
                    var items = await DataItems.GetItemsAsync(page, PageSize);
                    IsWorking = false;
                    return items;
                }
            };
            // load the initial data
            loadDataAsync();
        }

       public InfiniteScrollCollection<Items> Items { get; set; }

        public bool IsWorking
        {
            get; set;
        }

        private async Task loadDataAsync()
        {
            var items = await DataItems.GetItemsAsync(pageIndex: 0, pageSize: PageSize);

            Items.AddRange(items);
            ListsingleItems.ItemsSource = Items;

        }
Step 9
Next, open GroupListView.xaml and paste the below-given code. The same thing as SingleViewList.cs page, but we are using Grouping based ListView of Header and Item template ListView.
XAML:
<?xml version="1.0" encoding="utf-8" ?>
<ContentPage xmlns="http://xamarin.com/schemas/2014/forms"
             xmlns:x="http://schemas.microsoft.com/winfx/2009/xaml"
             xmlns:d="http://xamarin.com/schemas/2014/forms/design"
                 xmlns:scroll="clr-namespace:Xamarin.Forms.Extended;assembly=Xamarin.Forms.Extended.InfiniteScrolling"
             xmlns:mc="http://schemas.openxmlformats.org/markup-compatibility/2006"
             mc:Ignorable="d"
             x:Class="XFInfiniteScroll.Views.GroupViewList">
    <ContentPage.Content>
        <ListView IsGroupingEnabled = "true" HasUnevenRows="True" VerticalOptions="FillAndExpand" HorizontalOptions="FillAndExpand" x:Name="GroupItems">
            <ListView.Behaviors>
                <scroll:InfiniteScrollBehavior IsLoadingMore="{Binding IsWorking}" />
            </ListView.Behaviors>
            <ListView.ItemTemplate>
                <DataTemplate>
                    <ViewCell>
                        <Grid Padding="12">
                            <Grid.ColumnDefinitions>
                                <ColumnDefinition Width="*" />
                            </Grid.ColumnDefinitions>
                            <Grid.RowDefinitions>
                                <RowDefinition Height="20" />
                                <RowDefinition Height="20" />
                            </Grid.RowDefinitions>
                            <Label Grid.Row="0" Text="{Binding Text}" />
                            <Label Grid.Row="1" Text="{Binding Description}" />
                        </Grid>
                    </ViewCell>
                </DataTemplate>
            </ListView.ItemTemplate>
            <ListView.GroupHeaderTemplate>
                <DataTemplate>
                    <ViewCell Height="25">
                        <ViewCell.View>
                            <Grid BackgroundColor="White">
                                <Label Text="{Binding Header}" TextColor="Blue" FontFamily="Roboto" FontAttributes="None"  FontSize="16" HorizontalTextAlignment="Center" VerticalTextAlignment="Center"/>
                            </Grid>
                        </ViewCell.View>
                    </ViewCell>
                </DataTemplate>
            </ListView.GroupHeaderTemplate>
            <ListView.Footer>
                <Grid Padding="6">
                    <Label Text="Loading..."  IsVisible="{Binding IsWorking}" VerticalOptions="Center" HorizontalOptions="Center" />
                </Grid>
            </ListView.Footer>
        </ListView>
    </ContentPage.Content>
</ContentPage>
Code Behind of GroupListView.cs.
        private int ListItemsCount = 0;
        private const int PageSize = 20;
        public InfiniteScrollCollection<ObservableGroupCollection<string, Items>> Items;
        public bool IsWorking
        {
            get; set;
        }

        public GroupViewList()
        {
            InitializeComponent();
            Items = new InfiniteScrollCollection<ObservableGroupCollection<string, Items>>
            {
                OnLoadMore = async () =>
                {
                    // load the next page
                    IsWorking = true;
                    ListItemsCount = 0;
                    foreach (var _itemslist in Items)
                    {
                        ListItemsCount += _itemslist.Count;
                    }
                    double _pagecount = (double)ListItemsCount / PageSize;
                    var page = Convert.ToInt32(Math.Ceiling(_pagecount));
                    var items = await DataItems.GetItemsAsync(page, PageSize);
                    var _items = items.GroupBy(e => e.Title).Select(e => new ObservableGroupCollection<string, Items>(e)).ToList();
                    if (_items.Count > 0)
                    {
                        foreach (var getGroupItems in _items.GroupBy(i => i.Header).ToList())
                        {

                            var _GetExistingGroupItems = Items.LastOrDefault(i => i.Header == getGroupItems.Key);
                            if (_GetExistingGroupItems != null && _GetExistingGroupItems.Count > 0)
                            {
                                // this is an existing group, so add the items to that
                                foreach (var _ExistingGroupedItems in getGroupItems.ToList())
                                {
                                    foreach (var _GroupListitems in _ExistingGroupedItems.ToList())
                                    {
                                        _GetExistingGroupItems.Add(_GroupListitems);  //Update items
                                    }
                                }
                            }
                            else
                            {
                                //Add new Group
                                Items.AddRange(getGroupItems);
                                GroupItems.ItemsSource = Items;
                            }
                        }
                    }
                    IsWorking = false;
                    return null;
                }
            };
            loadDataAsync();
        }
        private async Task loadDataAsync()
        {
            IsWorking = true;
            var items = await DataItems.GetItemsAsync(pageIndex: 0, pageSize: PageSize);
            var groupItems = items.GroupBy(e => e.Title).Select(e => new ObservableGroupCollection<string, Items>(e)).ToList();
            Items.AddRange(groupItems);
            OnPropertyChanged("Items");
            GroupItems.ItemsSource = Items;
            IsWorking = false;
        }
        public event PropertyChangedEventHandler PropertyChanged;
        protected virtual void OnPropertyChanged([CallerMemberName] string propertyName = null)
        {
            PropertyChanged?.Invoke(this, new PropertyChangedEventArgs(propertyName));
        }
        public class ObservableGroupCollection<K, T> : ObservableCollection<T>
        {
            private readonly K _header;

            public ObservableGroupCollection(IGrouping<K, T> group)
                : base(group)
            {
                _header = group.Key;
            }

            public K Header
            {
                get { return _header; }
            }
        }
Step 10
Next, go to MainPage.xaml and configure this “SingleViewList” and “GroupViewList” page as children of Tabbed Page. Code is given below
XAML
<?xml version="1.0" encoding="utf-8" ?>
<TabbedPage xmlns="http://xamarin.com/schemas/2014/forms"
             xmlns:x="http://schemas.microsoft.com/winfx/2009/xaml"
             xmlns:d="http://xamarin.com/schemas/2014/forms/design"
             xmlns:mc="http://schemas.openxmlformats.org/markup-compatibility/2006"
             mc:Ignorable="d"
              Title="XF Infinite Scroll"
             xmlns:views="clr-namespace:XFInfiniteScroll.Views"
             x:Class="XFInfiniteScroll.MainPage">

    <TabbedPage.Children>
        <NavigationPage Title="Single Items">
            <x:Arguments>
                <views:SingleViewList />
            </x:Arguments>
        </NavigationPage>
        <NavigationPage Title="Group Items">
            <x:Arguments>
                <views:GroupViewList />
            </x:Arguments>
        </NavigationPage>
    </TabbedPage.Children>

</TabbedPage>
Step 11
Now, run your Xamarin. Forms project by clicking run or F5 and you will get output like below.
Output:
iOS:

Android:

The full source code for this article can be referred here.
Conclusion:
I hope you understand how to use InfiniteScrollView in Xamarin.Forms. If you have any queries or issues command below. Thanks for reading. If you like this blog comment below.

Anbu Mani(Microsoft MVP) is working Software Engineer in Changepond Technologies, Chennai, Tamilnadu, India. Having 4+ years of experience and his area of interest is C#, ASP.NET, SQL Server, Xamarin and Xamarin Forms,Azure…etc

Hi there , very nice .. however not sure why not the collectionView since is now the preferred option.
thanks
How to setup search feature with virtual scrolling in xamarin forms listview ? (More than 10K items)