
Create Xamarin Android Animating Activities
Introduction
Android animations show the visual effects of transactions of the activities and fragments. Here, we will create four types of transactions.
- LEFT TO RIGHT ANIMATION
- RIGHT TO LEFT ANIMATION
- BOTTOM TO TOP ANIMATION
- TOP TO BOTTOM ANIMATION
Let’s start,
LEFT TO RIGHT ANIMATION
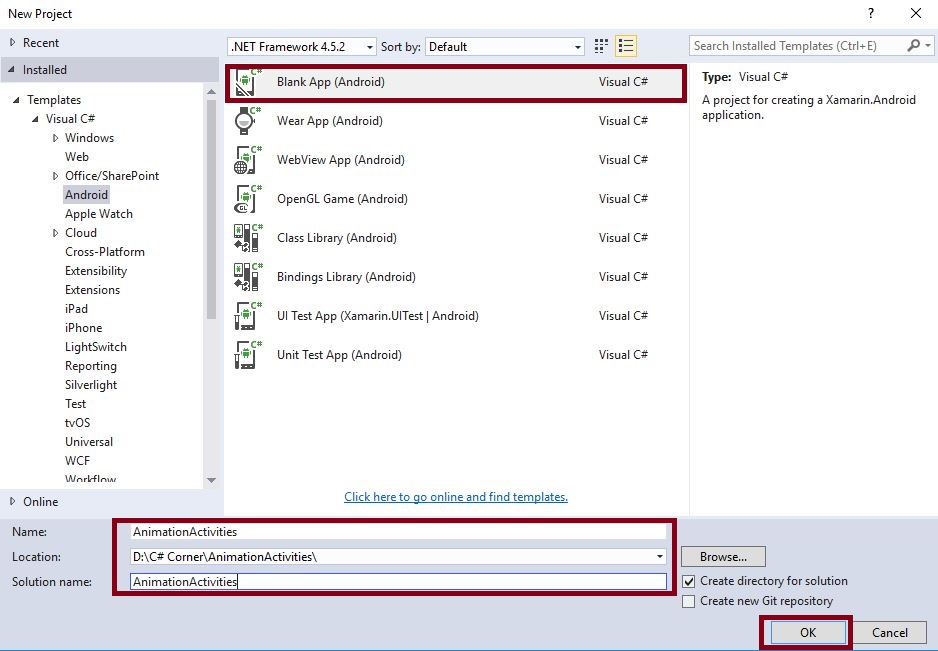
Step 1 : Open Visual Studio->New Project->Templates->Visual C#->Android->Blank App,Give the Project Name and Project Location.
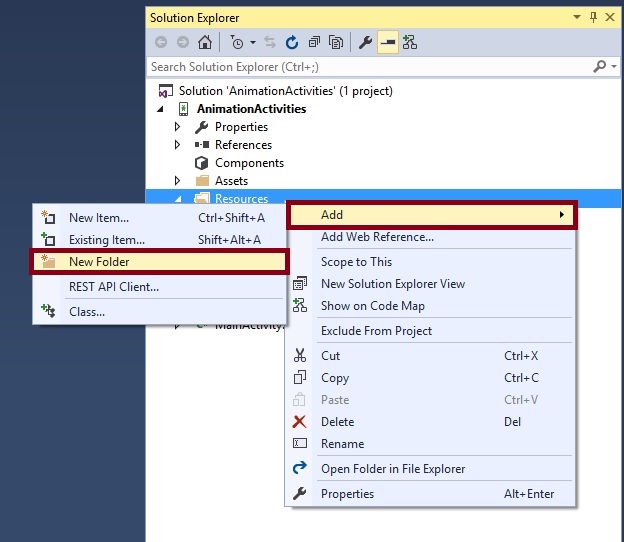
Step 2: Go to Solution Explorer-> Project Name-> Resources, followed by Right click to Add-> New Folder and give the name for Anim.
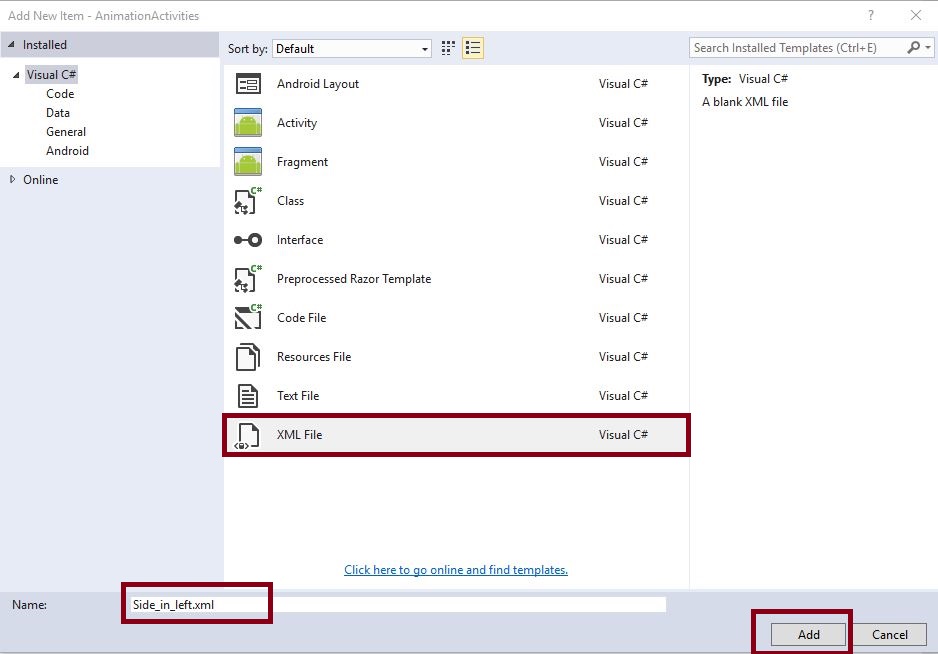
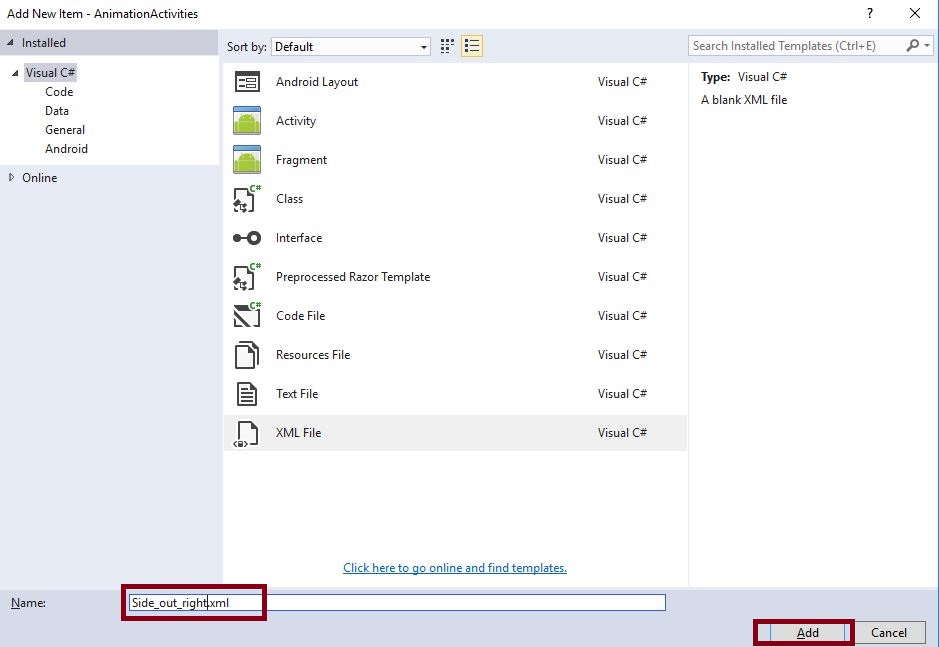
Step 3 : First, we create Left to Right Animation. Thus, we create two XML resources. Go to Solution Explorer-> Project Name-> Resources-> Anim and right click to Add-> New Item, which will open the new dialog box. This dialog box is required to select XML and give the name for Side_in_left.xml and one more resource is Side_out_right.xml.
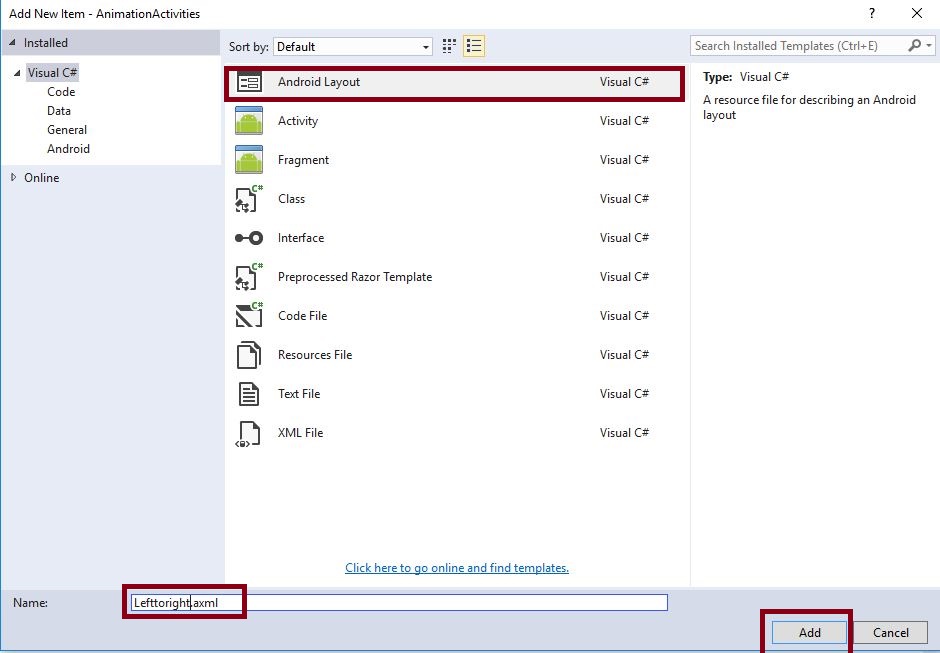
Step 4 : Add Lefttoright Design view. Go to Solution Explorer-> Project Name-> Resources-> Layout. Right click Add->New Item and open new dialog box. This dialog box is required to select XML and give the name for Lefttoright.axml.
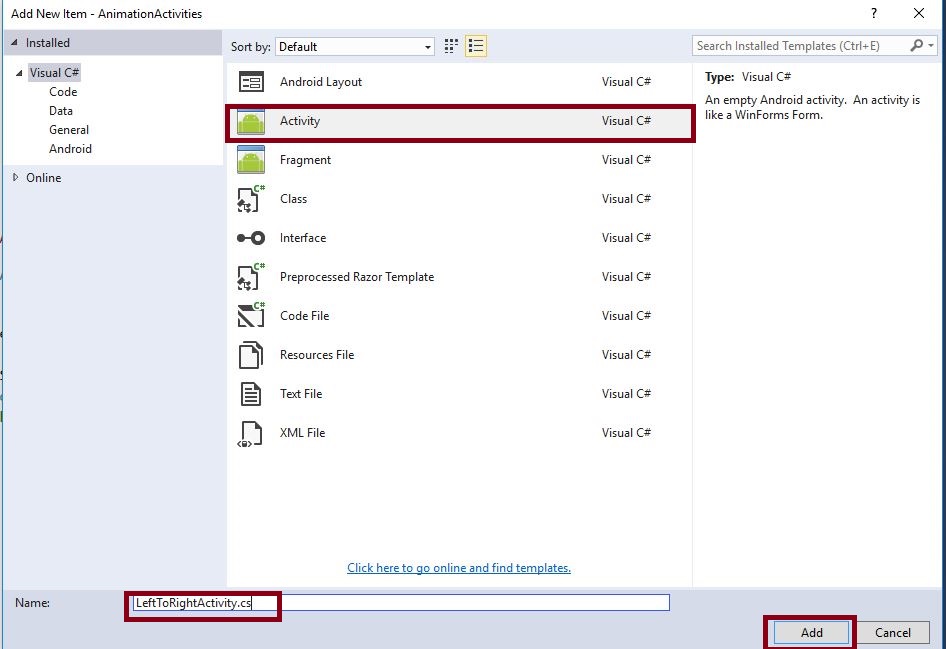
Step 5 : Add Lefttoright Activity page. Go to Solution Explorer-> Project Name, followed by right clicking Add->New Item, open new dialog box. This dialog box will select activity and give the name for LeftToRightActivity.cs.
Step 6: Open Solution Explorer-> Project Name-> Resources->Anim -> Side_in_left.xml. Click to open and add the code, given below,
 <?xml version="1.0" encoding="utf-8" ?>
 <set
 xmlns:android="http://schemas.android.com/apk/res/android"
 android:interpolator="@android:anim/linear_interpolator">
 <translate android:duration="600"
 android:fromXDelta="-100%"
 android:toXDelta="0%"/>
 </set>
Step 7: Open Solution Explorer-> Project Name-> Resources-> Anim -> Side_out_right.xml and click to open. Add the code, given below,
 <?xml version="1.0" encoding="utf-8" ?>
 <set
 xmlns:android="http://schemas.android.com/apk/res/android"
 android:interpolator="@android:anim/linear_interpolator">
 <translate android:duration="600"
 android:fromXDelta="0%"
 android:toXDelta="100%"/>
 </set>
Step 8: Open Solution Explorer-> Project Name-> Resources-> Layout -> Lefttoright.axml. Click to open and add the code, given below,
 <TextView
 android:text="LEFT TO RIGHT"
 android:textAppearance="?android:attr/textAppearanceLarge"
 android:layout_width="match_parent"
 android:layout_height="wrap_content"
 android:id="@+id/textView1" />
Step 9: Open Solution Explorer-> Project Name-> LeftToRightActivity.cs. Click to open and add the code, given below:
SetContentView(Resource.Layout.Lefttoright);RIGHT TO LEFT ANIMATION
Step 10: Go to Solution Explorer-> Project Name-> Resources-> Anim, followed by right click to add-> New Item. Open the new dialog box. This dialog box is required to select XML and give the name for Side_in_right.xml and one more resource is Side_out_left.xml
Step 11: Now, add RighttoLeft Design view. Go to Solution Explorer-> Project Name-> Resources-> Layout and right click to Add-> New Item, followed by opening the new dialog box. This dialog box is required to select XML and give the name for RighttoLeft.axml.
Step 12: Now, add RighttoLeft Activity page. Go to Solution Explorer-> Project Name, followed by right clicking to Add-> New Item, followed by opening the new dialog box. This dialog box is required to select activity and give the name for RighttoLeftActivity.cs.
Step 13: Now, open Solution Explorer-> Project Name->Resources->Anim -> Side_in_right.xml and click to open. Add the code, given below,
<?xml version="1.0" encoding="utf-8" ?>
<set
 xmlns:android="http://schemas.android.com/apk/res/android"
android:interpolator="@android:anim/linear_interpolator">
 <translate android:duration="600"
android:fromXDelta="100%"
android:toXDelta="0%" />
</set>
Step 14: Open Solution Explorer-> Project Name->Resources->Anim -> Side_out_left.xml and click to open. Add the code, given below,
<?xml version="1.0" encoding="utf-8" ?>
<set
 xmlns:android="http://schemas.android.com/apk/res/android"
android:interpolator="@android:anim/linear_interpolator">
 <translate android:duration="600"
android:fromXDelta="0%"
android:toXDelta="-100%"/>
</set>
Step 15: Open Solution Explorer-> Project Name->Resources->Layout -> RighttoLeft.axml and click to open. Add the code, given below,
 <TextView
 android:text="RIGHT TO LEFT"
 android:textAppearance="?android:attr/textAppearanceLarge"
 android:layout_width="match_parent"
 android:layout_height="wrap_content"
 android:id="@+id/textView1" />
Step 16: Open Solution Explorer-> Project Name-> RighttoLeftActivity.cs and click to open. Add the code, given below,
SetContentView(Resource.Layout.Righttoleft);
BOTTOM TO TOP ANIMATION
Step 17: Go to Solution Explorer-> Project Name->Resources-> Anim, followed by right click to Add-> New Item, open new dialog box. This dialog box is required to select XML and give the name for Pushup_in.xml. One more resource is Pushup_out.xml.
Step 18: Add bottomtotop design view. Go to Solution Explorer-> Project Name->Resources-> Layout, followed by right clicking to Add->New Item. Open the new dialog box. This dialog box is required to select XML and give the name for bottomtotop.axml.
Step 19: Add bottomtotopActivity page. Go to Solution Explorer-> Project Name, right click to Add-> New Item. New dialog box will open. This dialog box is required to select activity and give the name for bottomtotop.cs.
Step 20: Open Solution Explorer-> Project Name-> Resources-> Anim-> Pushup_in.xml. Click to open and add the code, given below,
<?xml version="1.0" encoding="utf-8" ?>
<set
 xmlns:android="http://schemas.android.com/apk/res/android"
android:interpolator="@android:anim/linear_interpolator">
 <translate android:fromYDelta="100%p"
android:toYDelta="0"
android:duration="600"/>
</set>
Step 21: Open Solution Explorer-> Project Name->Resources->Anim -> Pushup_out.xml. Click to open and add the code, given below,
<?xml version="1.0" encoding="utf-8" ?>
<set
 xmlns:android="http://schemas.android.com/apk/res/android"
android:interpolator="@android:anim/linear_interpolator">
 <translate android:fromYDelta="0"
android:toYDelta="-100%p"
android:duration="600"/>
</set>
Step 22: Open Solution Explorer-> Project Name-> Resources-> Layout -> RighttoLeft.axml. Click to open and add the code, given below,
 <TextView
 android:text="BOTTOM TO TOP"
 android:textAppearance="?android:attr/textAppearanceLarge"
 android:layout_width="match_parent"
 android:layout_height="wrap_content"
 android:id="@+id/textView1" />
Step 23: Open Solution Explorer-> Project Name-> RighttoLeftActivity.cs. Click to open and add the code, given below,
SetContentView(Resource.Layout.bottomtotop);
TOP TO BOTTOM ANIMATION
Step 24: Go to Solution Explorer-> Project Name-> Resources-> Anim, followed by right click to Add-> New Item. Open new dialog box. This dialog box is required to select XML and give the name for Pushdown_in.xml. One more resource is Pushdown_out.xml.
Step 25: Add Toptobottom Design view.go to Solution Explorer-> Project Name->Resources->Layout then Right Click to Add->New Item then open new Dialog box. That Dialog box to Select XML and give Name for Toptobottom.axml.
Step 26: Add Toptobottom Activity page. Go to Solution Explorer-> Project Name, followed by right clicking to Add->New Item, open new dialog box. This dialog box is required to select activity and give name for Toptobottom Activity.cs.
Step 27: Open Solution Explorer-> Project Name->Resources-> Anim -> Pushdown_in.xml. Click to open and add the code, given below,
 <?xml version="1.0" encoding="utf-8" ?>
 <set
 xmlns:android="http://schemas.android.com/apk/res/android"
 android:interpolator="@android:anim/linear_interpolator">
 <translate android:fromYDelta="-100%p"
 android:toYDelta="0"
 android:duration="600"/>
 </set>
Step 28: Open Solution Explorer-> Project Name->Resources-> Anim -> Pushdown_out.xml. Click to open and add the code, given below,
 <?xml version="1.0" encoding="utf-8" ?>
 <set
 xmlns:android="http://schemas.android.com/apk/res/android"
 android:interpolator="@android:anim/linear_interpolator">
 <translate android:fromYDelta="0"
 android:toYDelta="100%p"
 android:duration="600" />
 </set>
Step 29: Open Solution Explorer-> Project Name-> Resources-> Layout -> RighttoLeft.axml. Click to open and add the code, given below,
 <TextView
 android:text="TOP TO BOTTOM"
 android:textAppearance="?android:attr/textAppearanceLarge"
 android:layout_width="match_parent"
 android:layout_height="wrap_content"
 android:id="@+id/textView1" />
Step 30: Open Solution Explorer-> Project Name-> RighttoLeftActivity.cs. Click to open and add the code, given below,
SetContentView(Resource.Layout. Toptobottom);
Step 31: Finally, create button click event each animation. Open Main.axml.Solution Explorer-> Project Name->Resources->Layout -> Main.axml. Click to open and add the code,given below,
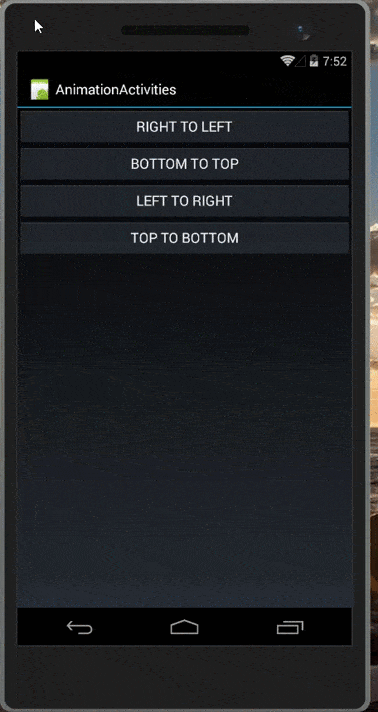
 <Button
 android:text="RIGHT TO LEFT"
 android:layout_width="match_parent"
 android:layout_height="wrap_content"
 android:id="@+id/righttoleft" />
 <Button
 android:layout_width="match_parent"
 android:layout_height="wrap_content"
 android:id="@+id/bottomtotop"
 android:text="BOTTOM TO TOP" />
 <Button
 android:text="LEFT TO RIGHT"
 android:layout_width="match_parent"
 android:layout_height="wrap_content"
 android:id="@+id/lefttoright" />
 <Button
 android:layout_width="match_parent"
 android:layout_height="wrap_content"
 android:id="@+id/toptobottom"
 android:text="TOP TO BOTTOM" />
Step 32: Open Solution Explorer-> Project Name-> MainActivity.cs. Click to open and add the code, given below,
 public class MainActivity: Activity {
 int count = 1;
 Button Righttoleft;
 Button bottomtotop;
 Button lefttoright;
 Button toptobottom;
 protected override void OnCreate(Bundle bundle) {
 base.OnCreate(bundle);
 // Set our view from the "main" layout resource
 SetContentView(Resource.Layout.Main);
 Righttoleft = FindViewById < Button > (Resource.Id.righttoleft);
 bottomtotop = FindViewById < Button > (Resource.Id.bottomtotop);
 lefttoright = FindViewById < Button > (Resource.Id.lefttoright);
 toptobottom = FindViewById < Button > (Resource.Id.toptobottom);
 Righttoleft.Click += Righttoleft_Click;
 bottomtotop.Click += bottomtotop_Click;
 lefttoright.Click += Lefttoright_Click;
 toptobottom.Click += Toptobottom_Click;
 }
 private void Toptobottom_Click(object sender, EventArgs e) {
 Intent intent;
 intent = new Intent(this, typeof(ToptoBottomActivity));
 StartActivity(intent);
 OverridePendingTransition(Resource.Animation.@Pushdown_in, Resource.Animation.@Pushdown_out);
 }
 private void Lefttoright_Click(object sender, EventArgs e) {
 Intent intent;
 intent = new Intent(this, typeof(LeftToRightActivity));
 StartActivity(intent);
 OverridePendingTransition(Resource.Animation.@Side_in_left, Resource.Animation.@Side_out_right);
 }
 private void bottomtotop_Click(object sender, EventArgs e) {
 Intent intent;
 intent = new Intent(this, typeof(BottomToTopActivity));
 StartActivity(intent);
 OverridePendingTransition(Resource.Animation.@Pushup_in, Resource.Animation.@Pushup_out);
 }
 private void Righttoleft_Click(object sender, EventArgs e) {
 Intent intent;
 intent = new Intent(this, typeof(RighttoLeftActivity));
 StartActivity(intent);
 OverridePendingTransition(Resource.Animation.@Side_in_right, Resource.Animation.@Side_out_left);
 }
}
Step 33: Press F5 or build and run the Application.
Download Source Code Here,
Finally, we successfully created Xamarin Android Animating activities.

Anbu Mani(Microsoft MVP) is working Software Engineer in Changepond Technologies, Chennai, Tamilnadu, India. Having 4+ years of experience and his area of interest is C#, ASP.NET, SQL Server, Xamarin and Xamarin Forms,Azure…etc