
Create Android TextInputLayout And Spinner
Let’s start,
Step 1: Open Visual Studio->New Project->Templates->Visual C#->Android->Blank app,Give the Project Name and Project Location.

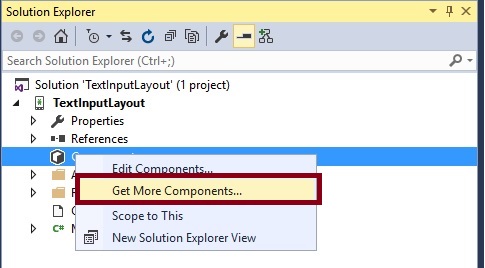
Step 2: Go to Solution Explorer-> Project Name-> Components, right click to get more components, open new dialog box. This dialog box is required to search the design, add the Android Support Design Library Packages.

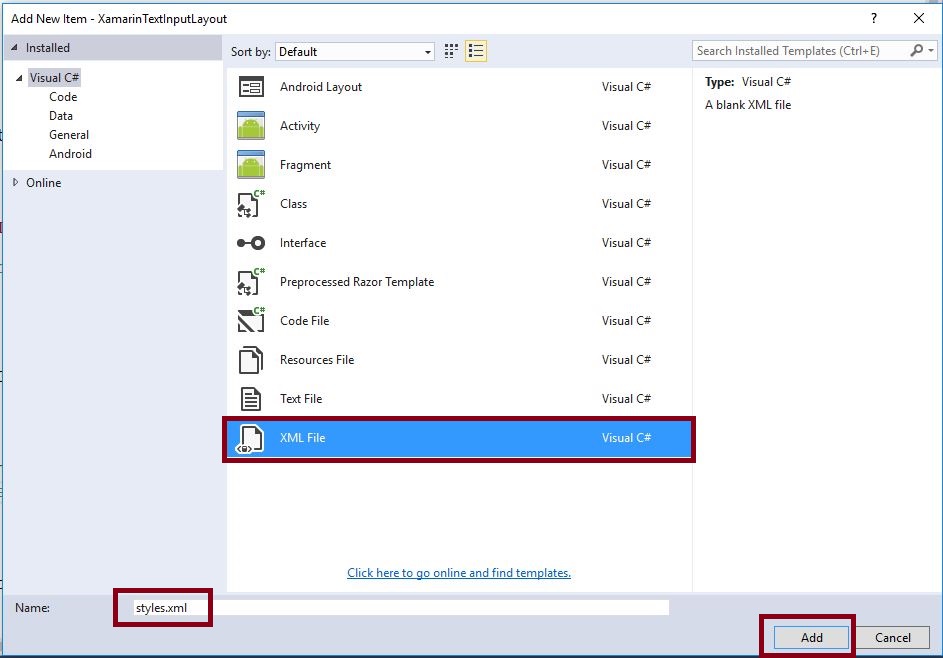
Step 3: Next to Add Theme.AppCompat.Light.NoActionBar, create styles.xml file. Go to Solution Explorer-> Project Name->Resources->values, right click to Add-> New Item, open new dialog box. Select XML file and give the name for styles.xml,
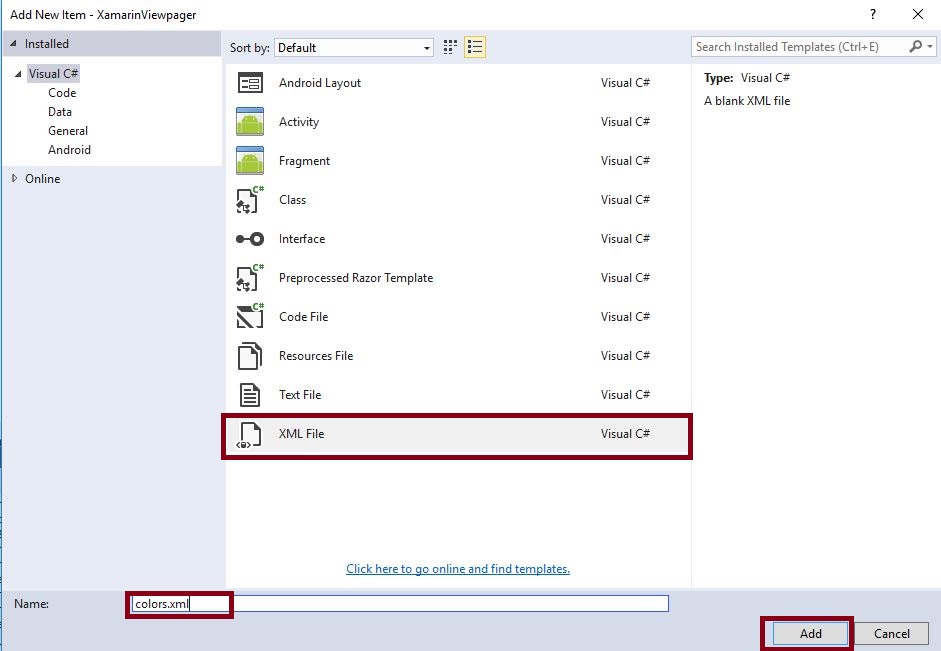
Step 4: Create colors.xml file. Go to Solution Explorer-> Project Name->Resources->values, right click to Add-> New Item, open new dialog box. Select XML file, give the name for colors.xml.
Step 5: Open Solution Explorer-> Project Name->Resources->values->colors.xml. Click to open Design View and the code, given below,
 <?xml version="1.0" encoding="utf-8" ?>
 <resources>
 <color name="window_background">#8AA5B9</color>
 </resources>
Step 6: Open Solution Explorer-> Project Name->Resources->values->styles.xml. Click to open Design View and the code, given below,
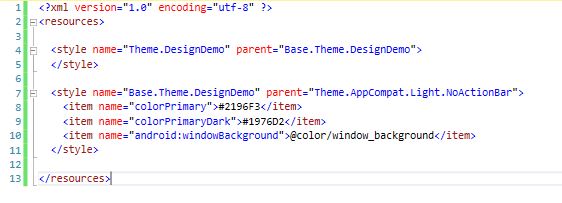
 <?xml version="1.0" encoding="utf-8" ?>
 <resources>
 <style name="Theme.DesignDemo" parent="Base.Theme.DesignDemo">

 </style>
 <style name="Base.Theme.DesignDemo" parent="Theme.AppCompat.Light.NoActionBar">
 <item name="colorPrimary">#2196F3</item> <item name="colorPrimaryDark">#1976D2</item> <item name="android:windowBackground">@color/window_background</item>
 </style>
 </resources>
Step 7: Open Solution Explorer-> Project Name->Resources->values->Strings.xml. Click to open Design View and the code, given below,
<string name="pro_Languages1">Type of Languages</string>
<string-array name="pro_Languages">
 <item>C#</item>
 <item>.Net</item>
 <item>Java</item>
 <item>C</item>
 <item>C++</item>
 <item>Swift</item>
</string-array>
</resources>
Step 8: Open Solution Explorer-> Project Name->Resources->layout ->Main.axml. Click to open Design View and the code, given below,
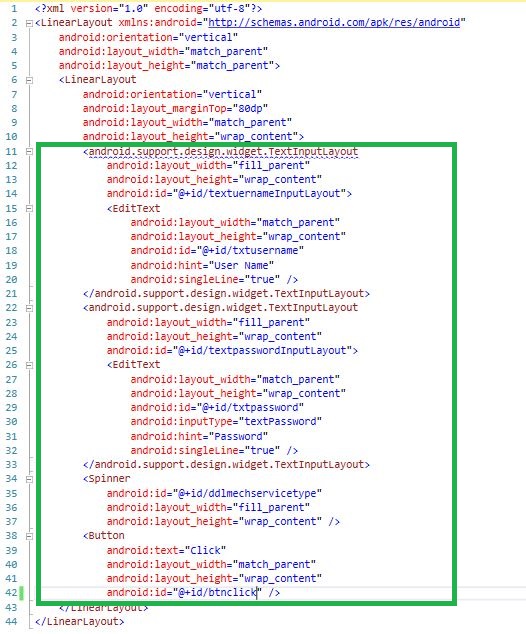
<?xml version="1.0" encoding="utf-8"?>
<LinearLayout xmlns:android="http://schemas.android.com/apk/res/android"
android:orientation="vertical"
android:layout_width="match_parent"
android:layout_height="match_parent">
<LinearLayout
android:orientation="vertical"
android:layout_marginTop="80dp"
android:layout_width="match_parent"
android:layout_height="wrap_content">
<android.support.design.widget.TextInputLayout
android:layout_width="fill_parent"
android:layout_height="wrap_content"
android:id="@+id/textuernameInputLayout">
<EditText
android:layout_width="match_parent"
android:layout_height="wrap_content"
android:id="@+id/txtusername"
android:hint="User Name"
android:singleLine="true" />
</android.support.design.widget.TextInputLayout>
<android.support.design.widget.TextInputLayout
android:layout_width="fill_parent"
android:layout_height="wrap_content"
android:id="@+id/textpasswordInputLayout">
<EditText
android:layout_width="match_parent"
android:layout_height="wrap_content"
android:id="@+id/txtpassword"
android:inputType="textPassword"
android:hint="Password"
android:singleLine="true" />
</android.support.design.widget.TextInputLayout>
<Spinner
android:id="@+id/ddlmechservicetype"
android:layout_width="fill_parent"
android:layout_height="wrap_content" />
<Button
android:text="Click"
android:layout_width="match_parent"
android:layout_height="wrap_content"
android:id="@+id/btnclick" />
</LinearLayout>
</LinearLayout>
Step 9: After Design view creation open Solution Explorer-> Project Name->MainActivity.cs then following below steps.
Step 10: Add below Namespaces,
using Android.Support.V7.App;
using Android.Support.Design.Widget;
Step 11: Create Spinner and TextInputLayout variable, declare the Spinner and TextInputLayout within the OnCreate().before to change to the Activity to AppCompatActivity.
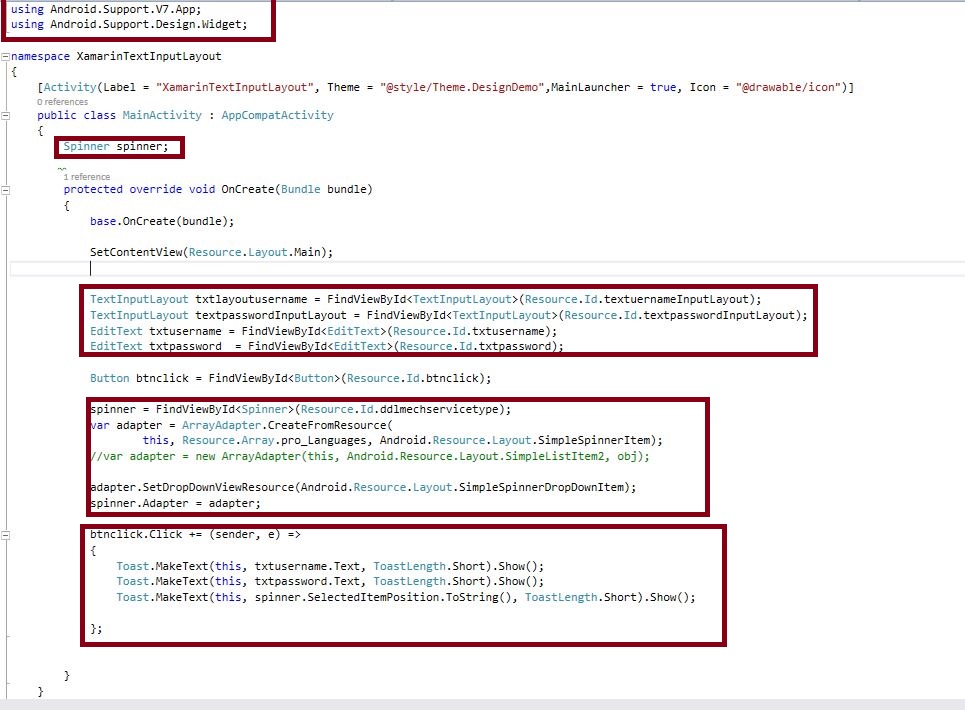
 //TextInputLayout
 TextInputLayout txtlayoutusername = FindViewById < TextInputLayout > (Resource.Id.textuernameInputLayout);
 TextInputLayout textpasswordInputLayout = FindViewById < TextInputLayout > (Resource.Id.textpasswordInputLayout);
 EditText txtusername = FindViewById < EditText > (Resource.Id.txtusername);
 EditText txtpassword = FindViewById < EditText > (Resource.Id.txtpassword);
 Button btnclick = FindViewById < Button > (Resource.Id.btnclick);
 //Spinner
 spinner = FindViewById < Spinner > (Resource.Id.ddlmechservicetype);
 var adapter = ArrayAdapter.CreateFromResource(this, Resource.Array.pro_Languages, Android.Resource.Layout.SimpleSpinnerItem); //Assign Array List Strings
 adapter.SetDropDownViewResource(Android.Resource.Layout.SimpleSpinnerDropDownItem);
 spinner.Adapter = adapter;
 //Button Click
 btnclick.Click += (sender, e) =>
 {
 //Showing Notifications
 Toast.MakeText(this, txtusername.Text, ToastLength.Short).Show();
 Toast.MakeText(this, txtpassword.Text, ToastLength.Short).Show();
 Toast.MakeText(this, spinner.SelectedItemPosition.ToString(), ToastLength.Short).Show();
 };
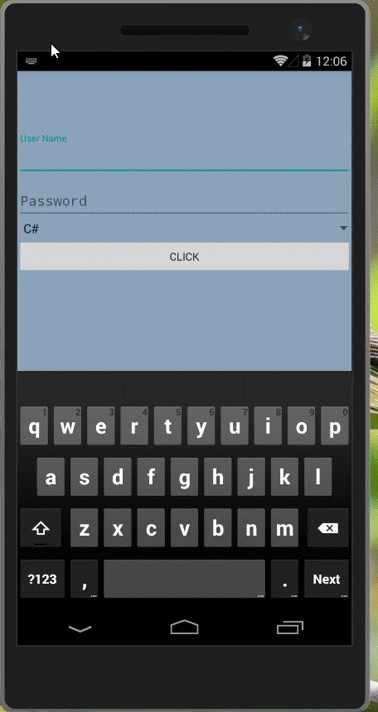
Step 12: Press F5 or build and run the Application.
Download Source Code Here.
Finally, we successfully created Xamarin Android TextInputLayout and Spinner app.

Anbu Mani(Microsoft MVP) is working Software Engineer in Changepond Technologies, Chennai, Tamilnadu, India. Having 4+ years of experience and his area of interest is C#, ASP.NET, SQL Server, Xamarin and Xamarin Forms,Azure…etc