
Create Android App Contact Picker and Send SMS
Let’s start,
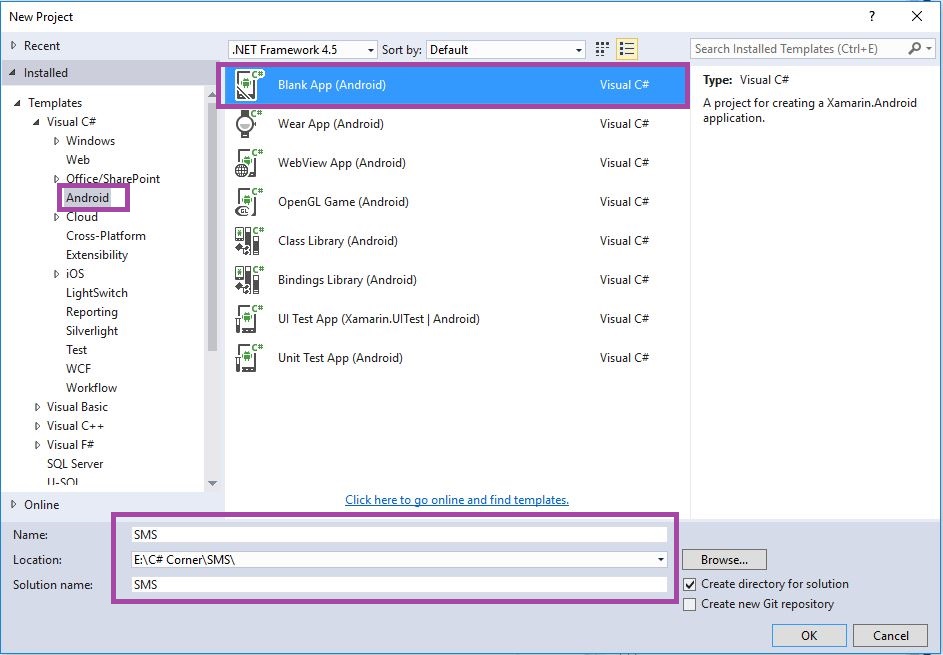
Step 1: Open Visual Studio->New Project->Templates->Visual C#->Android, then Select Blank App. Then give Project Name and Project Location.
Step 2: Next go to Solution Explorer-> Project Name-> Components then Right Click to Get More Components then open new Dialog box. This dialog box to search the Xamarin.Mobile then Click Add App.

Step 3: Next to Open Solution Explorer->Project Name->Properties->AndroidManifest.xml Open the Xml page then give permission for READ_CONTACTS and SEND_SMS.

Step 4: Next to Open Solution Explorer->Project Name->Resources->layout, then Main.axml Click Open Design View and give the following code.
AXML Code:-
 <?xml version="1.0" encoding="utf-8"?>
 <RelativeLayout
 xmlns:android="http://schemas.android.com/apk/res/android"
 android:orientation="vertical" android:layout_width="match_parent"
 android:layout_height="match_parent"
 android:id="@+id/lellayout"
 android:background="#3E4095">
 <RelativeLayout
 android:orientation="horizontal"
 android:layout_width="match_parent"
 android:id="@+id/linearLayout3"
 android:layout_height="wrap_content">
 <TextView
 android:text="TO"
 android:layout_width="wrap_content"
 android:layout_height="wrap_content"
 android:id="@+id/textView1"
 android:gravity="top"
 android:paddingTop="20dp" />
 <EditText
 android:layout_width="match_parent"
 android:layout_height="wrap_content"
 android:layout_alignParentRight="true"
 android:id="@+id/txtmobilenum"
 android:layout_marginLeft="20dp"
 android:layout_marginRight="35dp" />
 <Button
 android:background="@drawable/addusergroup_48"
 android:layout_width="42.7dp"
 android:layout_alignParentRight="true"
 android:layout_height="wrap_content"
 android:id="@+id/btncontact"
 android:layout_marginLeft="20dp"
 android:layout_marginRight="2dp" />
 </RelativeLayout>
 <LinearLayout
android:orientation="vertical"
android:minWidth="25px"
 android:minHeight="25px"
 android:layout_width="match_parent"
 android:layout_height="wrap_content"
 android:layout_below="@id/linearLayout3"
 android:id="@+id/linearLayout6">
 <EditText
 android:inputType="textMultiLine"
 android:layout_width="match_parent"
 android:layout_height="wrap_content"
 android:id="@+id/txtbodymsg" />
 </LinearLayout>
 <LinearLayout
 android:orientation="vertical"
 android:minWidth="25px"
 android:minHeight="25px"
 android:layout_width="match_parent"
 android:layout_height="match_parent"
 android:layout_below="@id/linearLayout6"
 android:id="@+id/linearLayout7">
 <TableLayout
 android:orientation="horizontal"
 android:layout_width="match_parent"
 android:layout_below="@id/linearLayout3"
 android:stretchColumns="*"
 android:layout_height="wrap_content"
 android:id="@+id/linearLayout5">
 <TableRow
 android:minWidth="25px"
 android:minHeight="25px"
 android:layout_width="wrap_content"
 android:layout_height="match_parent"
 android:id="@+id/tableRow1">
 <Button
 android:text="Send"
 android:layout_width="wrap_content"
 android:layout_height="46.0dp"
 android:id="@+id/btnsmssend"
 android:layout_column="2" />
 </TableRow>
 </TableLayout>
 </LinearLayout>
 </RelativeLayout>
Step 5: Next to Open Solution Explorer-> Project Name->MainActivity.cs.open c# Code Window. First give name space for using System.Linq;
Step 6: Next to declare Button and EditText Events and following to create Button Click Events.
C# Code:-
 using System;
 using Android.App;
 using Android.Content;
 using Android.Runtime;
 using Android.Views;
 using Android.Widget;
 using Android.OS;
 using System.Linq;
 namespace SMS
 {
 [Activity(Label = "SMS", MainLauncher = true, Icon = "@drawable/icon")]
 public class MainActivity: Activity
 {
 Button btncontact;
 Button btnsmssend;
 EditText txtmobilenum;
 EditText txtbodymsg;
 protected override void OnCreate(Bundle bundle)
 {
 base.OnCreate(bundle);
 // Set our view from the "main" layout resource
 SetContentView(Resource.Layout.Main);
 txtbodymsg = FindViewById < EditText > (Resource.Id.txtbodymsg);
 txtmobilenum = FindViewById < EditText > (Resource.Id.txtmobilenum);
 btncontact = FindViewById < Button > (Resource.Id.btncontact);
 btnsmssend = FindViewById < Button > (Resource.Id.btnsmssend);
 btncontact.Click += Btncontact_Click;
 btnsmssend.Click += Btnsmssend_Click;
 }
 }
 }
Step 7: Next to Pick the Contact Number in Contact List.so here create Contact Picker Button Click Event and then its passing Intent Value in OnActivityResult().
 private void Btncontact_Click(object sender, EventArgs e)
 {
 var contactPickerIntent = new Intent(Intent.ActionPick,
 Android.Provider.ContactsContract.Contacts.ContentUri);
 StartActivityForResult(contactPickerIntent, 101);
 }
 protected override void OnActivityResult(int requestCode, Result resultCode, Intent data)
 {
 if (requestCode == 101 && resultCode == Result.Ok)
 {
 //Ensure we have data returned
 if (data == null || data.Data == null)
 return;
 var addressBook = new Xamarin.Contacts.AddressBook(this);
 addressBook.PreferContactAggregation = false;
 //Load the contact via the android contact id
 // in the last segment of the Uri returned by the
 // android contact picker
 var contact = addressBook.Load(data.Data.LastPathSegment);
 //Use linq to find a mobile number
 var mobile = (from p in contact.Phones
 where
 p.Type == Xamarin.Contacts.PhoneType.Mobile
 select p.Number).FirstOrDefault();
 //See if the contact has a mobile number
 if (string.IsNullOrEmpty(mobile))
 {
 Toast.MakeText(this, "No Mobile Number for contact!",
 ToastLength.Short).Show();
 return;
 }
 txtmobilenum.Text = mobile;
 }
 }
Step 8: Finally we Send the sms on given selected Number so here to create Send Button Event.
C# code:–
private void Btnsmssend_Click(object sender, EventArgs e)
{
try
{
if (string.IsNullOrWhiteSpace(txtbodymsg.Text))
{
Toast.MakeText(this, "SMS Text Body Is Empty", ToastLength.Long).Show();
}
else if (string.IsNullOrWhiteSpace(txtmobilenum.Text))
{
Toast.MakeText(this, "Enter Mobile Number", ToastLength.Long).Show();
}
else
{
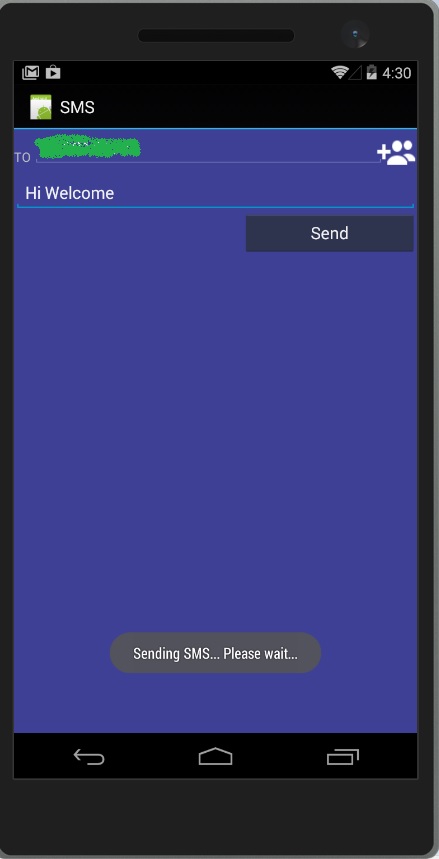
Toast.MakeText(this, "Sending SMS... Please wait...", ToastLength.Short).Show();
//Send SMS!
var smsMgr = Android.Telephony.SmsManager.Default;
smsMgr.SendTextMessage(txtmobilenum.Text, null, txtbodymsg.Text, null, null);
Toast.MakeText(this, "SMS successfully sent", ToastLength.Short).Show();
txtbodymsg.Text = "";
txtmobilenum.Text = "";
}
}
catch (Exception ex)
{
Toast.MakeText(this, ex.ToString(), ToastLength.Short).Show();
}
}

Anbu Mani(Microsoft MVP) is working Software Engineer in Changepond Technologies, Chennai, Tamilnadu, India. Having 4+ years of experience and his area of interest is C#, ASP.NET, SQL Server, Xamarin and Xamarin Forms,Azure…etc