
Register, Login and Update using SQLite in Xamarin.Forms
Introduction
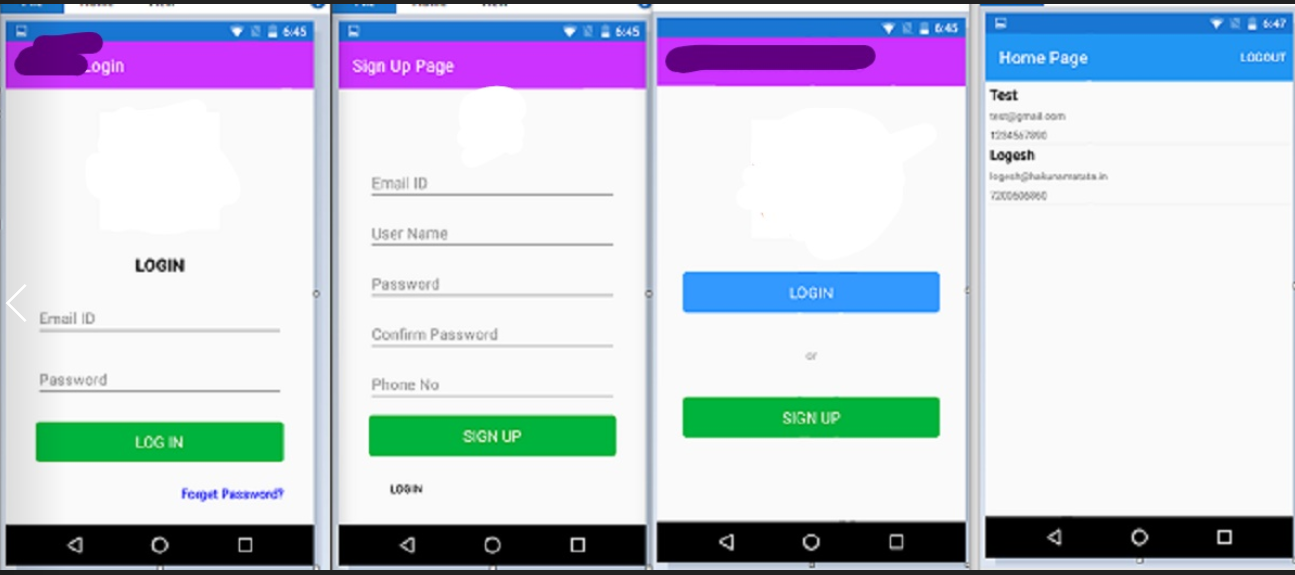
Output:
Prerequisites
- Visual Studio 2019
- This sample project is targeted only for Android and iOS.
Step 1:

Step 2:
- Package Name: SQLite.Net-PCL
Step 3:
using SQLite.Net;
 namespace DesignTask2.Interfaces
{
    public interface ISQLiteInterface
    {
        SQLiteConnection GetSQLiteConnection();
    }
 }
Step 4:
using System.IO;
 using DesignTask2.Droid.Dependancies;
 using DesignTask2.Interfaces;
 using SQLite.Net;
 using Xamarin.Forms;
 [assembly: Dependency(typeof(GetSQLiteConnnection))]
 namespace DesignTask2.Droid.Dependancies
 {
     public class GetSQLiteConnnection : ISQLiteInterface
     {
         public GetSQLiteConnnection()
         {
         }
         public SQLite.Net.SQLiteConnection GetSQLiteConnection()
         {
             var fileName = "UserDatabase.db3";
             var documentPath = System.Environment.GetFolderPath(System.Environment.SpecialFolder.Personal);
             var path = Path.Combine(documentPath, fileName);
             var platform = new SQLite.Net.Platform.XamarinAndroid.SQLitePlatformAndroid();
             var connection = new SQLiteConnection(platform, path);
             return connection;
        }
     }
 }
IOS : ISQLiteDbInterface_iOS.cs
using System;
 using Xamarin.Forms;
 using XamarinSqliteSample.iOS;
 using System.IO;
 [assembly:Dependency(typeof(ISQLiteDbInterface_iOS))]
 namespace DesignTask2.iOS
 {
     public class ISQLiteDbInterface_iOS: ISQLite
     {
         public SQLite.Net.SQLiteConnection GetConnection ()
         {
             var fileName = "Student.db3";
             var documentsPath = Environment.GetFolderPath (Environment.SpecialFolder.Personal);
             var libraryPath = Path.Combine (documentsPath, "..", "Library");
             var path = Path.Combine (libraryPath, fileName);
            var platform = new SQLite.Net.Platform.XamarinIOS.SQLitePlatformIOS ();
            var connection = new SQLite.Net.SQLiteConnection (platform, path);
             return connection;
         }
     }
 }
Step 5:
Now, go to ‘create a model’ from the shared project. For that, go to Solution Explorer >> SQliteDemo(Shared) >> Right click and select Add >> class and give the class name and click Create. The class contains five fields, the first field is Primary key and AutoIncrement. The other fields are username, password, and phone number.
User.cs
using SQLite.Net.Attributes;
 namespace DesignTask2.Database
 {
     public class User
     {
         [PrimaryKey,AutoIncrement]
         public int Id { get; set; }
         public string userName { get; set; }
         public string name { get; set; }
         [MaxLength(12)]
         public string password { get; set; }
         [MaxLength(10)]
         public string phone { get; set; }
         public User()
         {
         }
     }
 }
Step 6:
After that, create another Helper class named UserDB.cs. In this class, we are creating a new private SQLiteConnection. The Interface return DB path is stored in this SQLiteConnection. The queries are written based on LINQ methods. There is no need to write SQL queries. The GetUser method will return all users from the database. The GetSpecificUser method passes an id parameter to return that specific user. The AddUser method will add the new user. If the user id already exists, it will return ‘already exists.’ The updateUser method is used for updating the existing user data like a forgotten user password. The deleteUser method is used to delete the specific user. The last one is LoginValidate method, which is used to check if the user exists or not.
UserDB.cs
using DesignTask2.Database;
using DesignTask2.Interfaces;
using SQLite.Net;
using System.Collections.Generic;
using System.Linq;
using Xamarin.Forms;
namespace DesignTask2.Helper
{
    public class UserDB
    {
        private SQLiteConnection _SQLiteConnection;

        public UserDB()
        {
            _SQLiteConnection = DependencyService.Get<ISQLiteInterface>().GetSQLiteConnection();
            _SQLiteConnection.CreateTable<User>();
        }

        public IEnumerable<User> GetUsers()
        {
            return (from u in _SQLiteConnection.Table<User>()
                    select u).ToList();
        }

        public User GetSpecificUser(int id)
        {
            return _SQLiteConnection.Table<User>().FirstOrDefault(t => t.Id == id);
        }

        public void DeleteUser(int id)
        {
            _SQLiteConnection.Delete<User>(id);
        }

        public string AddUser(User user)
        {
            var data = _SQLiteConnection.Table<User>();
            var d1 = data.Where(x => x.name == user.name && x.userName == user.userName).FirstOrDefault();
            if (d1 == null)
            {
                _SQLiteConnection.Insert(user);
                return "Sucessfully Added";
            }
            else
                return "Already Mail id Exist";
        }

        public bool updateUserValidation(string userid)
        {
            var data = _SQLiteConnection.Table<User>();
            var d1 = (from values in data
                      where values.name == userid
                      select values).Single();
            if (d1 != null)
            {
                return true;
            }
            else
                return false;
        }

        public bool updateUser(string username, string pwd)
        {
            var data = _SQLiteConnection.Table<User>();
            var d1 = (from values in data
                      where values.name == username
                      select values).Single();
            if (true)
            {
                d1.password = pwd;
                _SQLiteConnection.Update(d1);
                return true;
            }
            else
                return false;
        }

        public bool LoginValidate(string userName1, string pwd1)
        {
            var data = _SQLiteConnection.Table<User>();
            var d1 = data.Where(x => x.name == userName1 && x.password == pwd1).FirstOrDefault();
            if (d1 != null)
            {
                return true;
            }
            else
                return false;
        }
    }
 }
Step 7:
MainPage.xaml
<?xml version="1.0" encoding="utf-8" ?>
 <ContentPage xmlns="http://xamarin.com/schemas/2014/forms"
              xmlns:x="http://schemas.microsoft.com/winfx/2009/xaml"
              xmlns:local="clr-namespace:DesignTask2"
              x:Class="DesignTask2.MainPage"
              Title="Hakuna Matata Solutions"
              x:Name="musicPage" BackgroundColor="Transparent"
  NavigationPage.HasBackButton="False">
     <ContentPage.Content>
         <AbsoluteLayout>
             <FlexLayout IsVisible="True" JustifyContent="SpaceEvenly" Direction="Column" AlignItems="Center" Margin="30,0,30,0" >
                 <Image Source="hakuna.png" HeightRequest="140" WidthRequest="140" FlexLayout.AlignSelf="Center" BackgroundColor="Transparent" />
                 <Button x:Name="logIn" FontSize="Medium" BorderColor="Black" FlexLayout.AlignSelf="Stretch" CornerRadius="5" Clicked="LoginButton_Clicked" HorizontalOptions="CenterAndExpand" Text="Login" TextColor="White" BackgroundColor="#3399ff"/>
                 <Label Text="or" FontSize="15" TextColor="DarkGray" BackgroundColor="Transparent" FlexLayout.AlignSelf="Center"/>
                 <Button x:Name="signUp" FontSize="Medium" TextColor="White" BorderColor="Black" BackgroundColor="#00b33c" CornerRadius="5" FlexLayout.AlignSelf="Stretch" Clicked="SignUp_Clicked" HorizontalOptions="CenterAndExpand" Text="Sign Up"/>
                 <Label Text=""/>
           </FlexLayout>
         </AbsoluteLayout>
     </ContentPage.Content>
</ContentPage>
Step 7.1:
MainPage.xaml.cs
using DesignTask2.Helper;
 using DesignTask2.Views;
using System;
using System.Collections.Generic;
using System.Linq;
using System.Text;
using System.Threading.Tasks;
using Xamarin.Forms;
namespace DesignTask2
{
    public partial class MainPage : ContentPage
    {
        public MainPage()
       {
            InitializeComponent();
            NavigationPage.SetHasNavigationBar(this.musicPage, true);
        }
        private async void LoginButton_Clicked(object sender, EventArgs e)
        {
            await Navigation.PushAsync(new LoginPage());
        }
        private async void SignUp_Clicked(object sender, EventArgs e)
        {
            await Navigation.PushAsync(new RegistrationPage());
        }
    }
}
Step 8:
-
Entry — Email Id
-
Entry — User name
-
Entry — Password
-
Entry — Confirm Password
-
Entry — Mobile number
-
Button — Sign up
-
Button — Login: If you already exist, go to Login Page
RegistrationPage.xaml
<?xml version="1.0" encoding="utf-8" ?>
<ContentPage xmlns="http://xamarin.com/schemas/2014/forms"
xmlns:x="http://schemas.microsoft.com/winfx/2009/xaml"
xmlns:local="clr-namespace:DesignTask2"
x:Class="DesignTask2.Views.RegistrationPage" Title="Sign Up Page">
<ContentPage.Content>
<AbsoluteLayout Margin="5,0,5,5">
<FlexLayout IsVisible="True" JustifyContent="SpaceEvenly" Direction="Column" AlignItems="Center" Margin="30,0,30,0" >
<Image Source="hakuna.png" HeightRequest="60" WidthRequest="60" FlexLayout.AlignSelf="Center" BackgroundColor="Transparent" />
<Entry x:Name="emailEntry" Placeholder="Email ID" ReturnType="Next" Keyboard="Email" FontSize="Medium" FlexLayout.AlignSelf="Stretch" HorizontalOptions="CenterAndExpand" TextColor="Black" >
<Entry.Behaviors>
<local:EmailValidationBehavior></local:EmailValidationBehavior>
</Entry.Behaviors>
</Entry>
<Entry x:Name="userNameEntry" ReturnType="Next" MaxLength="10" Placeholder="User Name" FontSize="Medium" FlexLayout.AlignSelf="Stretch" HorizontalOptions="CenterAndExpand" TextColor="Black" Keyboard="Text" />
<Entry x:Name="passwordEntry" ReturnType="Next" MaxLength="12" IsPassword="True" Placeholder="Password" FontSize="Medium" FlexLayout.AlignSelf="Stretch" HorizontalOptions="CenterAndExpand" TextColor="Black" />
<Entry x:Name="confirmpasswordEntry" ReturnType="Next" MaxLength="12" IsPassword="True" Placeholder="Confirm Password" FontSize="Medium" FlexLayout.AlignSelf="Stretch" HorizontalOptions="CenterAndExpand" TextColor="Black" />
<Label x:Name="warningLabel" Text="" IsVisible="False" TextColor="Blue" FontSize="15" BackgroundColor="Transparent" FlexLayout.AlignSelf="End"/>
<Entry x:Name="phoneEntry" ReturnType="Done" MaxLength="10" Keyboard="Telephone" Placeholder="Phone No" FontSize="Medium" FlexLayout.AlignSelf="Stretch" HorizontalOptions="CenterAndExpand" TextColor="Black" >
<Entry.Behaviors>
<local:NumberValidationBehavior></local:NumberValidationBehavior>
</Entry.Behaviors>
</Entry>
<Label x:Name="phoneWarLabel" Text="" IsVisible="False" TextColor="Blue" FontSize="15" BackgroundColor="Transparent" FlexLayout.AlignSelf="End"/>
<Button x:Name="signUp" Clicked="SignupValidation_ButtonClicked" FontSize="Medium" TextColor="White" BorderColor="Black" BackgroundColor="#00b33c" CornerRadius="5" FlexLayout.AlignSelf="Stretch" HorizontalOptions="CenterAndExpand" Text="Sign Up"/>
<Button TextColor="Black" BackgroundColor="Transparent" Clicked="login_ClickedEvent" Text="Login" FontSize="13" FlexLayout.AlignSelf="Start" />
</FlexLayout>
</AbsoluteLayout>
</ContentPage.Content>
</ContentPage>
Step 8.1:
using DesignTask2.Database;
using DesignTask2.Helper;
using System;
using System.Diagnostics;
using Xamarin.Forms;
using Xamarin.Forms.Xaml;
namespace DesignTask2.Views
{

   [XamlCompilation(XamlCompilationOptions.Compile)]
public partial class RegistrationPage : ContentPage//, Behavior<Entry>
   {
User users = new User();
UserDB userDB = new UserDB();
public RegistrationPage()
   {
InitializeComponent();
NavigationPage.SetHasBackButton(this, false);
emailEntry.ReturnCommand = new Command(() => userNameEntry.Focus());
userNameEntry.ReturnCommand = new Command(() => passwordEntry.Focus());
passwordEntry.ReturnCommand = new Command(() => confirmpasswordEntry.Focus());
confirmpasswordEntry.ReturnCommand = new Command(() => phoneEntry.Focus());
  }
private async void SignupValidation_ButtonClicked(object sender, EventArgs e)
{
  if ((string.IsNullOrWhiteSpace(userNameEntry.Text)) || (string.IsNullOrWhiteSpace(emailEntry.Text)) ||
   (string.IsNullOrWhiteSpace(passwordEntry.Text)) || (string.IsNullOrWhiteSpace(phoneEntry.Text)) ||
   (string.IsNullOrEmpty(userNameEntry.Text)) || (string.IsNullOrEmpty(emailEntry.Text)) ||
   (string.IsNullOrEmpty(passwordEntry.Text)) || (string.IsNullOrEmpty(phoneEntry.Text)))
     {
      await DisplayAlert("Enter Data", "Enter Valid Data", "OK");
     }
   else if (!string.Equals(passwordEntry.Text,confirmpasswordEntry.Text) )
   {
   warningLabel.Text = "Enter Same Password";
   passwordEntry.Text = string.Empty;
confirmpasswordEntry.Text = string.Empty;
warningLabel.TextColor = Color.IndianRed;
warningLabel.IsVisible = true;
 }
else if (phoneEntry.Text.Length < 10)
{
phoneEntry.Text = string.Empty;
phoneWarLabel.Text = "Enter 10 digit Number";
phoneWarLabel.TextColor = Color.IndianRed;
phoneWarLabel.IsVisible = true;
}
else
{
users.name = emailEntry.Text;
users.userName = userNameEntry.Text;
users.password = passwordEntry.Text;
users.phone = phoneEntry.Text.ToString();
try
 {
var retrunvalue = userDB.AddUser(users);
if (retrunvalue == "Sucessfully Added")
{
await DisplayAlert("User Add", retrunvalue, "OK");
await Navigation.PushAsync(new LoginPage());
}
else
{
await DisplayAlert("User Add", retrunvalue, "OK");
warningLabel.IsVisible = false;
emailEntry.Text = string.Empty;
userNameEntry.Text = string.Empty;
passwordEntry.Text = string.Empty;
confirmpasswordEntry.Text = string.Empty;
phoneEntry.Text = string.Empty;
}
}
catch (Exception ex)
{
Debug.WriteLine(ex);
}
}
}
private async void login_ClickedEvent(object sender, EventArgs e)
{
await Navigation.PushAsync(new LoginPage());
}
}
}
Step 9:
-
Entry: Mail id
-
Entry: Password
-
Button: Validate entered data in the above field.
-
Button: Forget Password
<?xml version="1.0" encoding="utf-8" ?>
<ContentPage xmlns="http://xamarin.com/schemas/2014/forms"
xmlns:x="http://schemas.microsoft.com/winfx/2009/xaml"
x:Class="DesignTask2.Views.LoginPage" x:Name="loginPage"
Title="Login"
NavigationPage.HasBackButton="True"
NavigationPage.HasNavigationBar="True" >
<ContentPage.Content>
<ScrollView>
<AbsoluteLayout x:Name="absLayout" Margin="5,0" IsVisible="True">
<FlexLayout IsVisible="True" JustifyContent="SpaceEvenly" Direction="Column" AlignItems="Center" Margin="30,0,30,0" >
<Image Source="hakuna.png" HeightRequest="140" WidthRequest="140" FlexLayout.AlignSelf="Center" BackgroundColor="Transparent" />
<Label TextColor="Black" FontAttributes="Bold" Text="LOGIN" FlexLayout.AlignSelf="Center" FontSize="20"/>
<Entry x:Name="userNameEntry" ReturnType="Next" Placeholder="Email ID" FontSize="Medium" FlexLayout.AlignSelf="Stretch" HorizontalOptions="CenterAndExpand" TextColor="Black" />
<Entry x:Name="passwordEntry" ReturnType="Done" IsPassword="True" Placeholder="Password" FontSize="Medium" FlexLayout.AlignSelf="Stretch" HorizontalOptions="CenterAndExpand" TextColor="Black" />
<Button x:Name="signUp" Clicked="LoginValidation_ButtonClicked" FontSize="Medium" TextColor="White" BorderColor="Black" BackgroundColor="#00b33c" CornerRadius="5" FlexLayout.AlignSelf="Stretch" HorizontalOptions="CenterAndExpand" Text="LOg in"/>
<Label x:Name="forgetLabel" Text="Forget Password?" TextColor="Blue" FontSize="15" BackgroundColor="Transparent" FlexLayout.AlignSelf="End"/>
</FlexLayout>
<ContentView x:Name="popupLoadingView" BackgroundColor="#C0808080" Padding="0, 0" IsVisible="false" AbsoluteLayout.LayoutBounds="0, 0, 1, 1" AbsoluteLayout.LayoutFlags="All">
<StackLayout VerticalOptions="CenterAndExpand" HorizontalOptions="CenterAndExpand">
<StackLayout x:Name="stackIncrese1" Orientation="Vertical" HeightRequest="150" WidthRequest="300" BackgroundColor="White">
<Label x:Name="labelenter" Text="Enter User Mail id" VerticalOptions="StartAndExpand" HorizontalOptions="FillAndExpand"></Label>
<Entry x:Name="useridValidationEntry" Keyboard="Email" IsPassword="True" Placeholder="Enter User id Here" TextColor="Black" VerticalOptions="FillAndExpand" HorizontalOptions="FillAndExpand" ></Entry>
<Button x:Name="UpdateButton" Clicked="userIdCheckEvent" BackgroundColor="#ff6600-" Text="Check" HorizontalOptions="EndAndExpand" VerticalOptions="EndAndExpand"/>
</StackLayout>
</StackLayout>
</ContentView>
<ContentView x:Name="passwordView" BackgroundColor="#C0808080" Padding="0, 0" IsVisible="false" AbsoluteLayout.LayoutBounds="0, 0, 1, 1" AbsoluteLayout.LayoutFlags="All">
<StackLayout VerticalOptions="CenterAndExpand" HorizontalOptions="CenterAndExpand">
<StackLayout x:Name="stackIncrese" Orientation="Vertical" HeightRequest="180" WidthRequest="300" BackgroundColor="White">
<Label x:Name="passwordLabel" Text="Password" VerticalOptions="StartAndExpand" HorizontalOptions="FillAndExpand"></Label>
<Entry x:Name="firstPassword" ReturnType="Next" Keyboard="Email" IsPassword="True" Placeholder="Enter User id Here" TextColor="Black" VerticalOptions="FillAndExpand" HorizontalOptions="FillAndExpand" ></Entry>
<Entry x:Name="secondPassword" ReturnType="Done" Keyboard="Email" IsPassword="True" Placeholder="Enter User id Here" TextColor="Black" VerticalOptions="FillAndExpand" HorizontalOptions="FillAndExpand" ></Entry>
<Label x:Name="warningLabel" Text="" IsVisible="False" TextColor="Blue" FontSize="15" BackgroundColor="Transparent" />
<Button x:Name="submitButton" Clicked="Password_ClickedEvent" BackgroundColor="#ff6600-" Text="Update" HorizontalOptions="EndAndExpand" VerticalOptions="EndAndExpand"/>
</StackLayout>
</StackLayout>
</ContentView>
</AbsoluteLayout>
</ScrollView>
</ContentPage.Content>
</ContentPage>
Step 9.1:
using DesignTask2.Helper;
using System;
using Xamarin.Forms;
using Xamarin.Forms.Xaml;
namespace DesignTask2.Views
{
   [XamlCompilation(XamlCompilationOptions.Compile)]
public partial class LoginPage : ContentPage
   {
UserDB userData;
public LoginPage()
 {
InitializeComponent();
userData = new UserDB();
NavigationPage.SetHasBackButton(this, false);
userNameEntry.ReturnCommand = new Command(() => passwordEntry.Focus());
firstPassword.ReturnCommand = new Command(() => secondPassword.Focus());
var forgetpassword_tap = new TapGestureRecognizer();
forgetpassword_tap.Tapped += Forgetpassword_tap_Tapped;
forgetLabel.GestureRecognizers.Add(forgetpassword_tap);
}
private async void Forgetpassword_tap_Tapped(object sender, EventArgs e)
{
popupLoadingView.IsVisible = true;
 }

string logesh;
private async void userIdCheckEvent(object sender, EventArgs e)
{
if ((string.IsNullOrWhiteSpace(useridValidationEntry.Text)) || (string.IsNullOrWhiteSpace(useridValidationEntry.Text)))
{
await DisplayAlert("Alert", "Enter Mail Id","OK");
}
else
{
logesh = useridValidationEntry.Text;
var textresult = userData.updateUserValidation(useridValidationEntry.Text);
if (textresult)
{
popupLoadingView.IsVisible = false;
passwordView.IsVisible = true;
}
else
{
await DisplayAlert("User Mail Id Not Exist", "Enter Correct User Name", "OK");
}
}
}
private async void Password_ClickedEvent(object sender, EventArgs e)
{
if (!string.Equals(firstPassword.Text, secondPassword.Text))
 {
warningLabel.Text = "Enter Same Password";
warningLabel.TextColor = Color.IndianRed;
warningLabel.IsVisible = true;
}
else if ((string.IsNullOrWhiteSpace(firstPassword.Text)) || (string.IsNullOrWhiteSpace(secondPassword.Text)))
{
await DisplayAlert("Alert", " Enter Password", "OK");
}
else
{
try
{
var return1 = userData.updateUser(logesh, firstPassword.Text);
passwordView.IsVisible = false;
if (return1)
{
await DisplayAlert("Password Updated","User Data updated","OK");
}
}
catch (Exception)
{
throw;
}
}
}
private async void LoginValidation_ButtonClicked(object sender, EventArgs e)
{
if (userNameEntry.Text != null && passwordEntry.Text != null)
{
var validData = userData.LoginValidate(userNameEntry.Text, passwordEntry.Text);
if (validData)
{
popupLoadingView.IsVisible = false;
await App.NavigatiPageAsync(loginPage);
}
else
{
popupLoadingView.IsVisible = false;
await DisplayAlert("Login Failed", "Username or Password Incorrect", "OK");
}
}
else
{
popupLoadingView.IsVisible = false;
await DisplayAlert("He He", "Enter User Name and Password Please", "OK");
}
}
}
}
Step 10:
<?xml version="1.0" encoding="utf-8" ?>
<ContentPage xmlns="http://xamarin.com/schemas/2014/forms"
xmlns:x="http://schemas.microsoft.com/winfx/2009/xaml"
x:Class="DesignTask2.Views.UsersListPage"
Title="Home Page">
<ContentPage.ToolbarItems>
<ToolbarItem Text="Logout" Priority="1" Clicked="MenuItem_OnClicked"/>
</ContentPage.ToolbarItems>
<ContentPage.Content>
<AbsoluteLayout Margin="3,3,3,3">
<ScrollView>
<FlexLayout IsVisible="True" JustifyContent="SpaceEvenly" Direction="Column" AlignItems="Start" >
<ListView x:Name="listUser"
HasUnevenRows="True"
IsVisible="True">
<ListView.ItemTemplate>
<DataTemplate>
<ViewCell>
<StackLayout Margin="2,2,2,2">
<Label Text="{Binding userName}" FontAttributes="Bold" TextColor="Black" FontSize="16"/>
<Label Text="{Binding name}" FontSize="12"/>
<Label Text="{Binding phone}" FontSize="12"/>
</StackLayout>
</ViewCell>
</DataTemplate>
</ListView.ItemTemplate>
</ListView>
</FlexLayout>
</ScrollView>
</AbsoluteLayout>
</ContentPage.Content>
</ContentPage>
Step 10.1:
using DesignTask2.Helper;
using System;
using System.Collections.Generic;
using System.Linq;
using System.Text;
using System.Threading.Tasks;
using Xamarin.Forms;
using Xamarin.Forms.Xaml;
namespace DesignTask2.Views
{
   [XamlCompilation(XamlCompilationOptions.Compile)]
public partial class UsersListPage : ContentPage
   {
UserDB userData = new UserDB();
public UsersListPage()
       {
InitializeComponent();
NavigationPage.SetHasBackButton(this, false);
var sourceData = userData.GetUsers();
listUser.ItemsSource = sourceData;
}

private async void MenuItem_OnClicked(object sender, EventArgs e)
       {
await DisplayAlert("Quit", "You want Quit", "OK");
Application.Current.Quit();
       }
   }
}
Output:

Thanks for this clear thought tutorial. I am using Visual studio for Mac community 2019 and the error I had is on line 12 of RegistrationPage.xaml -/Users/akara/Projects/DesignTask2/DesignTask2/Views/RegistrationPage.xaml(26,26): Error: Position 12:26. Type local:EmailValidationBehavior not found in xmlns clr-namespace:DesignTask2 (DesignTask2)
I could not Geta solution from the compiler. Please, I need your help. Thanks for your anticipated support.
Very nice code, and helpful, I search this code in youtube and also many places I didn’t get this code, thanks for sharing the code.