
FCM implementation in Xamarin Forms – Part II
Before, reading this article, you should finish the “Xamarin Forms FCM Setup Configuration – Part I” to understand this article, because of this article continuous my first article.
This article demonstrates the configuration of the Firebase Notification Service in Xamarin.Forms application. In Xamarin.Forms there is no default function, so we need to install some packages. The Sample output of this demo shown below.
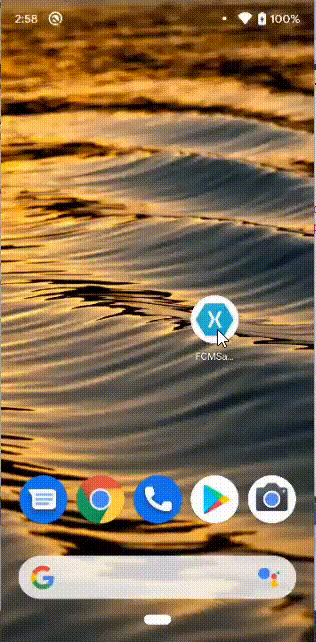
Android Output:-
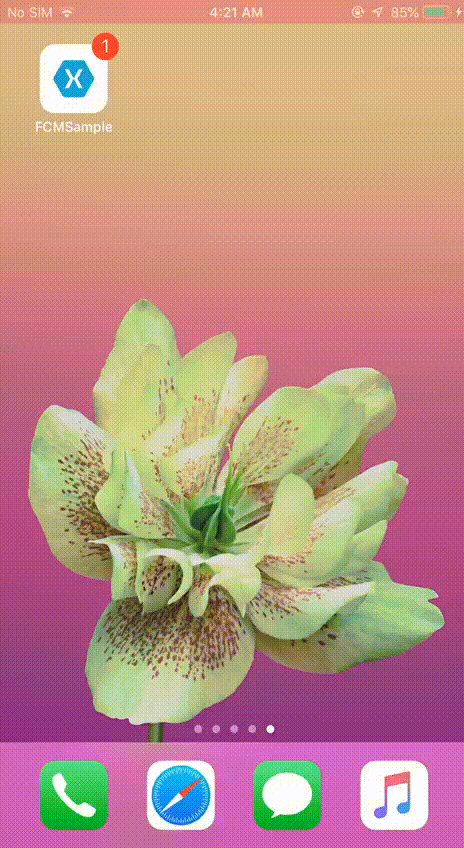
iOS Output: –
Let’s start…!?
Step 1:
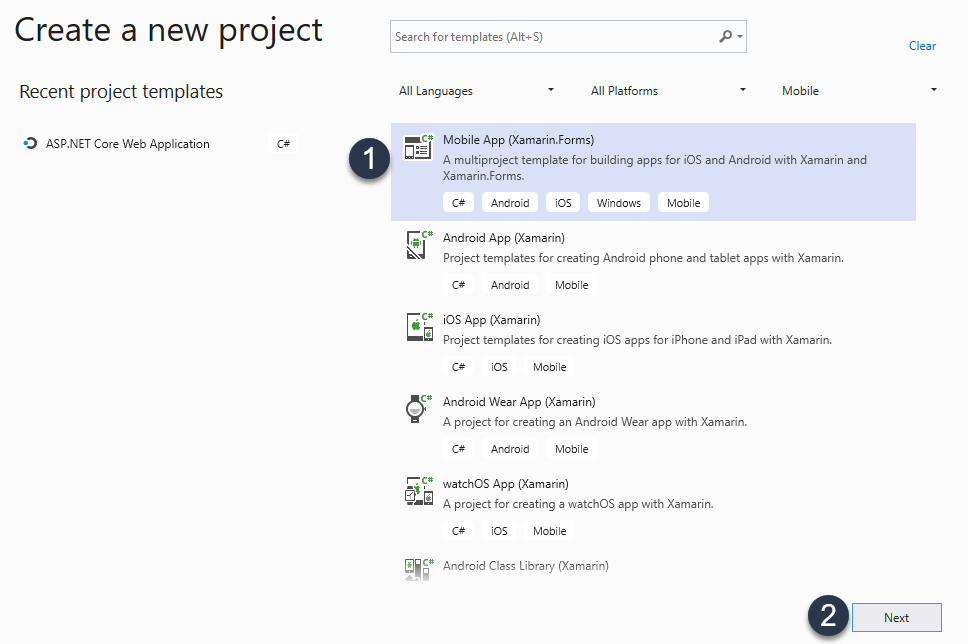
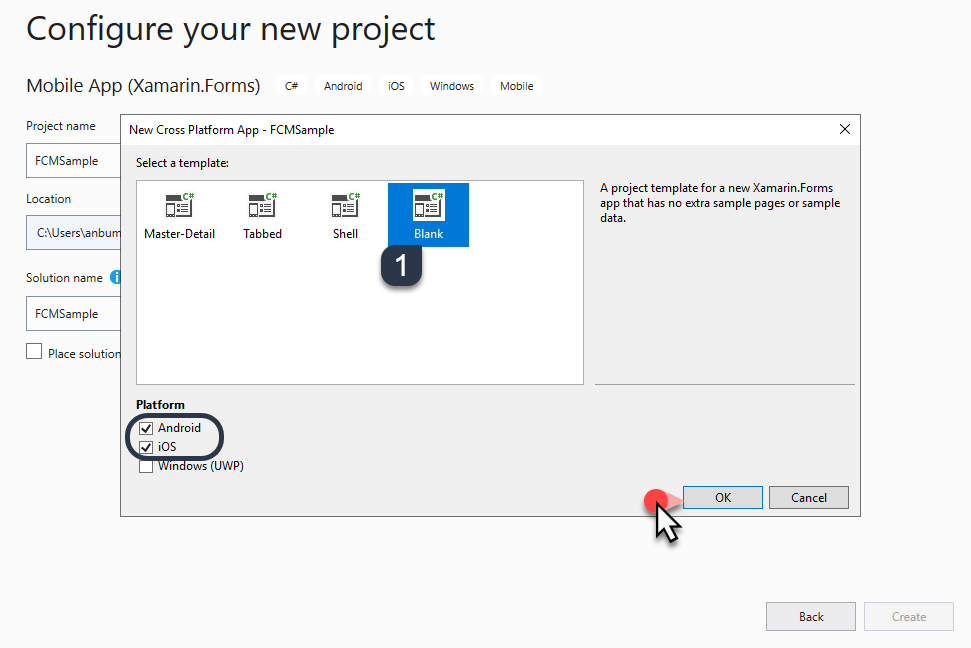
Create a blank Xamarin.Forms application by going to Open Visual Studio =>New =>select Xamarin.Forms template and click Next.
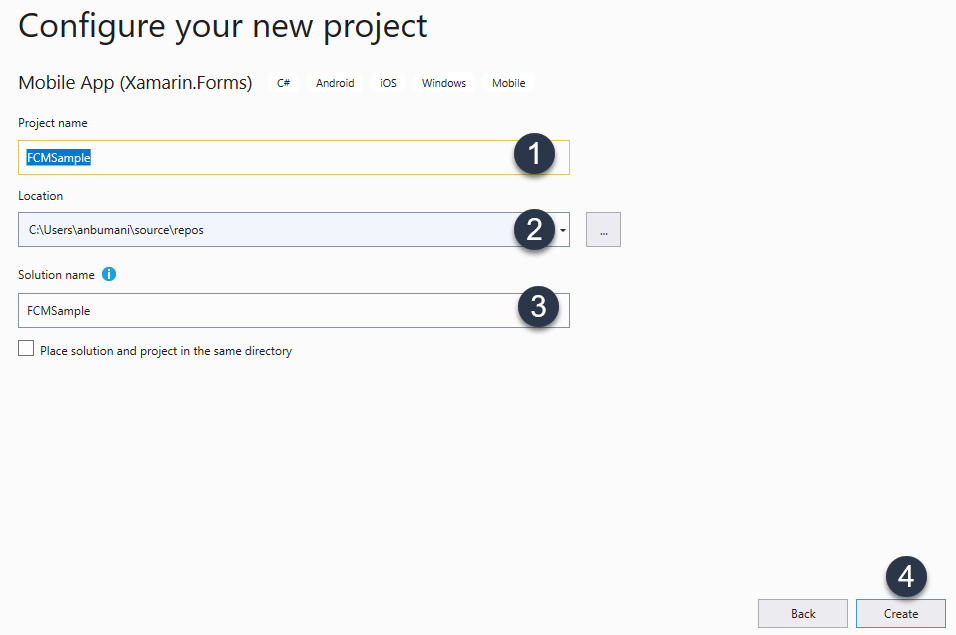
Now, enter the project & solution name, select location then click Create.
Next you will get a popup dialog window , here select Blank app, required platforms and then click OK.
Step 2:
After project creation, open the MainPage.xaml file. For that, Open Solution Explorer => .NetStandard Project > double click to open MainPage.xaml. Now, design one Button with the clicked event as shown below.
XAML Code:
<?xml version="1.0" encoding="utf-8" ?>
<ContentPage xmlns="http://xamarin.com/schemas/2014/forms"
             xmlns:x="http://schemas.microsoft.com/winfx/2009/xaml"
             xmlns:d="http://xamarin.com/schemas/2014/forms/design"
             xmlns:mc="http://schemas.openxmlformats.org/markup-compatibility/2006"
             mc:Ignorable="d"
             x:Class="FCMSample.MainPage">
    <StackLayout>
        <!-- Place new controls here -->
        <Button x:Name="BtnSend" Clicked="BtnSend_Clicked" Text="Send Notifications"
           HorizontalOptions="Center"
           VerticalOptions="CenterAndExpand" />
    </StackLayout>
</ContentPage>
Step 3:
Next, add a new class named as FCMBody.cs. For that, Open Solution Explorer => right-click the .NetStandard Project and select add > class. In the popup dialog window, select class and enter the name as FCMBody.cs and click Add.
Double click to open FCMBody.cs file and add the following code given below.
C# Code :-
using System; using System.Collections.Generic;
using System.Text;
namespace FCMSample
{
public class FCMBody
{
public string[] registration_ids { get; set; }
public FCMNotification notification { get; set; }
public FCMData data { get; set; }
}
public class FCMNotification
{
public string body { get; set; }
public string title { get; set; }
}
public class FCMData
{
public string key1 { get; set; }
public string key2 { get; set; }
public string key3 { get; set; }
public string key4 { get; set; }
}
}
Step 4:
Now, we need to install the “Newtonsoft.json” plugin. For that, go to Solution Explorer > Right-click .NetStandard Project and select “Manage NuGet Packages. A new window will appear, go to the Browse tab and search “Newtonsoft.Json” and click Install.
Step 5:
Open MainPage.xaml.cs page and update the code given below for setting the notification header and body.
Namespace: –
using Newtonsoft.Json;
C# Code:-
  private void BtnSend_Clicked(object sender, EventArgs e)
        {
            try
            {
                var FCMToken = Application.Current.Properties.Keys.Contains("Fcmtocken");
                if (FCMToken)
                {
                    var FCMTockenValue = Application.Current.Properties["Fcmtocken"].ToString();
                    FCMBody body = new FCMBody();
                    FCMNotification notification = new FCMNotification();
                    notification.title = "Xamarin Forms FCM Notifications";
                    notification.body = "Sample For FCM Push Notifications in Xamairn Forms";
                    FCMData data = new FCMData();
                    data.key1 = "";
                    data.key2 = "";
                    data.key3 = "";
                    data.key4 = "";
                    body.registration_ids = new[] { FCMTockenValue };
                    body.notification = notification;
                    body.data = data;
                    var isSuccessCall = SendNotification(body).Result;
                    if (isSuccessCall)
                    {
                        DisplayAlert("Alart", "Notifications Send Successfully", "Ok");
                    }
                    else
                    {
                        DisplayAlert("Alart", "Notifications Send Failed", "Ok");
                    }
                }
            }
            catch (Exception ex)
            {
            }
        }

        public async Task<bool> SendNotification(FCMBody fcmBody)
        {
            try
            {
                var httpContent = JsonConvert.SerializeObject(fcmBody);
                var client = new HttpClient();
                var authorization = string.Format("key={0}", "AAAAdo7memY:APA91bHNfseEKErXXXXXXX");
                client.DefaultRequestHeaders.TryAddWithoutValidation("Authorization", authorization);
                var stringContent = new StringContent(httpContent);
                stringContent.Headers.ContentType = new System.Net.Http.Headers.MediaTypeHeaderValue("application/json");
                string uri = "https://fcm.googleapis.com/fcm/send";
                var response = await client.PostAsync(uri, stringContent).ConfigureAwait(false);
                var result = response.Content.ReadAsStringAsync();
                if (response.IsSuccessStatusCode)
                {
                    return true;
                }
                else
                {
                    return false;
                }
            }
            catch (TaskCanceledException ex)
            {
                return false;
            }
            catch (Exception ex)
            {
                return false;
            }
        }
Step 6:
Next, we are going to write some platform-specific code for Android and iOS.
Android:
Step I:
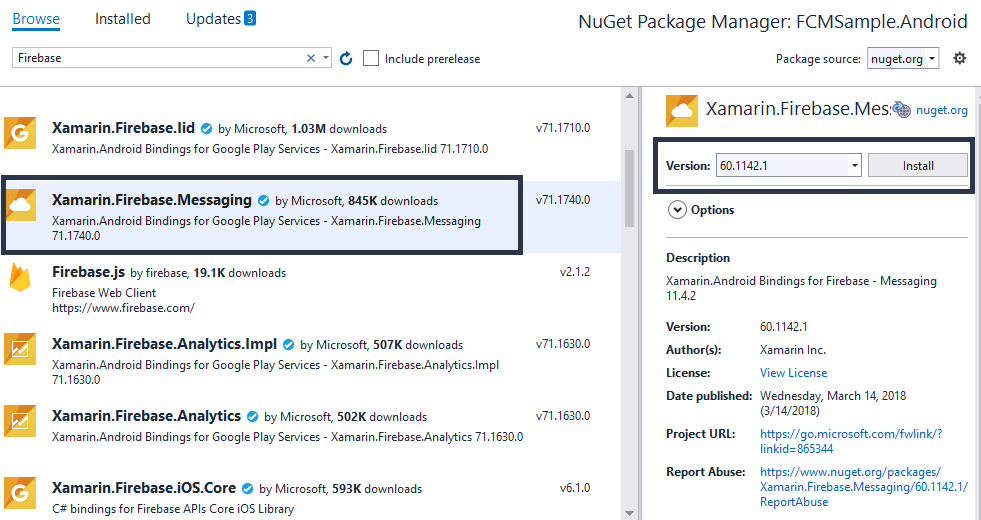
Before we start coding, must install some packages. For that, Open Solution Explorer >> Right click Android project and select “Manage NuGet Packages. In the new Window, select the “Browse” tab and search “Xamarin.Firebase.Messaging” and install the plugin.
Step II:
Now, create a new class named FirebaseInstanceIDService. For that, go to Solution Explorer >> Right click Android project >> Add >> Class and name it as FirebaseInstanceIDService.cs and click Add.
Then, Write the below code to refresh the Token by overriding the OnTokenRefresh method as shown below.
C# Code:-
using Android.App;
using Android.Content;
using Firebase.Iid;
namespace FCMSample.Droid
{
    [Service]
    [IntentFilter(new[] { "com.google.firebase.INSTANCE_ID_EVENT" })]
    public class FirebaseInstanceIDService : FirebaseInstanceIdService
    {
        const string TAG = "MyFirebaseIIDService";

        // [START refresh_token]
        public override void OnTokenRefresh()
        {
            // Get updated InstanceID token.
            var refreshedToken = FirebaseInstanceId.Instance.Token;
            Android.Util.Log.Debug(TAG, "Refreshed token: " + refreshedToken);
            System.Diagnostics.Debug.WriteLine($"######Token######  :  {refreshedToken}");
            Xamarin.Forms.Application.Current.Properties["Fcmtocken"] = FirebaseInstanceId.Instance.Token ?? "";
            Xamarin.Forms.Application.Current.SavePropertiesAsync();
        }
        // [END refresh_token]
    }
}
Step III:
Create another class named as MyFirebaseMessagingService.cs and add the below given code to that class.
C# Code:-
using Android.App;
using Android.Content;
using Android.Graphics;
using Android.OS;
using Android.Support.V4.App;
using Firebase.Messaging;
using System;
using System.Text.RegularExpressions;
namespace FCMSample.Droid
{
    [Service]
    [IntentFilter(new[] { "com.google.firebase.MESSAGING_EVENT" })]
    public class MyFirebaseMessagingService : FirebaseMessagingService
    {
        const string TAG = "MyFirebaseMsgService";
        public const string PRIMARY_CHANNEL = "default";
        // [START receive_message]
        public override void OnMessageReceived(RemoteMessage message)
        {
            try
            {
                Android.Util.Log.Debug(TAG, "From: " + message.From);
                Android.Util.Log.Debug(TAG, "Notification Message Body: " + message.GetNotification().Body);
                SendNotifications(message);
            }
            catch (Exception ex)
            {
            }

        }
        // [END receive_message]


        public void SendNotifications(RemoteMessage message)
        {
            try
            {
                NotificationManager manager = (NotificationManager)GetSystemService(NotificationService);
                var seed = Convert.ToInt32(Regex.Match(Guid.NewGuid().ToString(), @"\d+").Value);
                int id = new Random(seed).Next(000000000, 999999999);
                var push = new Intent();
                var fullScreenPendingIntent = PendingIntent.GetActivity(this, 0,
               push, PendingIntentFlags.CancelCurrent);
                NotificationCompat.Builder notification;
                if (Build.VERSION.SdkInt >= BuildVersionCodes.O)
                {
                    var chan1 = new NotificationChannel(PRIMARY_CHANNEL,
                     new Java.Lang.String("Primary"), NotificationImportance.High);
                    chan1.LightColor = Color.Green;
                    manager.CreateNotificationChannel(chan1);
                    notification = new NotificationCompat.Builder(this, PRIMARY_CHANNEL);
                }
                else
                {
                    notification = new NotificationCompat.Builder(this);
                }
                notification.SetContentIntent(fullScreenPendingIntent)
                         .SetContentTitle(message.GetNotification().Title)
                         .SetContentText(message.GetNotification().Body)
                         .SetLargeIcon(BitmapFactory.DecodeResource(Resources, Resource.Drawable.icon))
                         .SetSmallIcon(Resource.Drawable.icon)
                         .SetStyle((new NotificationCompat.BigTextStyle()))
                         .SetPriority(NotificationCompat.PriorityHigh)
                         .SetColor(0x9c6114)
                         .SetAutoCancel(true);
                manager.Notify(id, notification.Build());
            }
            catch (Exception ex)
            {
             }
        }
    }
}
Finally, we need to add given below code in MainActivity.cs , It will help to generate Firebase Token.
protected override void OnCreate(Bundle savedInstanceState)
{
FirebaseApp.InitializeApp(this);
}
iOS
Step I:
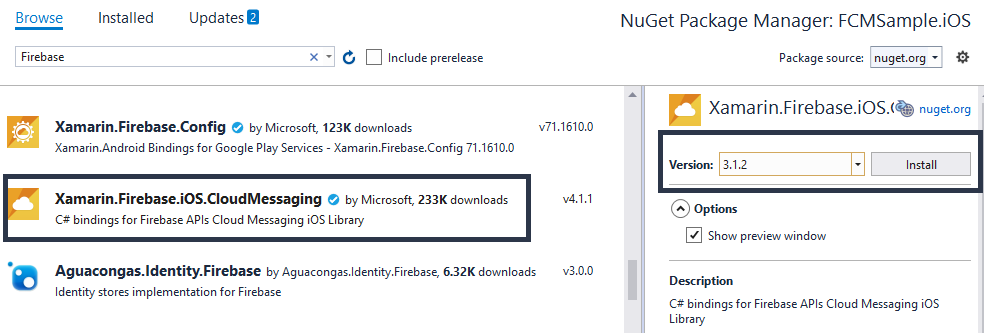
Install the “Xamarin.Firebase.iOS.CloudMessaging” Plugin from the NuGet Package similar to Android.
Step II:
Then open AppDelegate.cs class and then inherit from “IUNUserNotificationCenterDelegate and IMessagingDelegate interfaces.
After that need to register notifications in this instance. Please use following codes
NameSpace:
using Firebase.CloudMessaging;

using UserNotifications;
C# Code:-
public partial class AppDelegate : global::Xamarin.Forms.Platform.iOS.FormsApplicationDelegate, IUNUserNotificationCenterDelegate, IMessagingDelegat
    {
        public override bool FinishedLaunching(UIApplication app, NSDictionary options)
        {
            global::Xamarin.Forms.Forms.Init();
            LoadApplication(new App());
            RegisterForRemoteNotifications();
            Messaging.SharedInstance.Delegate = this;
            if (UNUserNotificationCenter.Current != null)
            {
                UNUserNotificationCenter.Current.Delegate = new UserNotificationCenterDelegate();
            }
            Firebase.Core.App.Configure();
            return base.FinishedLaunching(app, options);
        }
private void RegisterForRemoteNotifications()
{
// Register your app for remote notifications.
if (UIDevice.CurrentDevice.CheckSystemVersion(10, 0))
{
// For iOS 10 display notification (sent via APNS)
UNUserNotificationCenter.Current.Delegate = this;
var authOptions = UNAuthorizationOptions.Alert | UNAuthorizationOptions.Badge | UNAuthorizationOptions.Sound;
UNUserNotificationCenter.Current.RequestAuthorization(authOptions, async (granted, error) =>
{
Console.WriteLine(granted);
await System.Threading.Tasks.Task.Delay(500);
});
}
else
{
// iOS 9 or before
var allNotificationTypes = UIUserNotificationType.Alert | UIUserNotificationType.Badge | UIUserNotificationType.Sound;
var settings = UIUserNotificationSettings.GetSettingsForTypes(allNotificationTypes, null);
UIApplication.SharedApplication.RegisterUserNotificationSettings(settings);
}
UIApplication.SharedApplication.RegisterForRemoteNotifications();
Messaging.SharedInstance.ShouldEstablishDirectChannel = true;
}
Override Methods:
public override void RegisteredForRemoteNotifications(UIApplication application, NSData deviceToken)
{
Messaging.SharedInstance.ApnsToken = deviceToken;
}
public override void FailedToRegisterForRemoteNotifications(UIApplication application, NSError error)
{
base.FailedToRegisterForRemoteNotifications(application, error);
}
public override void DidReceiveRemoteNotification(UIApplication application, NSDictionary userInfo, Action<UIBackgroundFetchResult> completionHandler)
{
completionHandler(UIBackgroundFetchResult.NewData);
}
[Export(“messaging:didReceiveRegistrationToken:”)]
public void DidReceiveRegistrationToken(Messaging messaging, string fcmToken)
{
Xamarin.Forms.Application.Current.Properties[“Fcmtocken”] = Messaging.SharedInstance.FcmToken ?? “”;
Xamarin.Forms.Application.Current.SavePropertiesAsync();
System.Diagnostics.Debug.WriteLine($”######Token###### : {fcmToken}“);
Console.WriteLine(fcmToken);
}
} }
Step III:
Create another class named as “UserNotificationCenterDelegate” and override the WillPresentNotification and write the below given code.
C# Code:-
using System;
using UserNotifications;
namespace FCMSample.iOS
{
    internal class UserNotificationCenterDelegate : UNUserNotificationCenterDelegate
    {
        public UserNotificationCenterDelegate()
        {
        }
        public override void WillPresentNotification(UNUserNotificationCenter center, UNNotification notification, Action<UNNotificationPresentationOptions> completionHandler)
        {
            // Do something with the notification
            Console.WriteLine("Active Notification: {0}", notification);
            // Tell system to display the notification anyway or use
            // `None` to say we have handled the display locally.
            completionHandler(UNNotificationPresentationOptions.Alert);
        }
    }
}
Step 7: Add the Google Service File
Let’s add the file that we downloaded from the Firebase as stated in the Firebase FCM Implementation – Part 1 article, to the Android and iOS project.
Android:
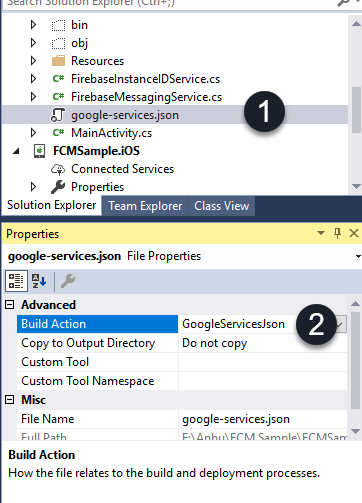
Go to Solution Explorer => Right click the Android Project => Add => Existing Item => Browse and select the “google-services.json” that we downloaded and click Add.
Right click the file and set its BuildAction to “GoogleServicesJson” in the Advanced section in the properties.
iOS
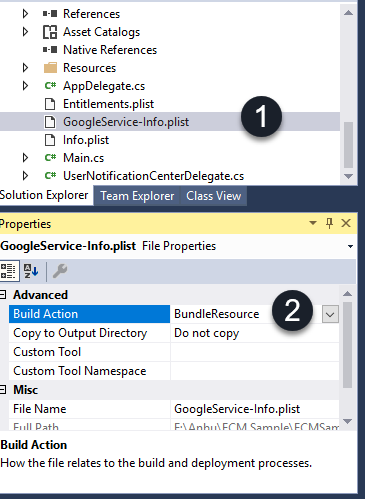
Similar to Android, add “GoogleService-Info.plist” in the iOS project and set it’s BuildAction to “BundleResource” in the Advanced section in the properties.
Step 8: Android & iOS Notifications Configuration
Android:-
Go to Solution Explorer => Android Project => AndroidManifest.xml and add the below codes.
XML Code:-
<?xml version="1.0" encoding="utf-8"?>
<manifest xmlns:android="http://schemas.android.com/apk/res/android" android:versionCode="1" android:versionName="1.0" package="com.fcmsample.fcmsample" android:installLocation="auto">
            <uses-sdk android:minSdkVersion="19" android:targetSdkVersion="28" />
            <application android:label="FCMSample.Android">
                        <uses-library android:name="org.apache.http.legacy" android:required="false" />
                        <receiver android:name="com.google.firebase.iid.FirebaseInstanceIdInternalReceiver" android:exported="false" />
                        <receiver android:name="com.google.firebase.iid.FirebaseInstanceIdReceiver" android:exported="true" android:permission="com.google.android.c2dm.permission.SEND">
                                    <intent-filter>
                                                <action android:name="com.google.android.c2dm.intent.RECEIVE" />
                                                <action android:name="com.google.android.c2dm.intent.REGISTRATION />
                                                <category android:name="${applicationId}" />
                                    </intent-filter>
                        </receiver>
            </application>
            <uses-permission android:name="android.permission.ACCESS_NETWORK_STATE" />
            <uses-permission android:name="android.permission.ACCESS_WIFI_STATE" />
            <uses-permission android:name="android.permission.INTERNET" />
</manifest>
iOS:-
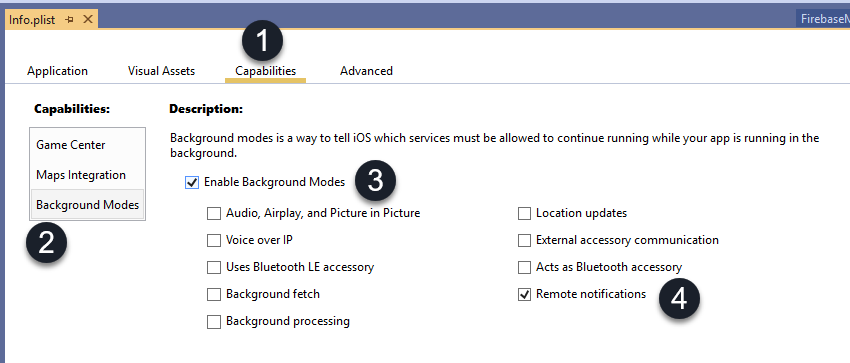
Go to Solution Explorer => Right click iOS Project => Properties => iOS Manifest => Capabilities => Background Modes. Check the Enable Background Modes option and then check the Remote Notifications.
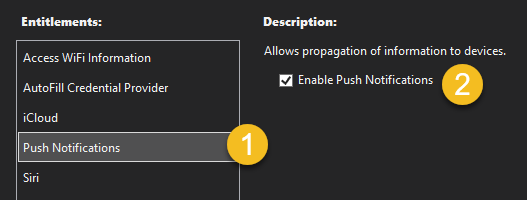
Go to Solution Explorer => Expand the iOS Project => Entitlements.plist. Choose the Push Notifications option from the left pane and check the Enable Push Notifications check box.
Note: You need to configure the required certificates and provisioning profile for your iOS project additional to these steps.
Step 9:
Set the Android and iOS projects as start-up projects one by one and run our application by pressing F5. The output would be similar to the below screenshots.
Android Output:-
iOS Output:-
The full source code for this article can be referred here.
Conclusion
We have successfully connected with Firebase Messaging Service, I hope you learned something from this article.

Anbu Mani(Microsoft MVP) is working Software Engineer in Changepond Technologies, Chennai, Tamilnadu, India. Having 4+ years of experience and his area of interest is C#, ASP.NET, SQL Server, Xamarin and Xamarin Forms,Azure…etc
Dear Sir,
how to show small icon when comming notificaitons from firebase in android device and how to collapse multiple notifications message in a single app like as Whatsapp Collapse Messages.
Hi, Below given this code using a small icon in your notifications.
“notification.SetSmallIcon(Resource.Drawable.icon)”
Hope its work for you
Doesn’t get notification message when my app is stopped. and few time is working and some times it’s not working
Hi,When your app got published in Release mode then it works well.
I have tried your Code, but issue is
var FCMToken = Application.Current.Properties.Keys.Contains(“Fcmtocken”)
FCMToken always return false
I have run your code, my issue is
var FCMToken = Application.Current.Properties.Keys.Contains(“Fcmtocken”);
FCMToken always return false
is anything I am missing
Thanks
Rizwan
Hi.
Did you initialize Firebase both MainActivity.cs and AppDelegate?
Thank you
is this notification receive when the app is closed?
Yes, it will work after release based on you app priority .
Hi, thank you for the code. In android, when the app is closed(in release mode) I am still not receiving the notifications. Is there any workaround? Thanks in advance
Hi bro, i wanna ask about the fcmtoken. where did i get the token? because even i tried to run the apps always got notification “the given key femtoken was not present in the dictionary”
Hi Bro,
Please use given below code in MainActivity.cs
FirebaseApp.InitializeApp(this);
Sample Project : https://github.com/AnbuMani27/Xamarin-Forms-FCM-Notifications
Not working. FCMToken is always false!
Did you initialize Firebase both MainActivity.cs and AppDelegate ? if not please Initialize both the class.
The only issue I have is the notification has a delay when screen is off in android device. Takes between 2 and 20 minutes to deliver the notification.
Hi Sir.
I have to enable Push Notification of entitlements.plist in release mode? I still don’t get the messages to the iPhone, I’m manually sending from firebase FCM to a specific device with this token: you think this is a valid token format for iOS 4a365a84adca037d6f1501031e5efa6054ae27ebfd002190ede3034e2f8210dc
thank you.
Hi, In the Release mode you need to Enable the Apple Push Notification(APNs) and then need to configure Firebase Portal.
Not working. FCMToken is always false! I initialize Firebase in MainActivity.cs as in the tutorial
Hi, Did you updated new Google Json File?
Dear Anbu Mani ,
thank you for your effort ,
i have issue – when run code i face issue in this function :-
public override void FailedToRegisterForRemoteNotifications(UIApplication application, NSError error)
{
base.FailedToRegisterForRemoteNotifications(application, error);
}
error is :-
Foundation.You_Should_Not_Call_base_In_This_Method: Exception of type ‘Foundation.You_Should_Not_Call_base_In_This_Method’ was thrown.
at UIKit.UIApplicationDelegate.FailedToRegisterForRemoteNotifications (UIKit.UIApplication application, Foundation.NSError error) [0x00000] in /Users/builder/azdo/_work/1/s/xamarin-macios/src/build/ios/native/UIKit/UIApplicationDelegate.g.cs:1003
at app6.iOS.AppDelegate.FailedToRegisterForRemoteNotifications (UIKit.UIApplication application, Foundation.NSError error) [0x00001] in /Users/IMACVM/Projects/app6/app6.iOS/AppDelegate.cs:90
at at (wrapper managed-to-native) UIKit.UIApplication.UIApplicationMain(int,string[],intptr,intptr)
at UIKit.UIApplication.Main (System.String[] args, System.IntPtr principal, System.IntPtr delegate) [0x00005] in /Users/builder/azdo/_work/1/s/xamarin-macios/src/UIKit/UIApplication.cs:86
at UIKit.UIApplication.Main (System.String[] args, System.String principalClassName, System.String delegateClassName) [0x0000e] in /Users/builder/azdo/_work/1/s/xamarin-macios/src/UIKit/UIApplication.cs:65
at app6.iOS.Application.Main (System.String[] args) [0x00001] in /Users/IMACVM/Projects/app6/app6.iOS/Main.cs:17
We just tried to ran your code and FCMToken is always false. Didn’t touch anything, just tried to run github code
Hi, Please updated your Firebase project Google Json File.
FirebaseApp.InitializeApp(this);
FirebaseInstanceId.Instance.GetInstanceId().AddOnSuccessListener(this);
public void OnSuccess(Java.Lang.Object result)
{
var token = result.Class.GetMethod(“getToken”).Invoke(result).ToString();
Xamarin.Forms.Application.Current.Properties[“Fcmtocken”] = token;
Xamarin.Forms.Application.Current.SavePropertiesAsync();
}
that was how on android I saved Fcmtocken.
FirebaseInstanceId.Instance.GetInstanceId () is now deprecated. Any suggestions please?
Hi Anbu
Somehow my firebasetoken has a length of over 300 (for ios). And when i tried to send notification using that token (through firebase console), i am not getting any notification.
Sholnd’t the length be less than 200?
I feel lost 🙁
Hi Anbu,
Your sample works like a charm. But, i have one doubt , can we use this sample for live application which sends notification for particular users only even the app is closed ?