
Create Login With Web API Using Azure SQL Server-II
First, create Web API using Azure SQL Server. Refer to part one:
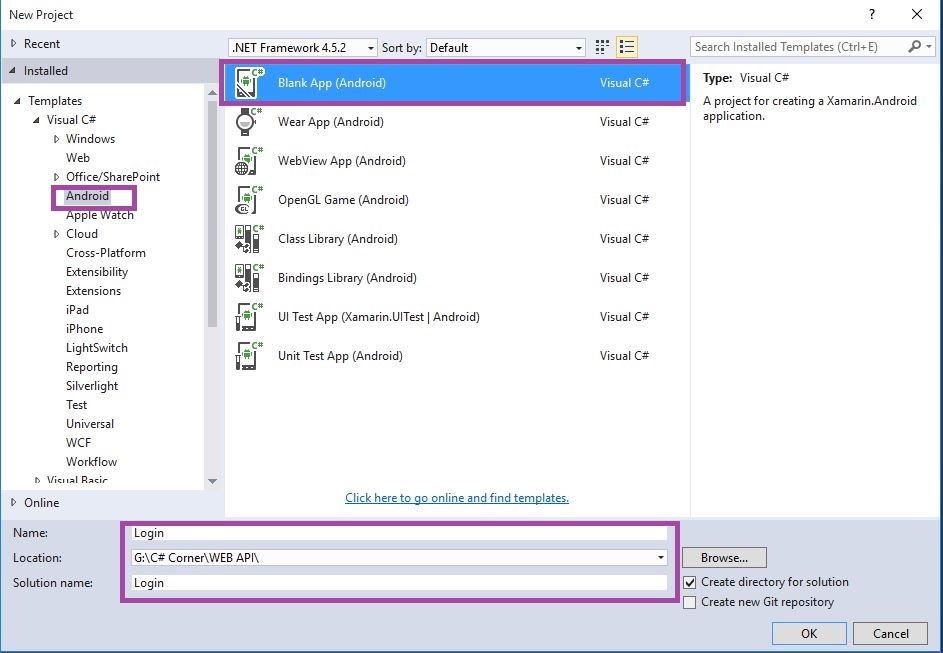
Step 1 : Open Visual Studio->New Project->Templates->Visual C#->Android, select Blank App (Android) then give Project Name and Project Location.
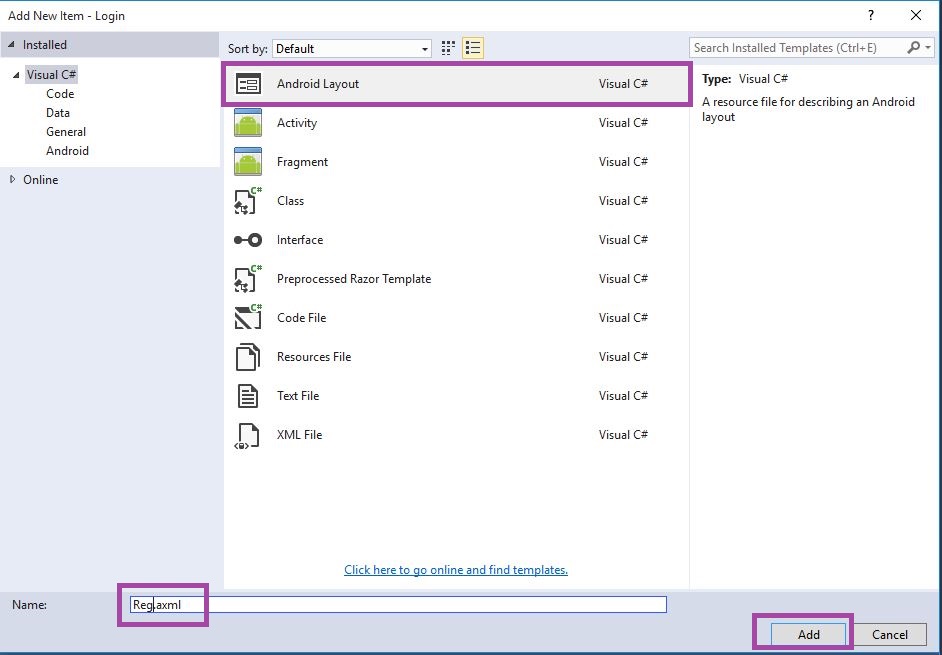
Step 2 : Next go to Solution Explorer-> Project Name-> Resources->layout then Right Click to Add then open new Dialog box. Then select Android Layout give name for Reg.axml after that Add New Layout Page.
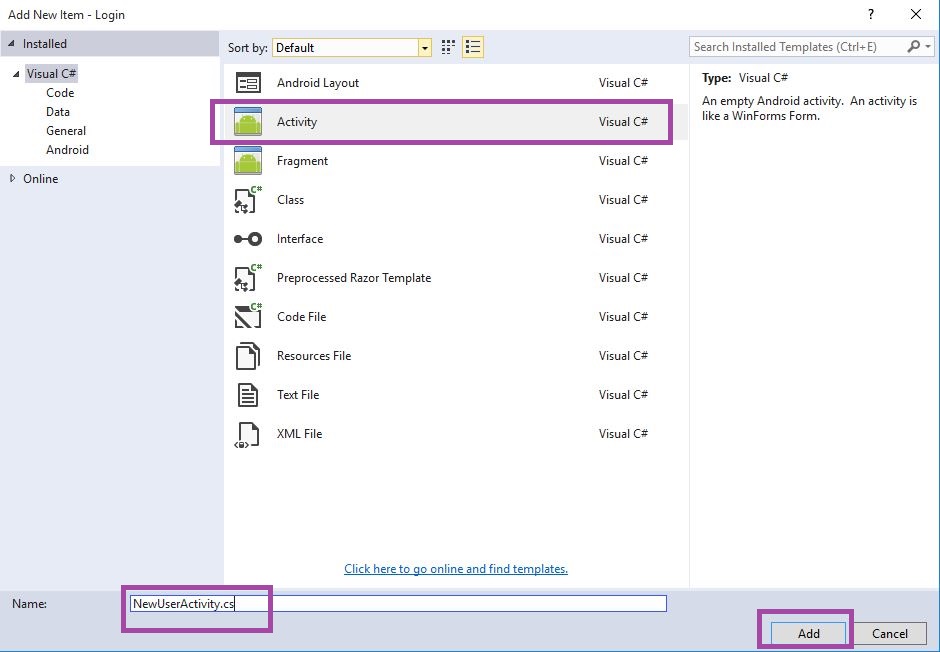
Step 3 : Next go to Solution Explorer-> Project Name then Right Click to Add then open new Dialog box. Then select Activity give name for NewUserActivity.cs after that Add the New Activity Class.
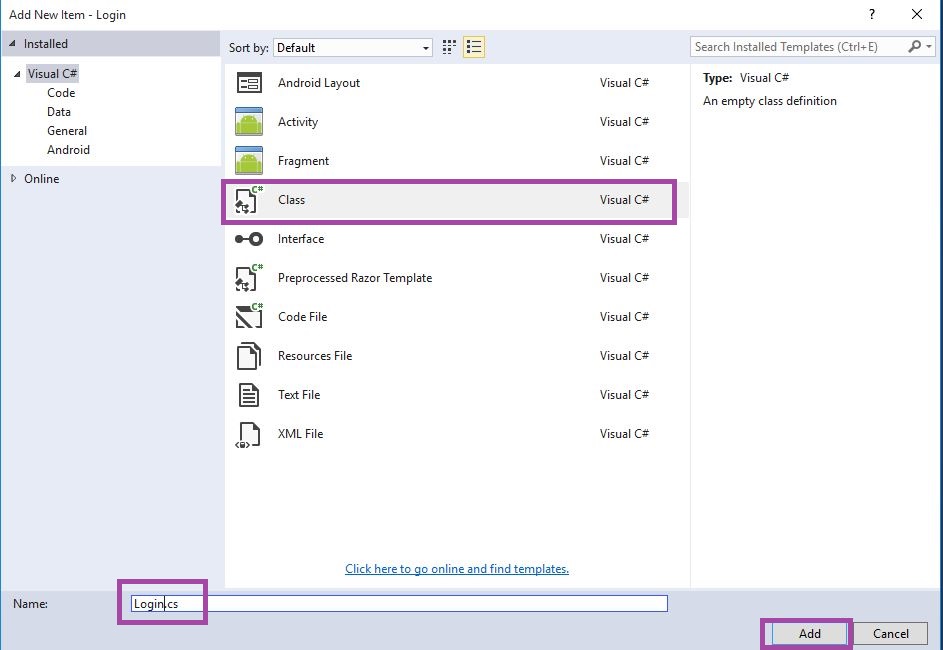
Step 4 :Next we need add one Data Layer Class. Go to Solution Explorer-> Project Name then Right Click to Add then open new Dialog box. Then select Class give name for Login.cs after that Add New Class.
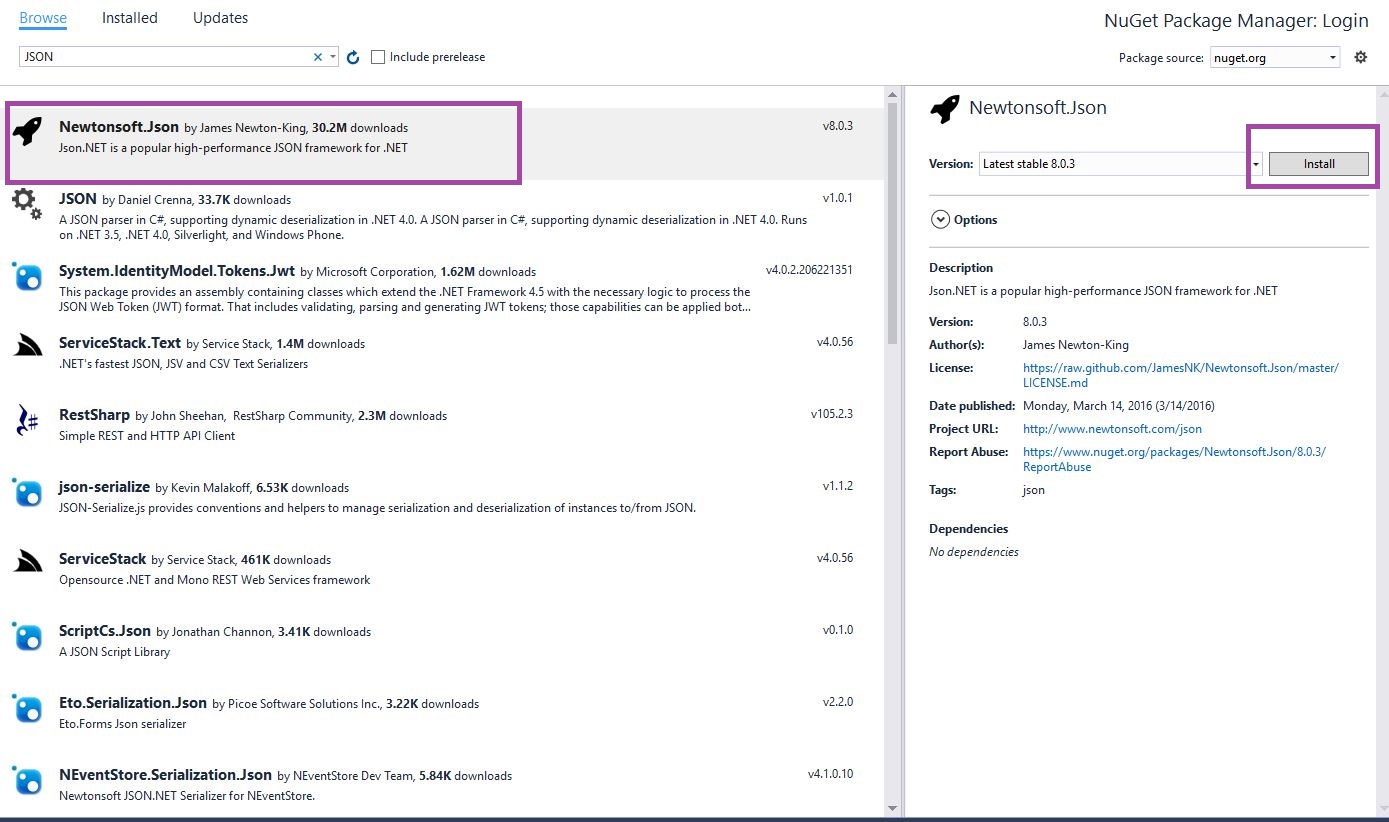
Step 5 : Next go to Solution Explorer-> Project Name-> References then Right Click to Manage Nuget Packages then open new Dialog box. This dialog box to search the Json then Install the Newtonsoft.Json Packages.
Step 6 : Next go to Open Solution Explorer-> Project Name->Resources->layout->Main.axml Click Open Design View. Here create Large Text, Two Plain Text and Two Buttons.
Step 7 : Next to Open Solution Explorer-> Project Name->Resources->layout->Reg.axml Click Open Design View. Here create Large Text, Two Plain Text and One Buttons.
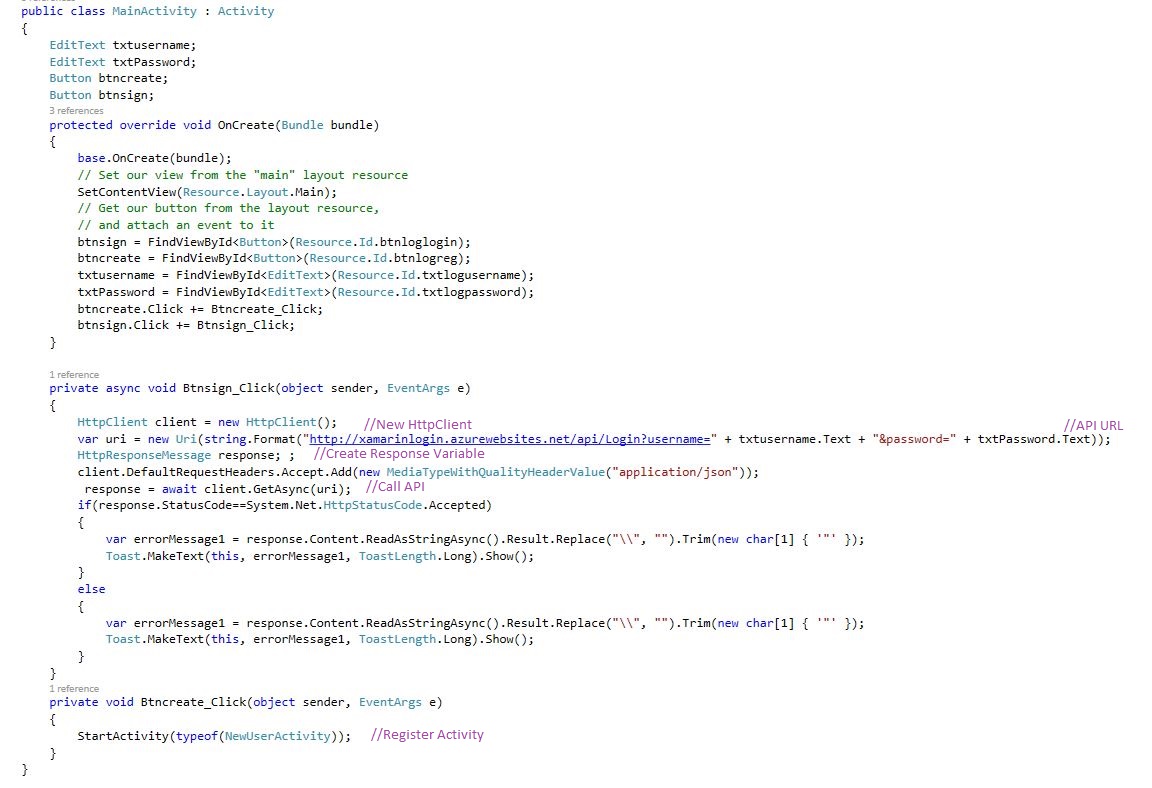
Step 8 : Next to Open Solution Explorer-> Project Name->Login.cs Click Open CS code Page View then create two class name Username and Password.
 public string username { get; set; }
 public string password { get; set; }
Step 9 : Next to Open Solution Explorer-> Project Name->MainActivity.cs Click Open CS code Page view then add below namespaces. Next to write given below code.
 using System.Net.Http;
 using System.Net.Http.Headers;
C# Code :
 public class MainActivity: Activity
 {
 EditText txtusername;
 EditText txtPassword;
 Button btncreate;
 Button btnsign;
 protected override void OnCreate(Bundle bundle)
 {
 base.OnCreate(bundle);
 // Set our view from the "main" layout resource
 SetContentView(Resource.Layout.Main);
 // Get our button from the layout resource,
 // and attach an event to it
 btnsign = FindViewById < Button > (Resource.Id.btnloglogin);
 btncreate = FindViewById < Button > (Resource.Id.btnlogreg);
 txtusername = FindViewById < EditText > (Resource.Id.txtlogusername);
 txtPassword = FindViewById < EditText > (Resource.Id.txtlogpassword);
 btncreate.Click += Btncreate_Click;
 btnsign.Click += Btnsign_Click;
 }
 private async void Btnsign_Click(object sender, EventArgs e)
 {
 HttpClient client = new HttpClient();
 var uri = new Uri(string.Format("http://xamarinlogin.azurewebsites.net/api/Login?username=" + txtusername.Text + "&password=" + txtPassword.Text));
 HttpResponseMessage response;;
 client.DefaultRequestHeaders.Accept.Add(new MediaTypeWithQualityHeaderValue("application/json"));
 response = await client.GetAsync(uri);
 if (response.StatusCode == System.Net.HttpStatusCode.Accepted)
 {
 var errorMessage1 = response.Content.ReadAsStringAsync().Result.Replace("\\", "").Trim(new char[1]
 {
 '"'
 });
 Toast.MakeText(this, errorMessage1, ToastLength.Long).Show();
 }
 else
 {
 var errorMessage1 = response.Content.ReadAsStringAsync().Result.Replace("\\", "").Trim(new char[1]
 {
 '"'
 });
 Toast.MakeText(this, errorMessage1, ToastLength.Long).Show();
 }
 }
 private void Btncreate_Click(object sender, EventArgs e)
 {
 StartActivity(typeof(NewUserActivity));
 }
 }
Step 10 : Next to Open Solution Explorer-> Project Name->NewUserActivity.cs Click Open CS code Page view then add below namespaces. Next to write given below code.
 using System.Net.Http;
 using System.Net.Http.Headers;
 using Newtonsoft.Json;
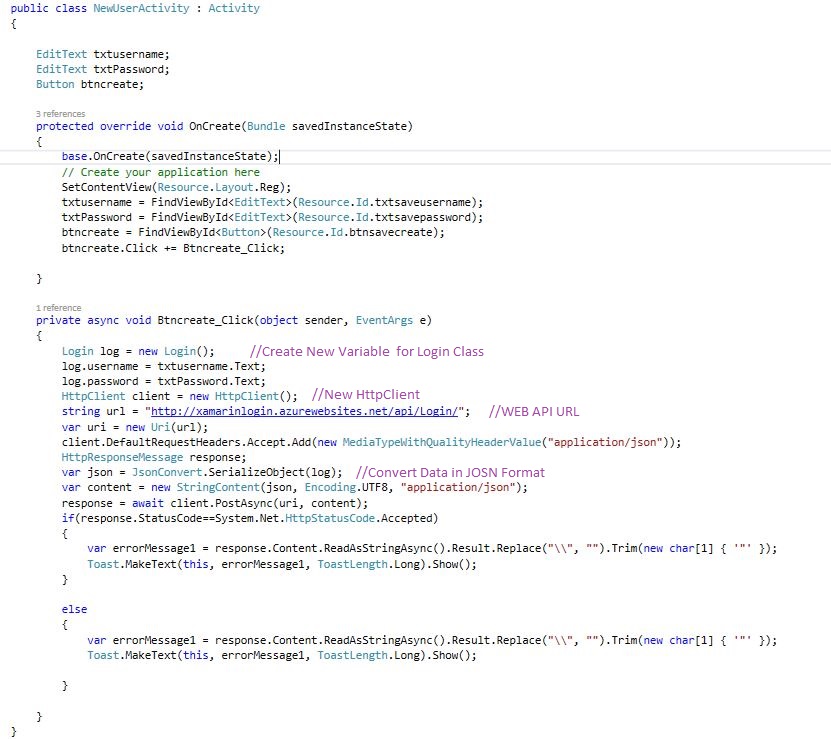
C# Code :
 public class NewUserActivity: Activity
 {
 EditText txtusername;
 EditText txtPassword;
 Button btncreate;
 protected override void OnCreate(Bundle savedInstanceState)
 {
 base.OnCreate(savedInstanceState);
 // Create your application here
 SetContentView(Resource.Layout.Reg);
 txtusername = FindViewById < EditText > (Resource.Id.txtsaveusername);
 txtPassword = FindViewById < EditText > (Resource.Id.txtsavepassword);
 btncreate = FindViewById < Button > (Resource.Id.btnsavecreate);
 btncreate.Click += Btncreate_Click;
 }
 private async void Btncreate_Click(object sender, EventArgs e)
 {
 Login log = new Login();
 log.username = txtusername.Text;
 log.password = txtPassword.Text;
 HttpClient client = new HttpClient();
 string url = "http://xamarinlogin.azurewebsites.net/api/Login/";
 var uri = new Uri(url);
 client.DefaultRequestHeaders.Accept.Add(new MediaTypeWithQualityHeaderValue("application/json"));
 HttpResponseMessage response;
 var json = JsonConvert.SerializeObject(log);
 var content = new StringContent(json, Encoding.UTF8, "application/json");
 response = await client.PostAsync(uri, content);
 if (response.StatusCode == System.Net.HttpStatusCode.Accepted)
 {
 var errorMessage1 = response.Content.ReadAsStringAsync().Result.Replace("\\", "").Trim(new char[1]
 {
 '"'
 });
 Toast.MakeText(this, errorMessage1, ToastLength.Long).Show();
 }
 else
 {
 var errorMessage1 = response.Content.ReadAsStringAsync().Result.Replace("\\", "").Trim(new char[1]
 {
 '"'
 });
 Toast.MakeText(this, errorMessage1, ToastLength.Long).Show();
 }
 }
 }
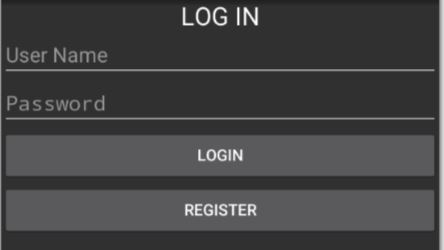
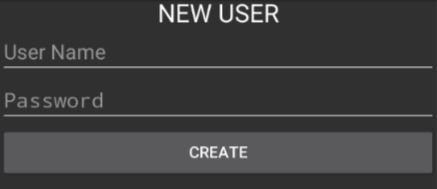
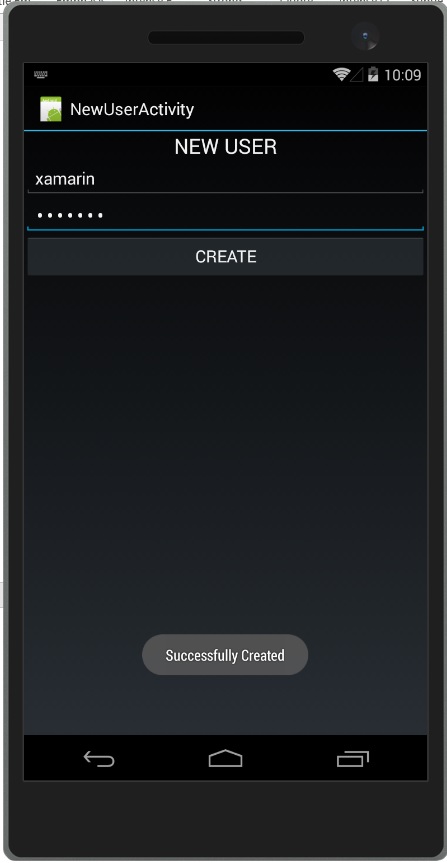
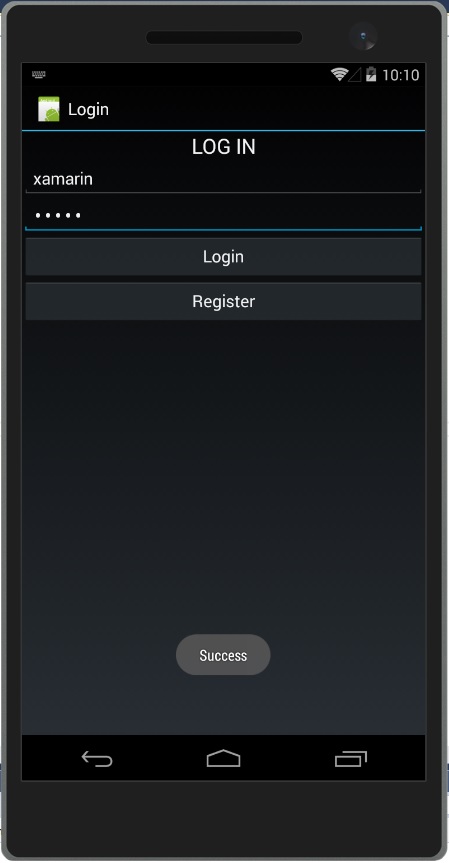
Step 11 : Press F5 or Build and Run the Application, first image to register the new user and then next image to login the user.
Download Source Here
Finally, we have successfully created Login with WEB API Using Azure SQL Server.

Anbu Mani(Microsoft MVP) is working Software Engineer in Changepond Technologies, Chennai, Tamilnadu, India. Having 4+ years of experience and his area of interest is C#, ASP.NET, SQL Server, Xamarin and Xamarin Forms,Azure…etc