
Create Remote Notifications Using Google GCM
Let’s start.
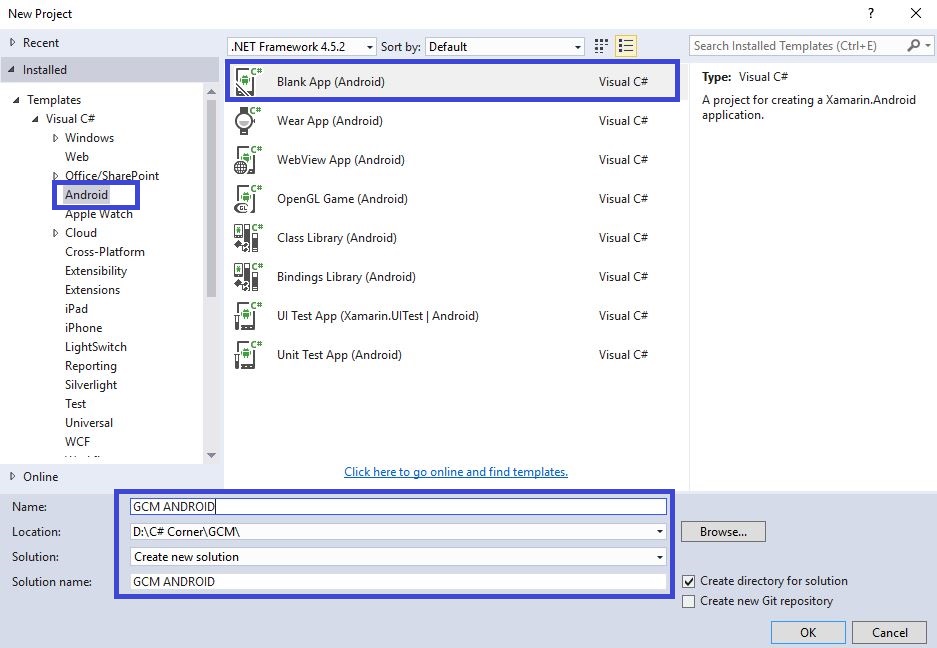
Step 1 : Open Visual Studio->New Project->Templates->Visual C#->Android->Blank app.Then Give the Project Name and Project Location.
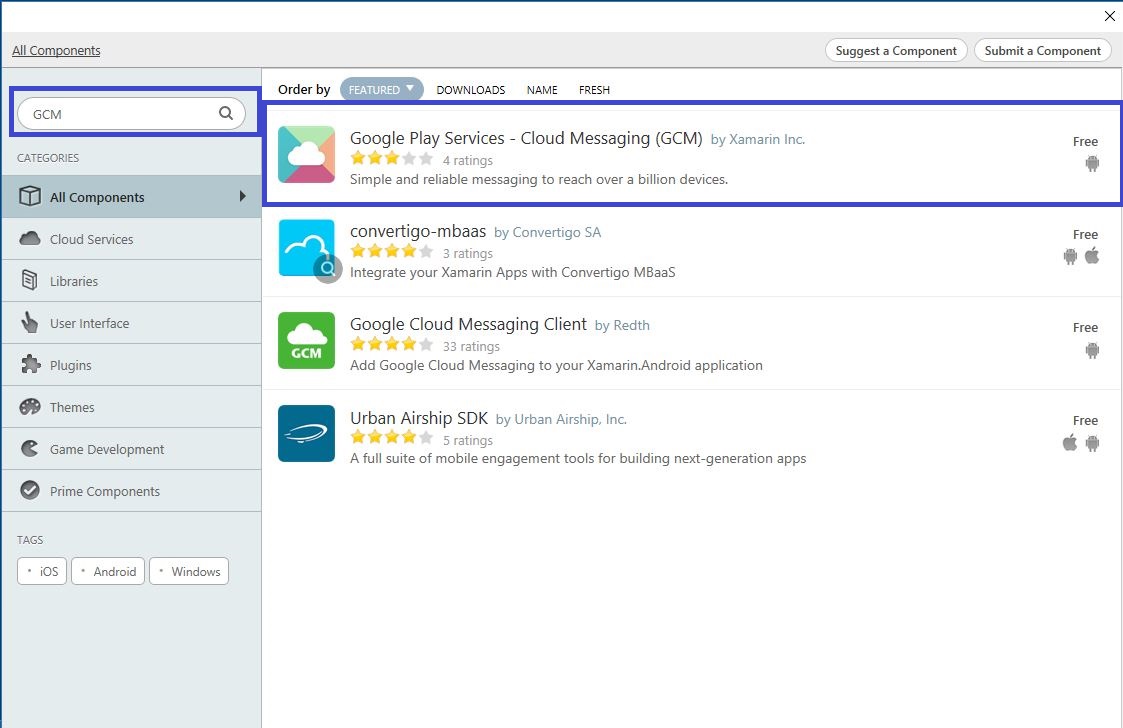
Step 2 : Go to Solution Explorer-> Project Name-> Components, right click to get more components. The new dialog box will open. This dialog box will be used to search the GCM. Add the Google Play Services-GCM Packages.
Add Namespace,
using Android.Gms.Common;
MainActivity.cs :
 protected override void OnCreate(Bundle bundle)
 {
 base.OnCreate(bundle);
 // Set our view from the "main" layout resource
 SetContentView(Resource.Layout.Main);
 IsPlayServicesAvailable()
 }
 public bool IsPlayServicesAvailable()
 {
 int resultCode = GooglePlayServicesUtil.IsGooglePlayServicesAvailable(this);
 if (resultCode != ConnectionResult.Success)
 {
 if (GooglePlayServicesUtil.IsUserRecoverableError(resultCode))
 txtmsg.Text = GooglePlayServicesUtil.GetErrorString(resultCode);
 else
 {
 Toast.MakeText(this, "Sorry, this device is not supported", ToastLength.Short)
 .Show();
 Finish();
 }
 return false;
 }
 else
 {
 Toast.MakeText(this, "Google Play Services is available.", ToastLength.Short)
 .Show();
 return true;
 }
 }
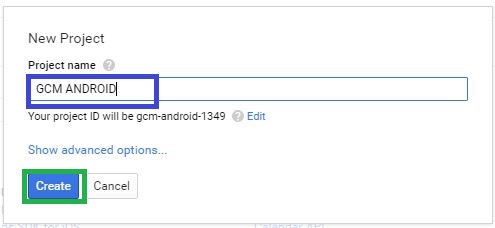
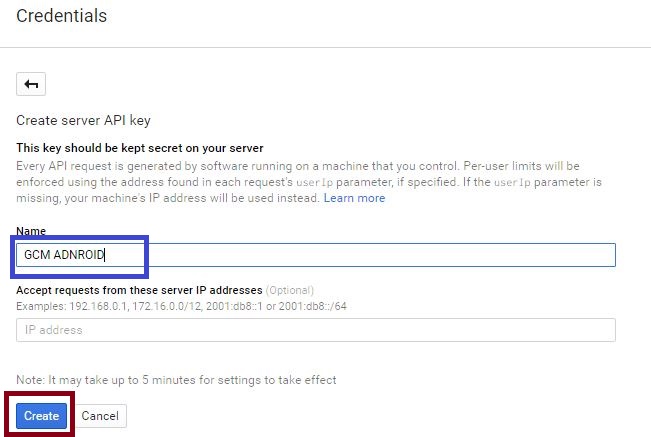
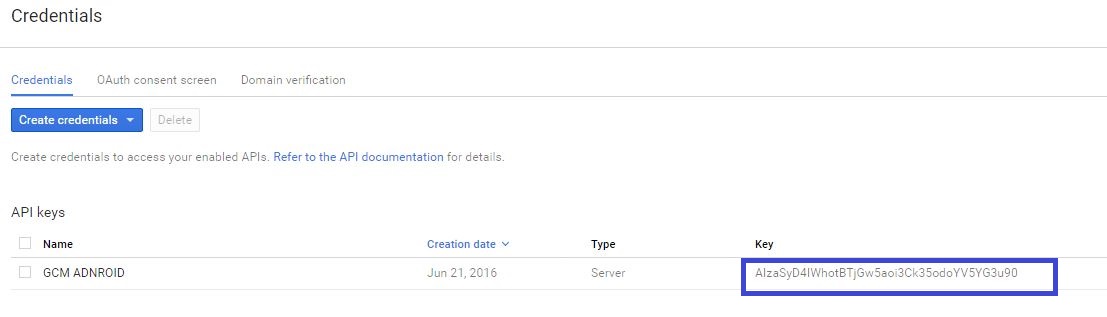
Step 4 : Register with GCM in Android Developer Console,
Go to https://console.developers.google.com, create New Project and give project Name. Refer to the screenshots, given below:
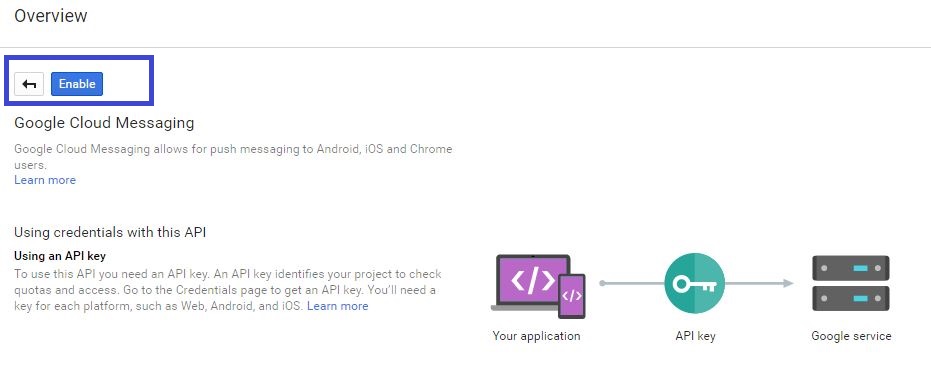
Next, enable API for Google Cloud Messaging.


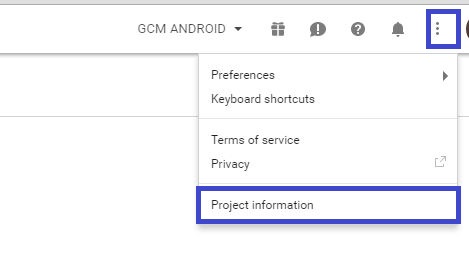
Step 5 : Register with GCM in the application. Here, we need InstanceID. Hence, go to the developer console to get InstanceID. Find Project information and get the project number.

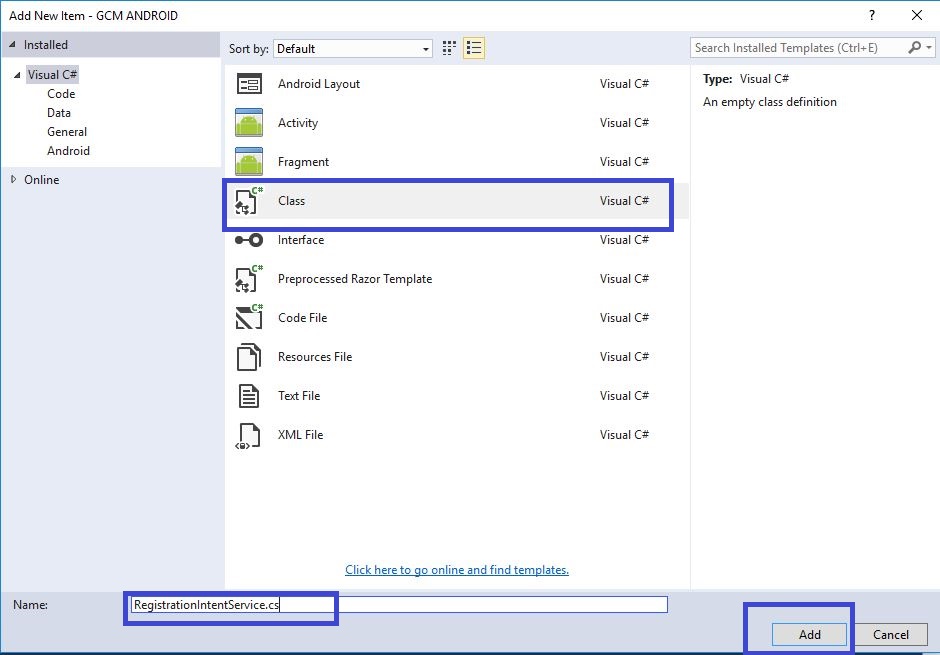
Step 6 : Next is Implementation Registration Intent Service in Android Application. Create a new class Registrationintentservice.cs and give the code, shown below,
C# Code :
 [Service(Exported = false)]
 class RegistrationIntentService: IntentService
 {
 static readonly string[] Topics = {
 "global"
 };
 public RegistrationIntentService(): base("RegistrationIntentService")
 {}
 protected override void OnHandleIntent(Intent intent)
 {
 try
 {
 Log.Info("RegistrationIntentService", "Calling InstanceID.GetToken");
 lock(this)
 {
 var instanceID = InstanceID.GetInstance(this);
 var token = instanceID.GetToken(
 "YOUR_INSTANCE_ID", GoogleCloudMessaging.InstanceIdScope, null);
 Log.Info("RegistrationIntentService", "GCM Registration Token: " + token);
 SendRegistrationToAppServer(token);
 SubscribeToTopics(token, Topics);
 }
 }
 catch (Exception e)
 {
 Log.Debug("RegistrationIntentService", "Failed to get a registration token");
 return;
 }
 }
 void SendRegistrationToAppServer(string token)
 {
 // Add custom implementation here as needed.
 }
 void SubscribeToTopics(string token, string[] topics)
 {
 foreach(var topic in topics)
 {
 var pubSub = GcmPubSub.GetInstance(this);
 pubSub.Subscribe(token, "/topics/" + topic, null);
 }
 }
 }
Step 7 : Next, run Registrationintentservice.cs. Hence, again modify MainActivity.cs; open Solution Explorer-> Project Name-> MainActivity.cs.
 protected override void OnCreate(Bundle bundle)
 {
 base.OnCreate(bundle);
 // Set our view from the "main" layout resource
 SetContentView(Resource.Layout.Main);
 txtmsg = FindViewById < TextView > (Resource.Id.txtmsg);
 btnsend = FindViewById < Button > (Resource.Id.btnsend);
 if (IsPlayServicesAvailable())
 {
 var intent = new Intent(this, typeof(RegistrationIntentService));
 StartService(intent);
 }
 }
Step 8 : Next is Implementation InstanceId Listener Service in Android Application. Create new class InstanceIdListenerService.cs and give the following code:

C# Code :
 [Service(Exported = false), IntentFilter(new []
 {
 "com.google.android.gms.iid.InstanceID"
 })]
 class MyInstanceIDListenerService: InstanceIDListenerService
 {
 // When a token refresh happens, start my RegistrationIntentService:
 public override void OnTokenRefresh()
 {
 var intent = new Intent(this, typeof(RegistrationIntentService));
 StartService(intent);
 }
 }
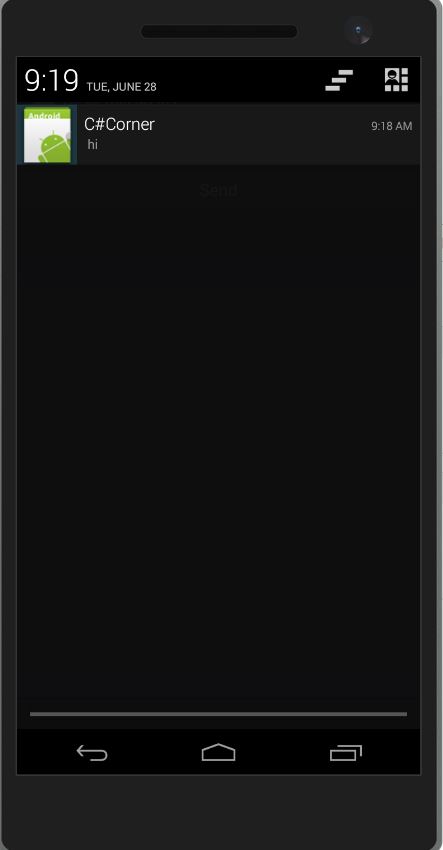
Step 9 : Next is Implementation GCM Listener Service in Android Application. Create new class GcmListenerService.cs and give the following code. This code receives the Notifications Title, Icon, and Message.
 [Service(Exported = false), IntentFilter(new []
 {
 "com.google.android.c2dm.intent.RECEIVE"
 })]
 public class MyGcmListenerService: GcmListenerService
 {
 public override void OnMessageReceived(string from, Bundle data)
 {
 // Extract the message received from GCM:
 var message = data.GetString("message");
 Log.Debug("MyGcmListenerService", "From: " + from);
 Log.Debug("MyGcmListenerService", "Message: " + message);
 // Forward the received message in a local notification:
 SendNotification(message);
 }
 // Use Notification Builder to create and launch the notification:
 void SendNotification(string message)
 {
 var intent = new Intent(this, typeof(MainActivity));
 intent.AddFlags(ActivityFlags.ClearTop);
 var pendingIntent = PendingIntent.GetActivity(this, 0, intent, PendingIntentFlags.OneShot);
 var notificationBuilder = new Notification.Builder(this)
 .SetSmallIcon(Resource.Drawable.Icon) //Icon
 .SetContentTitle("C#Corner") //Title
 .SetContentText(message) //Message
 .SetAutoCancel(true)
 .SetContentIntent(pendingIntent);
 var notificationManager = (NotificationManager) GetSystemService(Context.NotificationService);
 notificationManager.Notify(0, notificationBuilder.Build());
 }
 }
Step 10 : Go to Solution Explorer-> Project Name-> References and right click to Manage NuGet Packages, the new dialog box will open. This dialog box is used to search Json and install the Newtonsoft.Json Packages.

using Newtonsoft.Json.Linq;
using System.Net.Http;
using System.Net.Http.Headers;
using System.Text;
using System.Threading.Tasks;
protected override void OnCreate(Bundle bundle)
{
base.OnCreate(bundle);
// Set our view from the "main" layout resource
SetContentView(Resource.Layout.Main);
btnsend.Click += (object sender, EventArgs e) =>
{
OnButtonClicked(sender, e);
};
}
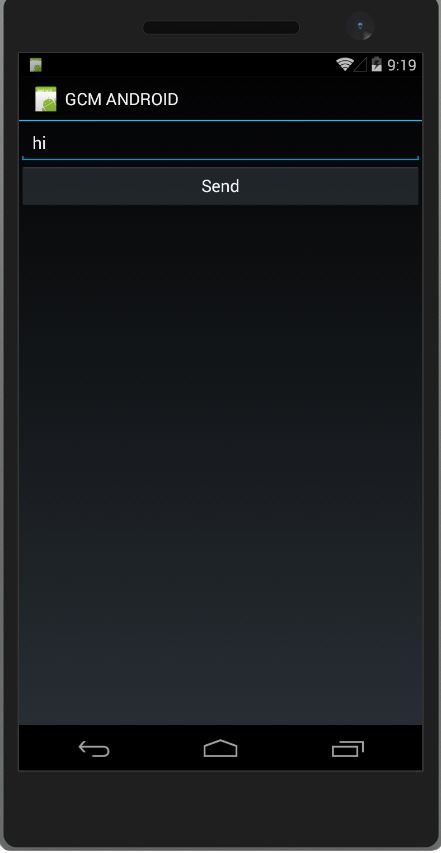
public async void OnButtonClicked(object sender, EventArgs args)
{
var MESSAGE = txtmsg.Text;
var jGcmData = new JObject();
var jData = new JObject();
jData.Add("message", MESSAGE);
jGcmData.Add("to", "/topics/global");
jGcmData.Add("data", jData);
string a;
var url = new Uri("https://gcm-http.googleapis.com/gcm/send");
try
{
using(var client = new HttpClient())
{
client.DefaultRequestHeaders.Accept.Add(
new MediaTypeWithQualityHeaderValue("application/json"));
client.DefaultRequestHeaders.TryAddWithoutValidation(
"Authorization", "key=" + API_KEY);
Task.WaitAll(client.PostAsync(url, new StringContent(jGcmData.ToString(), Encoding.Default, "application/json"))
.ContinueWith(response =>
{
Console.WriteLine(response);
Console.WriteLine("Message sent: check the client device notification tray.");
}));
}
}
catch (Exception e)
{
Console.WriteLine("Unable to send GCM message:");
Console.Error.WriteLine(e.StackTrace);
}
}
<receiver android:name="com.google.android.gms.gcm.GcmReceiver" android:exported="true" android:permission="com.google.android.c2dm.permission.SEND">
 <intent-filter>
 <action android:name="com.google.android.c2dm.intent.RECEIVE" />
 <action android:name="com.google.android.c2dm.intent.REGISTRATION" />
 <category android:name="GCM.GCM" />
 </intent-filter>
</receiver>
</application>
<uses-permission android:name="com.google.android.c2dm.permission.RECEIVE" />
<uses-permission android:name="android.permission.WAKE_LOCK" />
<uses-permission android:name="android.permission.INTERNET" />
<uses-permission android:name="GCM_ANDROID.GCM_ANDROID.permission.C2D_MESSAGE" />

Anbu Mani(Microsoft MVP) is working Software Engineer in Changepond Technologies, Chennai, Tamilnadu, India. Having 4+ years of experience and his area of interest is C#, ASP.NET, SQL Server, Xamarin and Xamarin Forms,Azure…etc