
Create Android Custom Action Bar Menu And Popup Menu
Let’s start.
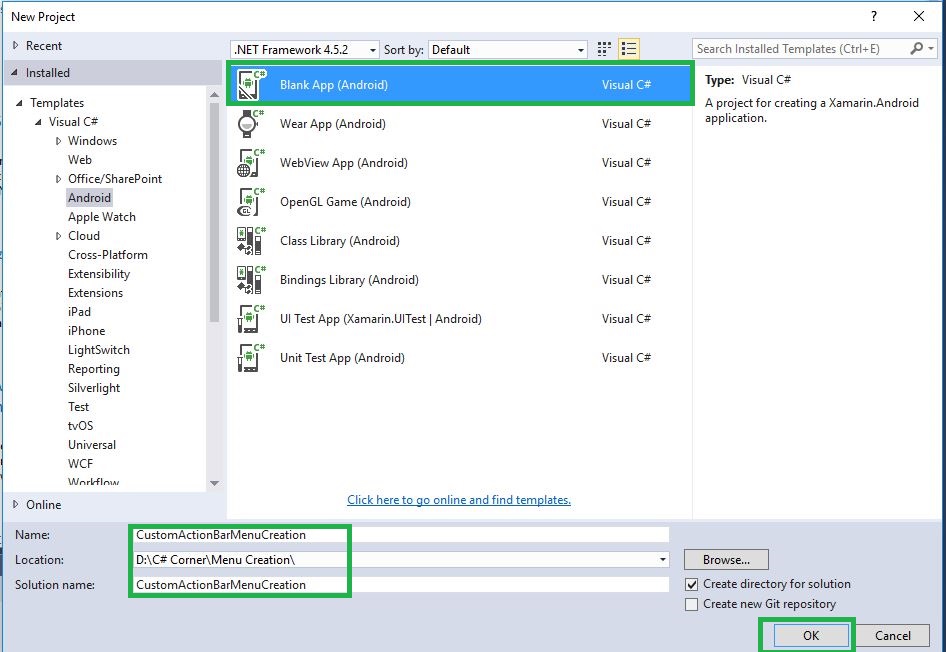
Step 1: Open Visual Studio ->New Project ->Templates ->Visual C# ->Android ->Blank App.then give the Project Name and Project Location.
CUSTOM ACTION BAR MENU
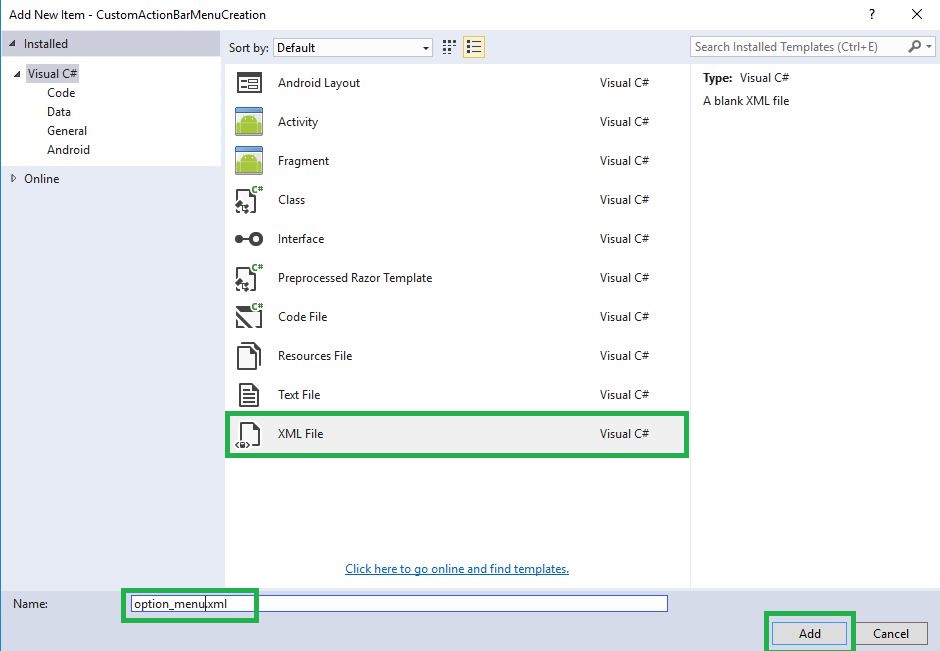
Step 2: Next, create options_menu.xml file. Go to Solution Explorer -> Project Name ->Resources ->values. Then, right click and go to Add->New Item. This opens a new dialog box. Select XML File and give it a name, as option_menu.xml.
Step 3: The next step is to open the Solution Explorer -> Project Name ->Resources ->values ->options_menu.xml. Click on Open Design View and then, give the following code in it.
<?xml version="1.0" encoding="utf-8" ?>
<menu
xmlns:android="http://schemas.android.com/apk/res/android"
xmlns:app="http://schemas.android.com/apk/res-auto">
<!--///showAsAction="always" ///-->
<item
android:id="@+id/action_settings"
android:title="Share"
showAsAction="always" />
<item
android:id="@+id/action_settings1"
android:title="Bluetooth"
showAsAction="always" />
<item
android:id="@+id/action_settings2"
android:title="Exit"
showAsAction="always" />
<!--/android:showAsAction="ifRoom"/-->
<item
android:id="@+id/action_settings3"
android:title="Share"
android:showAsAction="ifRoom" />
<item
android:id="@+id/action_settings4"
android:title="Bluetooth"
android:showAsAction="ifRoom" />
</menu>
Step 4: Next, open Solution Explorer -> Project Name ->MainActivity.cs. Create OnCreateOptionsMenu() after Oncreate() method.
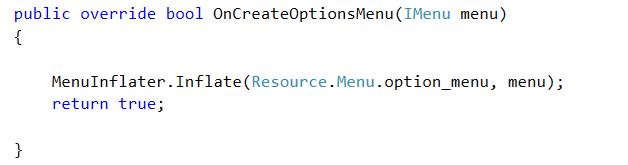
 public override bool OnCreateOptionsMenu(IMenu menu)
 {
 MenuInflater.Inflate(Resource.Menu.option_menu, menu);
 return true;
 }
POPUP MENU CREATION
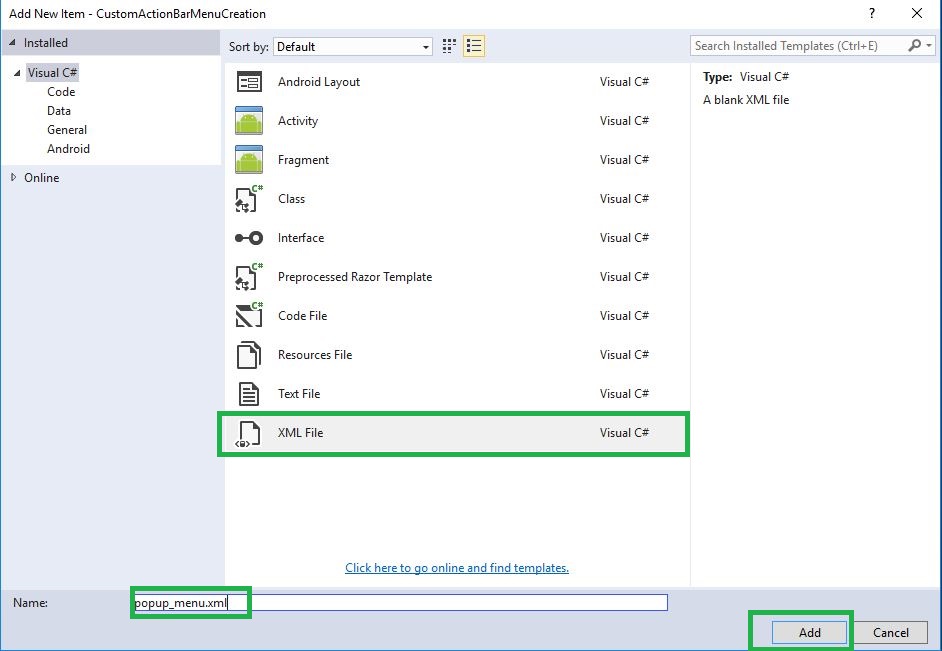
Step 5: Now, create another xml file as options_popup.xml file. For this, go to Solution Explorer -> Project Name ->Resources ->values. Right click and Add ->New Item. Then, open new dialog box. Then, select XML File and give it the name as popup_menu.xml.
Step 6: Next, open the Solution Explorer -> Project Name ->Resources ->values -> popup_menu.xml. Click on Open Design View. Then, give the following code,
<?xml version="1.0" encoding="utf-8" ?>
<menu
xmlns:android="http://schemas.android.com/apk/res/android"
xmlns:app="http://schemas.android.com/apk/res-auto">
<item
android:id="@+id/action_setting1"
android:title="Share"
showAsAction="always" />
<item
android:id="@+id/action_settings2"
android:title="Bluetooth"
showAsAction="always" />
<item
android:id="@+id/action_settings3"
android:title="Exit"
showAsAction="always" />
</menu>
Step 7: Next step is to open the Solution Explorer -> Project Name ->Resources ->Layout ->Main.axml. Then, give the following code.
<?xml version="1.0" encoding="utf-8"?>
<LinearLayout
xmlns:android="http://schemas.android.com/apk/res/android"
android:orientation="vertical"
android:layout_width="match_parent"
android:layout_height="match_parent">
<Button
android:id="@+id/btnpopupmenu"
android:layout_width="match_parent"
android:layout_height="wrap_content"
android:text="POPUP MENU" />
</LinearLayout>
Step 8: Now, open Solution Explorer -> Project Name -> MainActivity.cs. Then, give the following code,
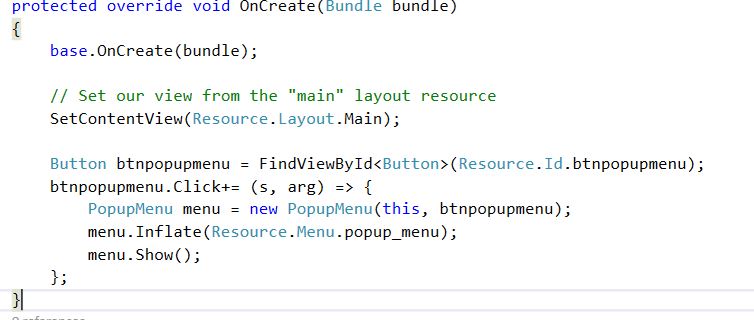
C#Code :
 protected override void OnCreate(Bundle bundle)
 {
 base.OnCreate(bundle);
 // Set our view from the "main" layout resource
 SetContentView(Resource.Layout.Main);
 Button btnpopupmenu = FindViewById < Button > (Resource.Id.btnpopupmenu);
 btnpopupmenu.Click += (s, arg) =>
 {
 PopupMenu menu = new PopupMenu(this, btnpopupmenu);
 menu.Inflate(Resource.Menu.popup_menu);
 menu.Show();
 };
 }
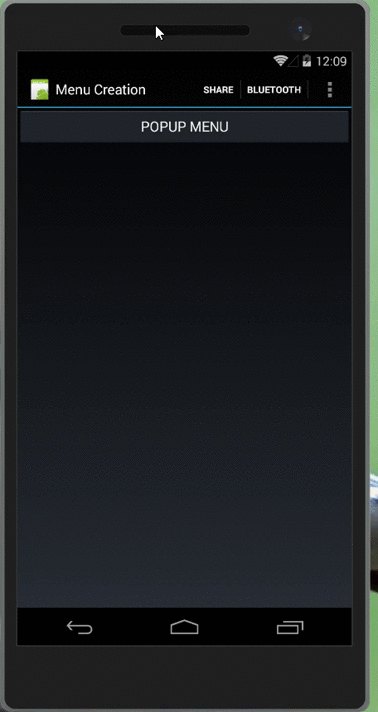
Step 9: Press F5 or Build and Run the Application.
Download Source Code Here..
Finally, we have successfully created the Xamarin Android Custom Action Bar Menu and created the Popup Menu.

Anbu Mani(Microsoft MVP) is working Software Engineer in Changepond Technologies, Chennai, Tamilnadu, India. Having 4+ years of experience and his area of interest is C#, ASP.NET, SQL Server, Xamarin and Xamarin Forms,Azure…etc