
Create Android Recyclerview Using Material Design
Introduction
The Recyclerview is used to display a group of messages, songs, images (Ex: Inbox, music player, Gallery). For more details, Click.
Let’s start,
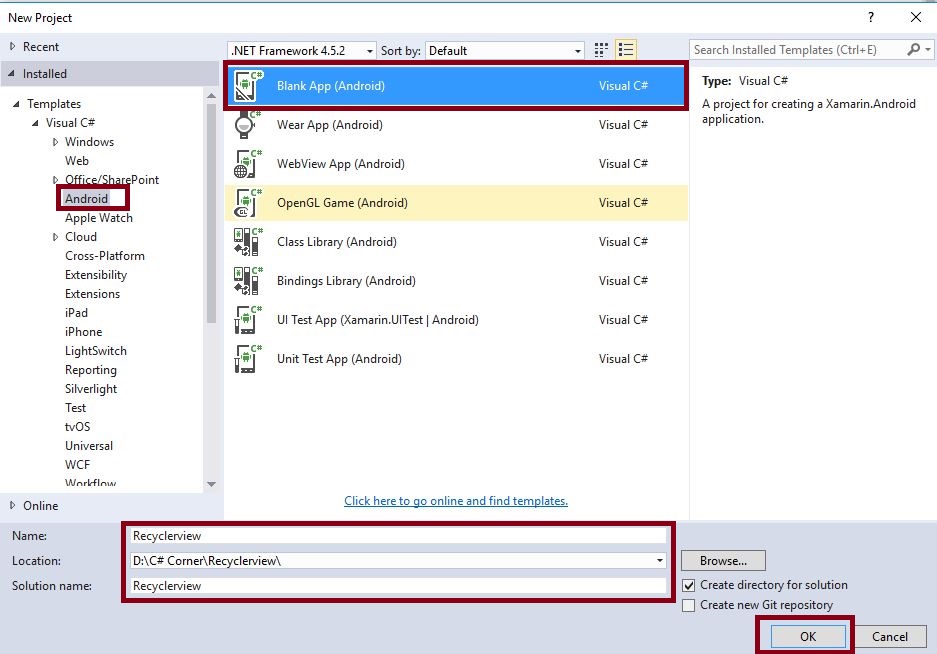
Step 1: Open Visual Studio->New Project->Templates->Visual C#->Android->Blank App. Then, give Project Name and Project Location.
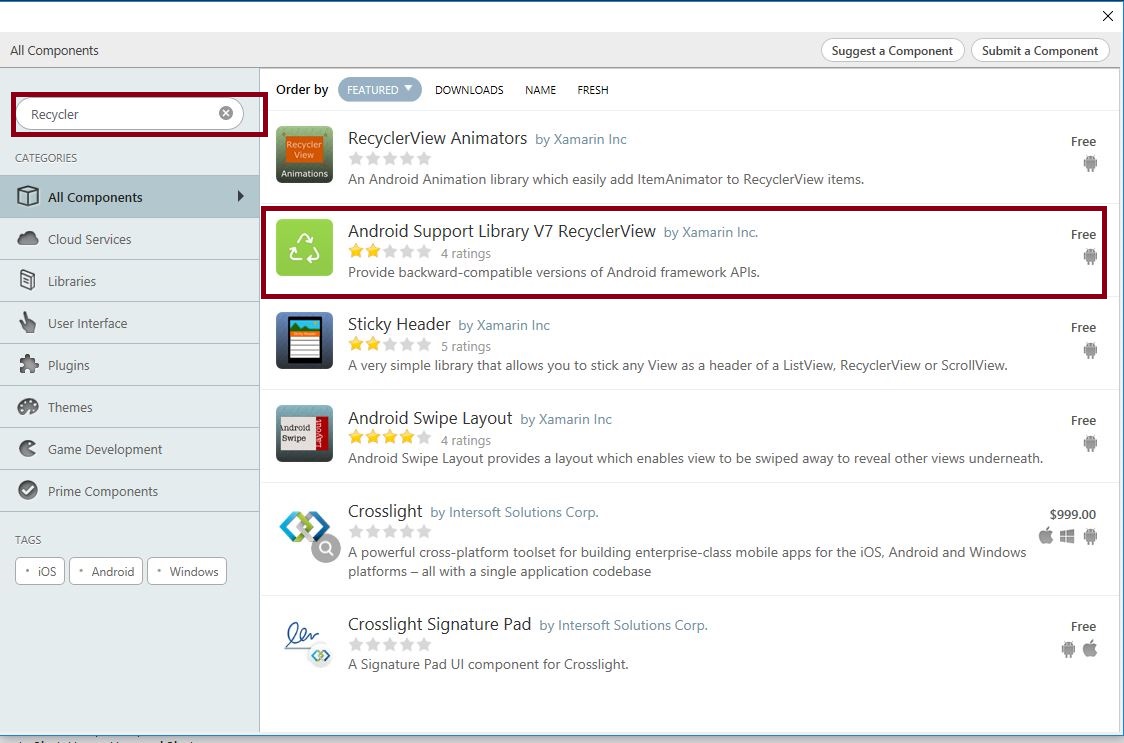
Step 2 : Next, go to Solution Explorer-> Project Name-> Components. Right click on Get More Components. This opens a new dialog box. In this dialog box, search for the Recycler. Now, add the Android Support Library V7 Recyclerview packages.
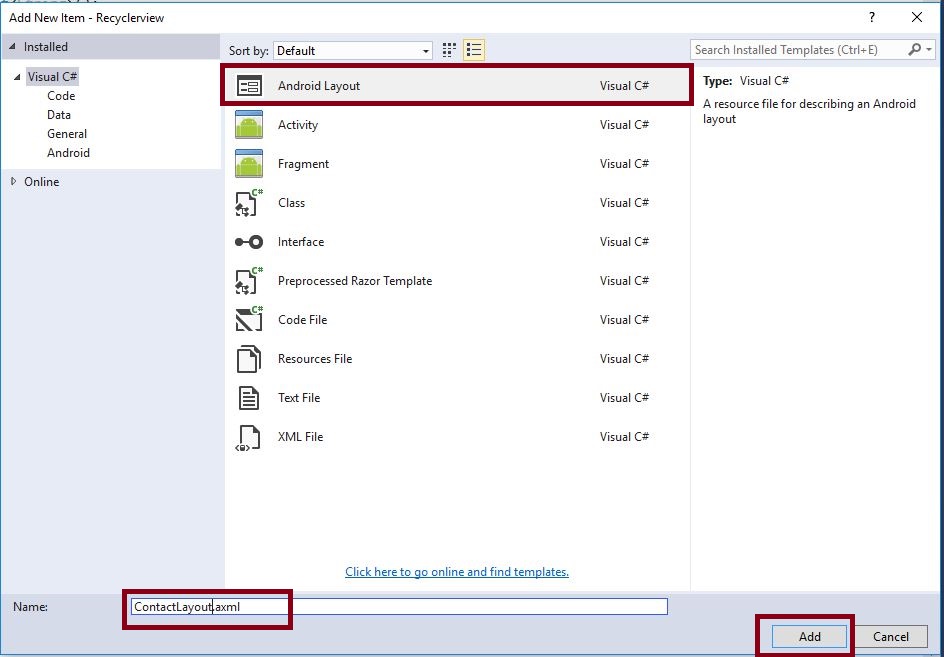
Step 3 : Next, we need to create New Layout for Contact List View. Go to Solution Explorer-> Project Name->Resources->layout. Right click on Add-> New Item;opens a new dialog box. Select Android Layout and name it as ContactLayout.axml.
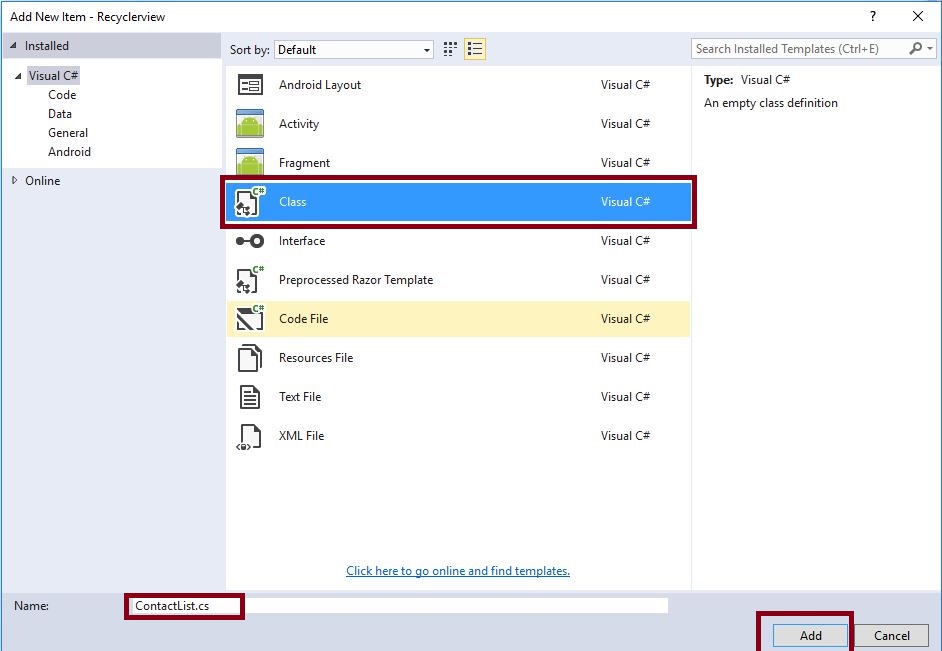
Step 4 : We need to store the contact name and number, so, here, we create a new class. Go to Solution Explorer-> Project Name and right click on Add->New Item. Open a new dialog box; select class File and give it a name as ContactList.cs.
Step 5: Next, open Solution Explorer-> Project Name->Resources->Layout->Main.axml. Click to open the Design View and paste the following code.
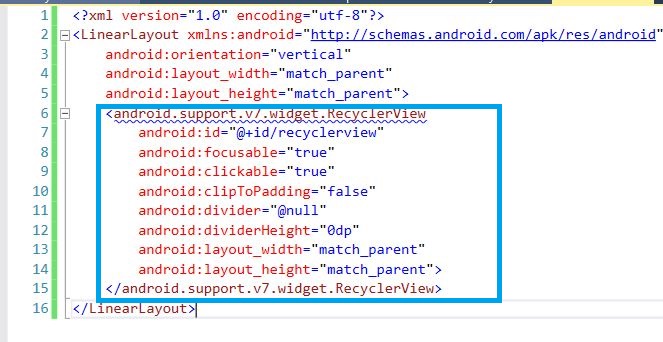
 <android.support.v7.widget.RecyclerView
 android:id="@+id/recyclerview"
 android:focusable="true"
 android:clickable="true"
 android:clipToPadding="false"
 android:divider="@null"
 android:dividerHeight="0dp"
 android:layout_width="match_parent"
 android:layout_height="match_parent">
 </android.support.v7.widget.RecyclerView>
Step 6 : Now, open Solution Explorer-> Project Name->Resources->Layout-> ContactLayout.axml. Click open the Design View and give the following code. Here, we create two textViews, one for Contact Name and another one for Contact Number.
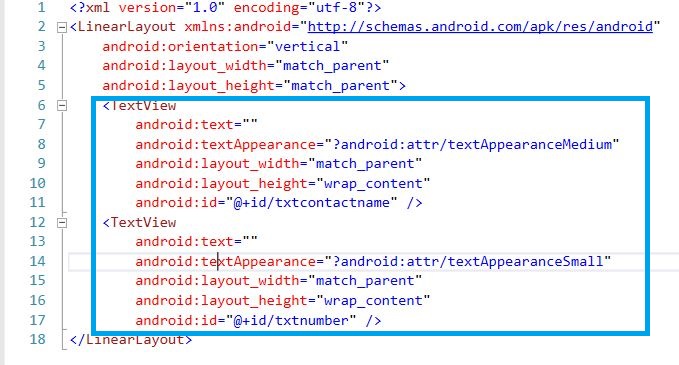
 <TextView
 android:text=""
 android:textAppearance="?android:attr/textAppearanceMedium"
 android:layout_width="match_parent"
 android:layout_height="wrap_content"
 android:id="@+id/txtcontactname" />
 <TextView
 android:text=""
 android:textAppearance="?android:attr/textAppearanceSmall"
 android:layout_width="match_parent"
 android:layout_height="wrap_content"
 android:id="@+id/txtnumber" />
Step 7: After creating the Design View, open Solution Explorer-> Project Name->MainActivity.cs. Add the following Namespaces.
using Android.Support.V7.Widget;
using System.Collections.Generic;
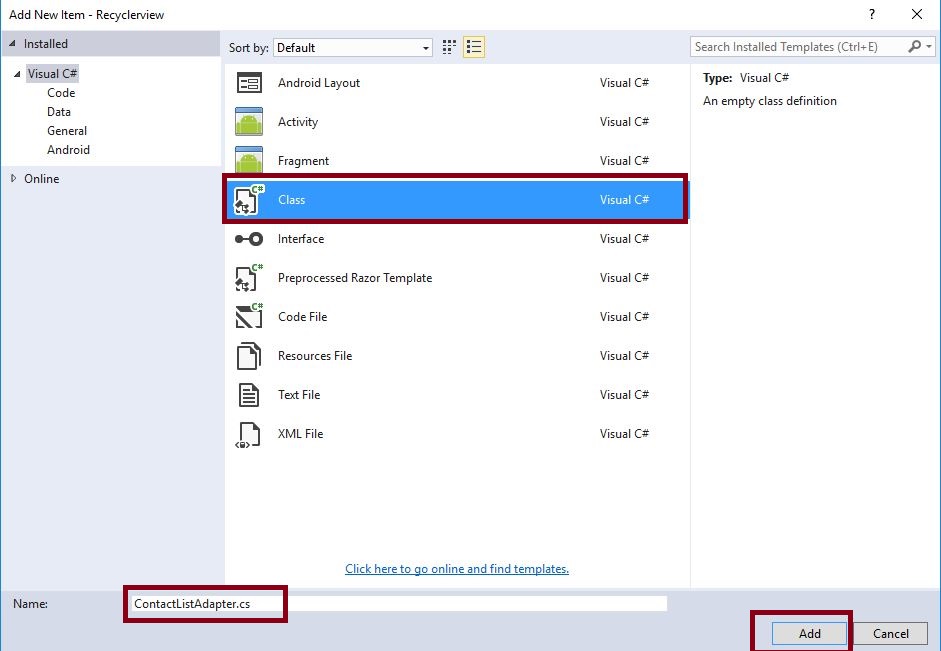
Step 8 : Next step is to create variables, then, declare the variables in OnCreate(), and assign ConatctList<> values. But before this, we need to create Recycler adapter. So, add one more class of ContactListAdapter.cs. Go to Solution Explorer-> Project Name. Right click on Add->New Item. A new dialog box opens. Select Class and give it the name ContactListAdapter.cs.
Step 9: Next, open the ContactListAdapter.cs and give the following code,
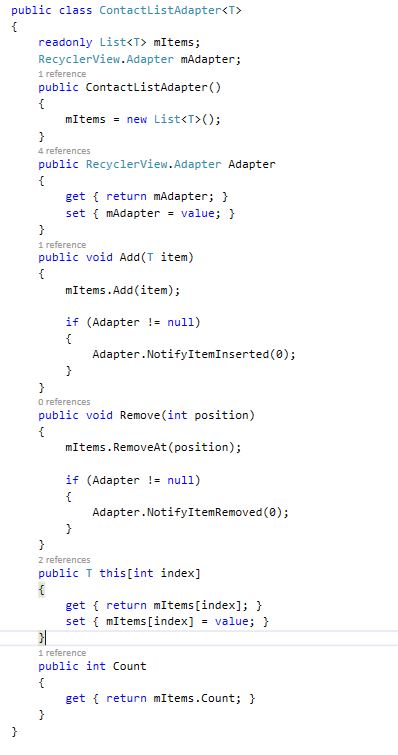
C# Code :
 public class ContactListAdapter < T >
 {
 readonly List < T > mItems;
 RecyclerView.Adapter mAdapter;
 public ContactListAdapter() {
 mItems = new List < T > ();
 }
 public RecyclerView.Adapter Adapter {
 get {
 return mAdapter;
 }
 set {
 mAdapter = value;
 }
 }
 public void Add(T item) {
 mItems.Add(item);
 if (Adapter != null) {
 Adapter.NotifyItemInserted(0);
 }
 }
 public void Remove(int position) {
 mItems.RemoveAt(position);
 if (Adapter != null) {
 Adapter.NotifyItemRemoved(0);
 }
 }
 public T this[int index] {
 get {
 return mItems[index];
 }
 set {
 mItems[index] = value;
 }
 }
 public int Count {
 get {
 return mItems.Count;
 }
 }
 }
Step 10: Then open ContactList.cs give the following code.
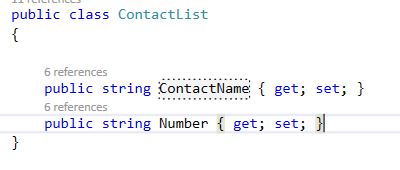
C# Code :
 public class ContactList
 {
 public string ContactName {
 get;
 set;
 }
 public string Number {
 get;
 set;
 }
 }
Step 11:Now, open MainActvity.cs and give the following code,
C# Code :
 private RecyclerView recyclerview;
 RecyclerView.LayoutManager recyclerview_layoutmanger;
 private RecyclerView.Adapter recyclerview_adapter;
 private ContactListAdapter < ContactList > ContactListitems;
 protected override void OnCreate(Bundle bundle)
 {
 base.OnCreate(bundle);
 SetContentView(Resource.Layout.Main);
 recyclerview = FindViewById < RecyclerView > (Resource.Id.recyclerview);
 List < ContactList > contact = new List < ContactList > ();
 contact.Add(new ContactList {
 ContactName = "Anbu", Number = "2564125624"
 });
 contact.Add(new ContactList {
 ContactName = "Arun", Number = "52459878788"
 });
 contact.Add(new ContactList {
 ContactName = "John", Number = "57879877878"
 });
 contact.Add(new ContactList {
 ContactName = "Peter", Number = "56478989798"
 });
 contact.Add(new ContactList {
 ContactName = "Ali", Number = "12345687945"
 });
 ContactListitems = new ContactListAdapter < ContactList > ();
 foreach(var s in contact) {
 ContactListitems.Add(s);
 }
 recyclerview_layoutmanger = new LinearLayoutManager(this, LinearLayoutManager.Vertical, false);
 recyclerview.SetLayoutManager(recyclerview_layoutmanger);
 recyclerview_adapter = new RecyclerAdapter(ContactListitems);
 recyclerview.SetAdapter(recyclerview_adapter);
 }
Step 12 : The last step is to end the Oncreate(), to create new RecyclerAdapter class. Here, we declare all variables of ContactList.axml page and then, create ViewHolder for viewing the List view of the items in that Recyclerview Adapter,
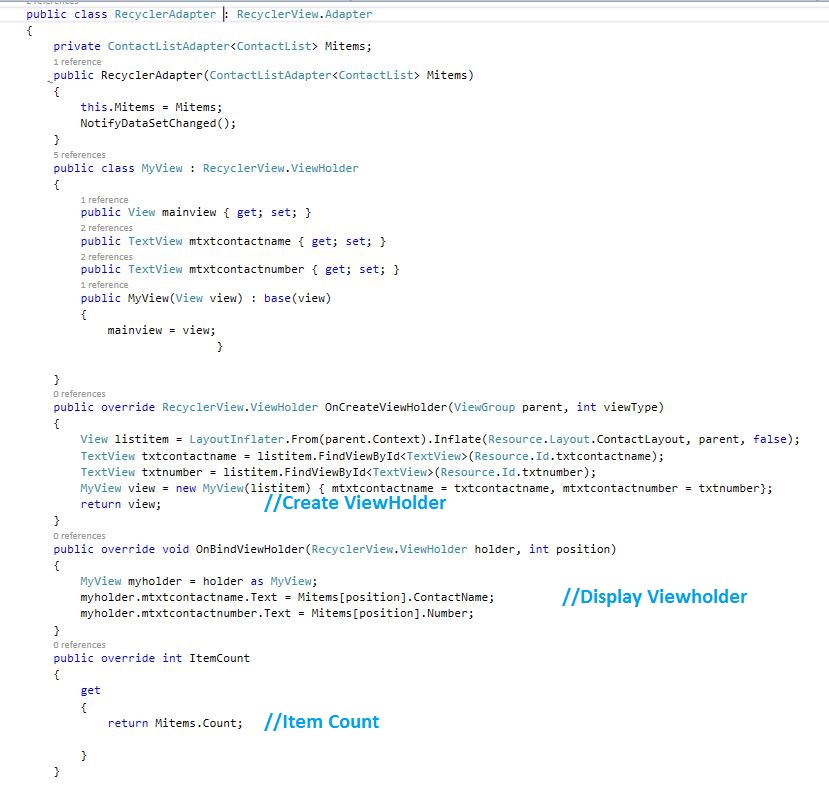
C# Code:
 public class RecyclerAdapter: RecyclerView.Adapter
 {
 private ContactListAdapter < ContactList > Mitems;
 Context context;
 public RecyclerAdapter(ContactListAdapter < ContactList > Mitems) {
 this.Mitems = Mitems;
 NotifyDataSetChanged();
 }
 public class MyView: RecyclerView.ViewHolder {
 public View mainview {
 get;
 set;
 }
 public TextView mtxtcontactname {
 get;
 set;
 }
 public TextView mtxtcontactnumber {
 get;
 set;
 }
 public MyView(View view): base(view) {
 mainview = view;
 }
 }
 public override RecyclerView.ViewHolder OnCreateViewHolder(ViewGroup parent, int viewType) {
 View listitem = LayoutInflater.From(parent.Context).Inflate(Resource.Layout.ContactLayout, parent, false);
 TextView txtcontactname = listitem.FindViewById < TextView > (Resource.Id.txtcontactname);
 TextView txtnumber = listitem.FindViewById < TextView > (Resource.Id.txtnumber);
 MyView view = new MyView(listitem) {
 mtxtcontactname = txtcontactname, mtxtcontactnumber = txtnumber
 };
 return view;
 }
 public override void OnBindViewHolder(RecyclerView.ViewHolder holder, int position) {
 MyView myholder = holder as MyView;
 myholder.mtxtcontactname.Text = Mitems[position].ContactName;
 myholder.mtxtcontactnumber.Text = Mitems[position].Number;
 }
 public override int ItemCount {
 get {
 return Mitems.Count;
 }
 }
 }
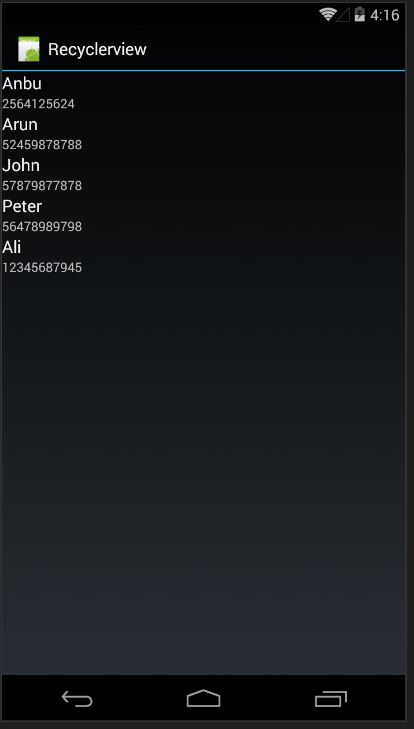
Step 13: Press F5 or Build and Run the Application.
Download Source Here.
Finally, we have successfully created the Xamarin Android Recyclerview using Material Design.
Next Recyclerview Click Event Refer this Article: Create Android Click Event Using Recyclerview.

Anbu Mani(Microsoft MVP) is working Software Engineer in Changepond Technologies, Chennai, Tamilnadu, India. Having 4+ years of experience and his area of interest is C#, ASP.NET, SQL Server, Xamarin and Xamarin Forms,Azure…etc