
Create Android Card Flip Animation Using Gesture Event -II
Let’s start,
First, we create a gesture event. Refer to part one,
Step 1: We already created the project and did some pages. Here, we create a card backend page and animation XML file.
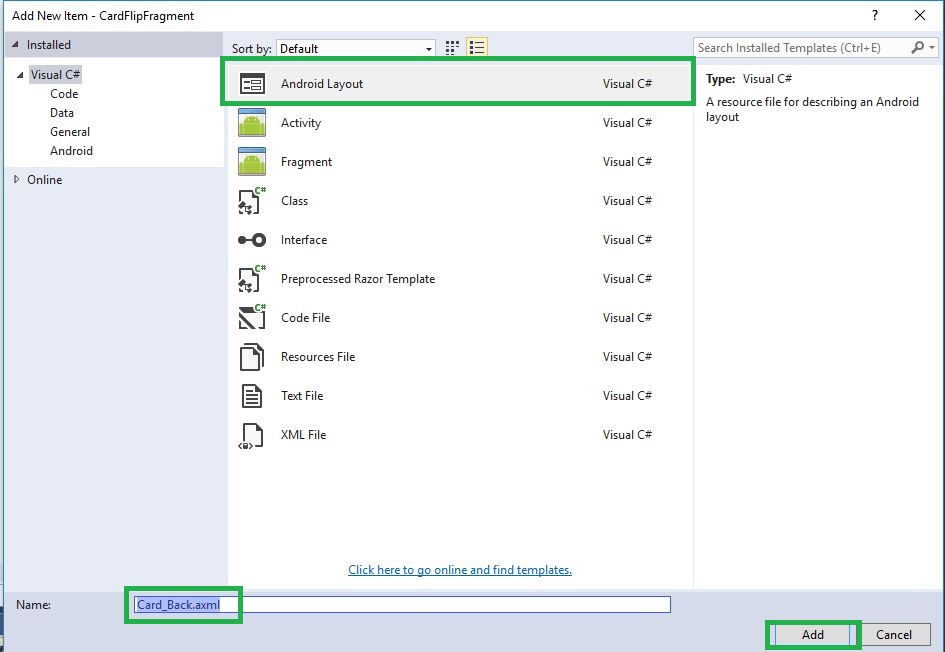
Step 3: This dialog box is required to select Android Layout and give the name for Card_back. axml.
Step 4: Go to Solution Explorer-> Project Name-> Resources. Right click to Add->New Folder and give the name for Anim.
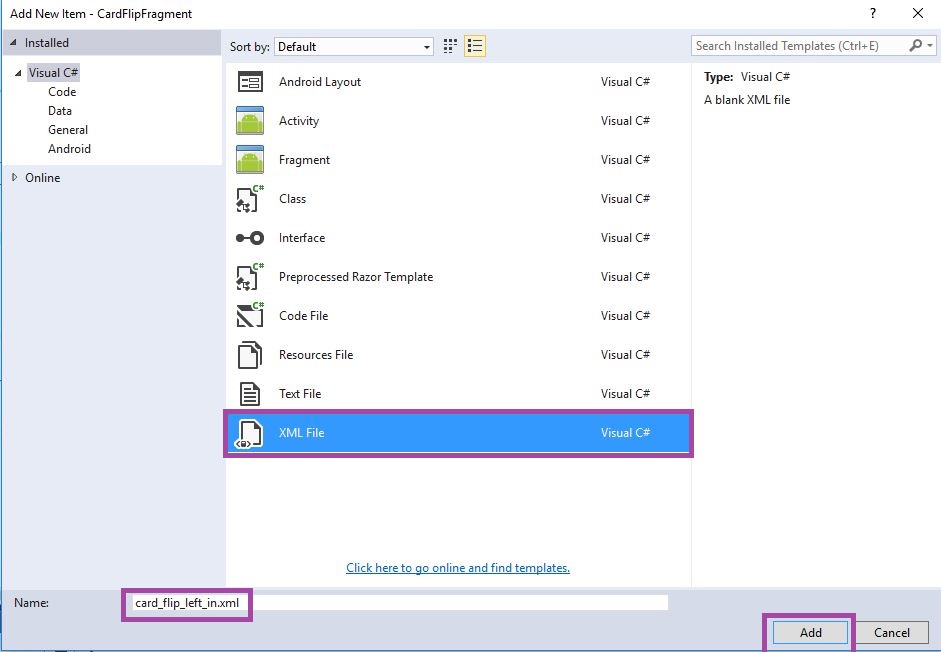
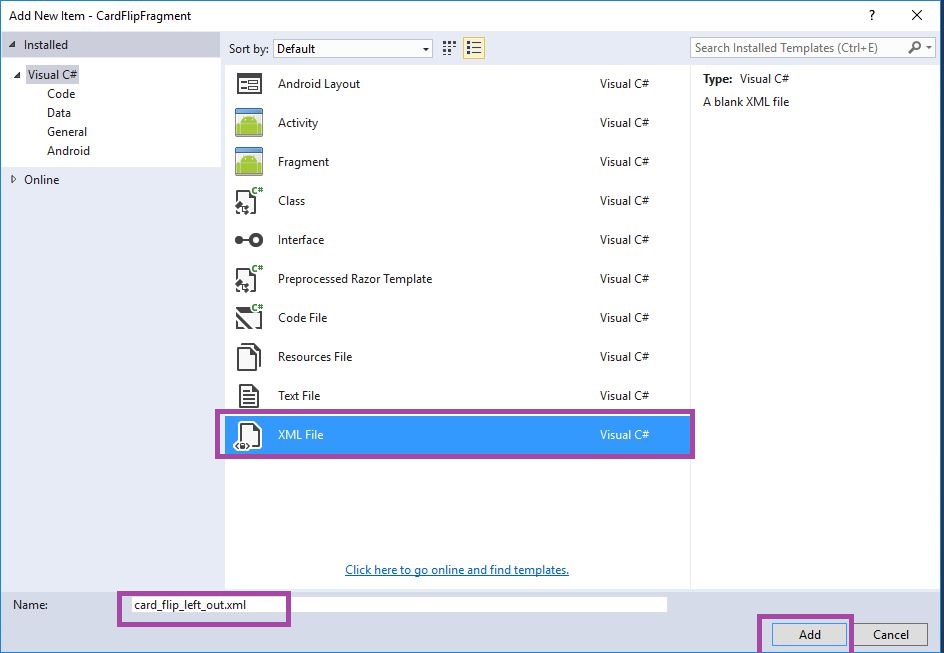
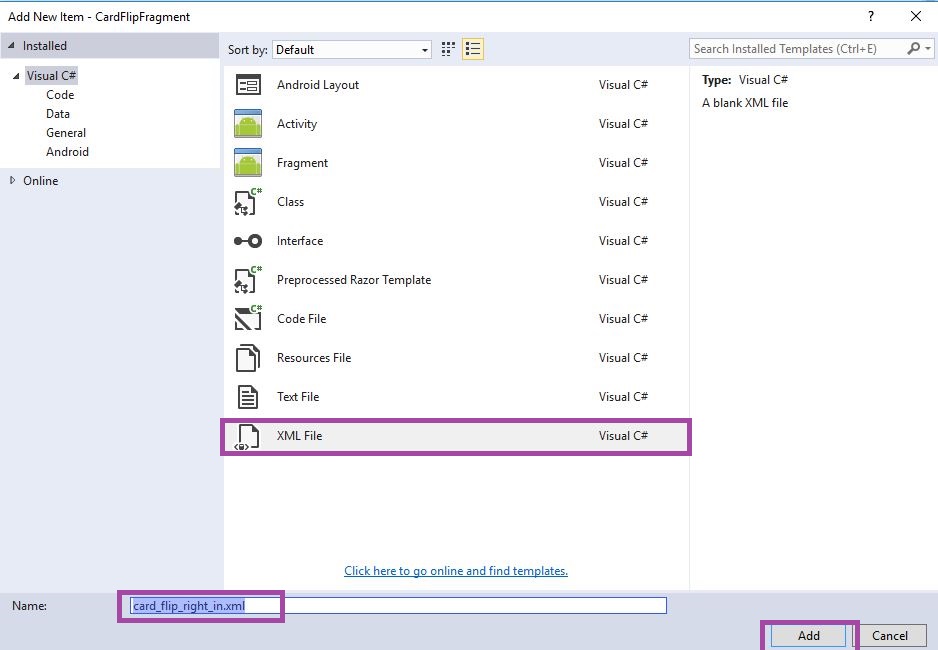
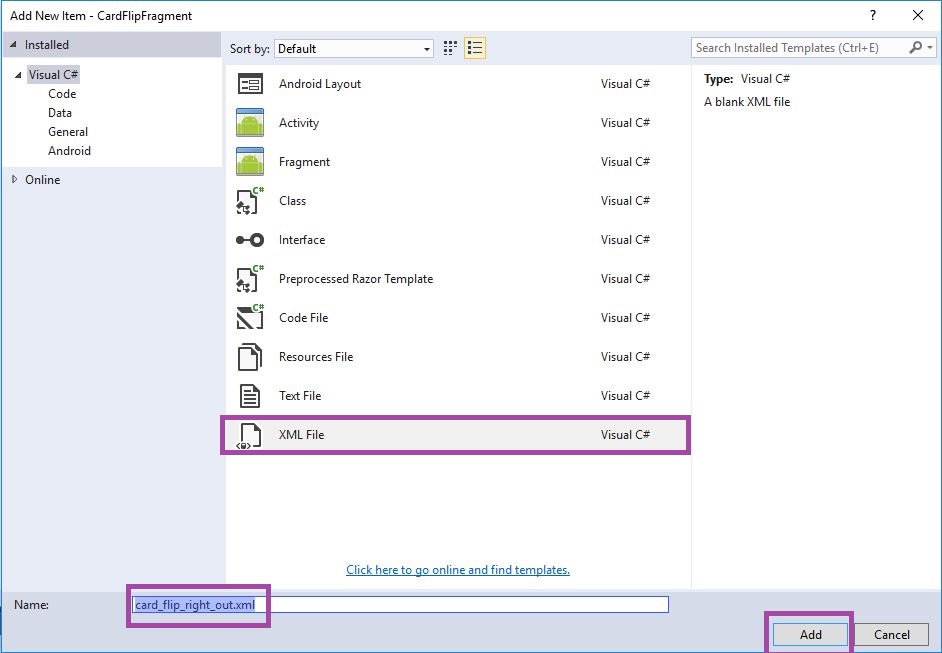
Step 5: Here, we will create four animations. Thus, we create XML resource. Go to Solution Explorer-> Project Name-> Resources-> Anim. Right click to Add-> New Item and open a new dialog box. This dialog box is required to select XML and give the name for Card_flip_left_in.xml, Card_flip_left_out.xml, Card_flip_right_in.xml and Card_flip_right_out.xml.
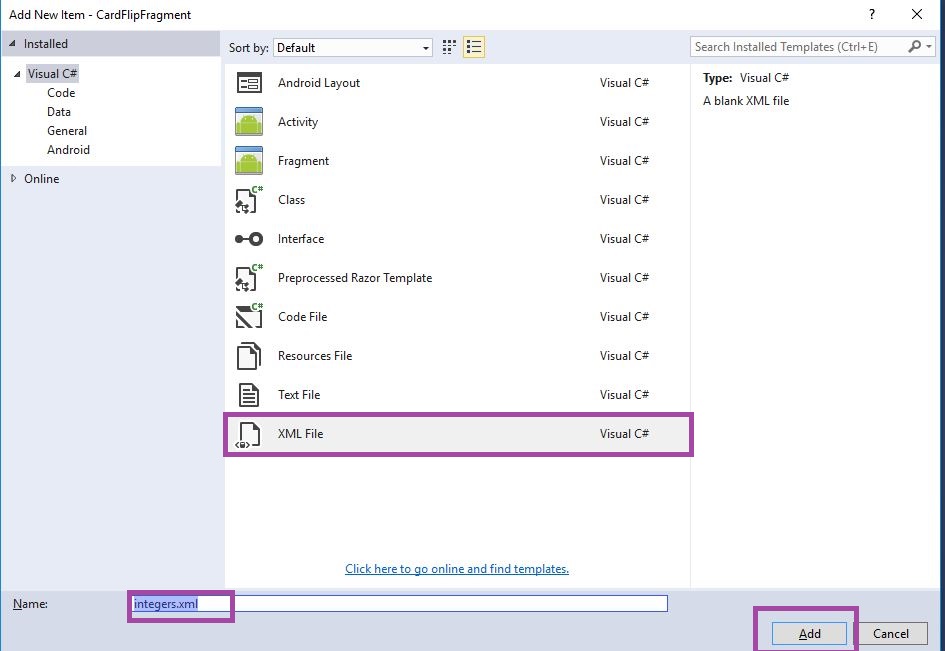
Step 6: Go to Solution Explorer-> Project Name-> Resources-> values. Right click to Add->New Item and select XML. Give the name for Integers.xml.
Step 7: Open Solution Explorer-> Project Name-> Resources-> Anim -> card_flip_left_in.xml. Click to open and add the code, given below,
 <set xmlns:android="http://schemas.android.com/apk/res/android">

 <!-- Before rotating, immediately set the alpha to 0. -->
 <objectAnimator
 android:valueFrom="1.0"
 android:valueTo="0.0"
 android:propertyName="alpha"
 android:duration="0" />
 <!-- Rotate. -->
 <objectAnimator
 android:valueFrom="-180"
 android:valueTo="0"
 android:propertyName="rotationY"
 android:interpolator="@android:interpolator/accelerate_decelerate"
 android:duration="@integer/card_flip_time_full" />
 <!-- Half-way through the rotation (see startOffset), set the alpha to 1. -->
 <objectAnimator
 android:valueFrom="0.0"
 android:valueTo="1.0"
 android:propertyName="alpha"
 android:startOffset="@integer/card_flip_time_half"
 android:duration="1" />
 </set>
Step 8: Open Solution Explorer-> Project Name-> Resources-> Anim -> card_flip_left_out.xml. Click to open and add the code, given below,
 <set xmlns:android="http://schemas.android.com/apk/res/android">
 <!-- Rotate. -->
 <objectAnimator
 android:valueFrom="0"
 android:valueTo="180"
 android:propertyName="rotationY"
 android:interpolator="@android:interpolator/accelerate_decelerate"
 android:duration="@integer/card_flip_time_full" />
 <!-- Half-way through the rotation (see startOffset), set the alpha to 0. -->
 <objectAnimator
 android:valueFrom="1.0"
 android:valueTo="0.0"
 android:propertyName="alpha"
 android:startOffset="@integer/card_flip_time_half"
 android:duration="1" />
 </set>
Step 9: Open Solution Explorer-> Project Name->Resources->Anim -> card_flip_right_in.xml. Click to open add the code, given below,
<set xmlns:android="http://schemas.android.com/apk/res/android">
 <!-- Before rotating, immediately set the alpha to 0. -->
 <objectAnimator
 android:valueFrom="1.0"
 android:valueTo="0.0"
 android:propertyName="alpha"
 android:duration="0" />
 <!-- Rotate. -->
 <objectAnimator
 android:valueFrom="180"
 android:valueTo="0"
 android:propertyName="rotationY"
 android:interpolator="@android:interpolator/accelerate_decelerate"
 android:duration="@integer/card_flip_time_full" />
 <!-- Half-way through the rotation (see startOffset), set the alpha to 1. -->
 <objectAnimator
 android:valueFrom="0.0"
 android:valueTo="1.0"
 android:propertyName="alpha"
 android:startOffset="@integer/card_flip_time_half"
 android:duration="1" />
 </set>
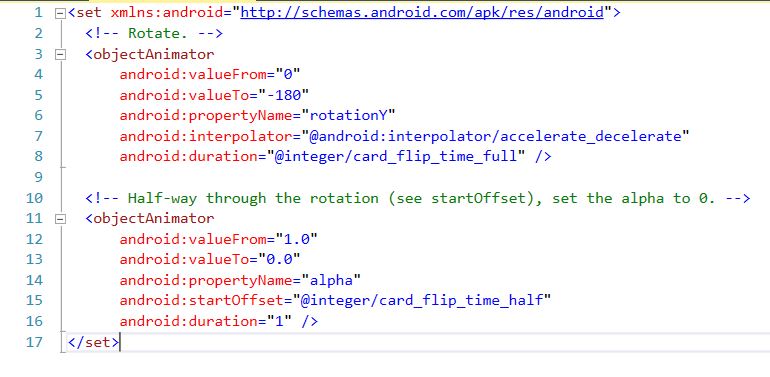
Step 10: Open Solution Explorer-> Project Name->Resources->Anim -> card_flip_right_out.xml. Click to open and add the code, given below,
 <set xmlns:android="http://schemas.android.com/apk/res/android">
 <!-- Rotate. -->
 <objectAnimator
 android:valueFrom="0"
 android:valueTo="-180"
 android:propertyName="rotationY"
 android:interpolator="@android:interpolator/accelerate_decelerate"
 android:duration="@integer/card_flip_time_full" />
 <!-- Half-way through the rotation (see startOffset), set the alpha to 0. -->
 <objectAnimator
 android:valueFrom="1.0"
 android:valueTo="0.0"
 android:propertyName="alpha"
 android:startOffset="@integer/card_flip_time_half"
 android:duration="1" />
 </set>
Step 11: Open Solution Explorer-> Project Name->Resources->values -> Integers.xml. Click to open and add the code, given below,
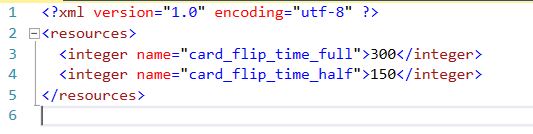
 <?xml version="1.0" encoding="utf-8" ?>
 <resources>
 <integer name="card_flip_time_full">300</integer>
 <integer name="card_flip_time_half">150</integer>
 </resources>
Step 12: Open Solution Explorer-> Project Name->Resources->drawable->Card_Back.axml. Click to open Design View. Give the following code,
 <?xml version="1.0" encoding="utf-8"?>
 <LinearLayout xmlns:android="http://schemas.android.com/apk/res/android"
 android:orientation="vertical"
 android:layout_width="match_parent"
 android:layout_height="match_parent"
 android:background="@android:color/holo_blue_dark">
 <TextView
 android:text="Card Back"
 android:textAppearance="?android:attr/textAppearanceLarge"
 android:layout_width="match_parent"
 android:layout_height="wrap_content"
 android:id="@+id/textView2"
 android:gravity="center_horizontal" />
 <TextView
 android:text="Card Back Side"
 android:textAppearance="?android:attr/textAppearanceLarge"
 android:layout_width="match_parent"
 android:layout_height="wrap_content"
 android:id="@+id/textView2"
 android:gravity="center_horizontal|center_vertical" />
 </LinearLayout>
Step 13: Open MainActivity.cs page, below OnCreate(), create a new class for FlipCard.
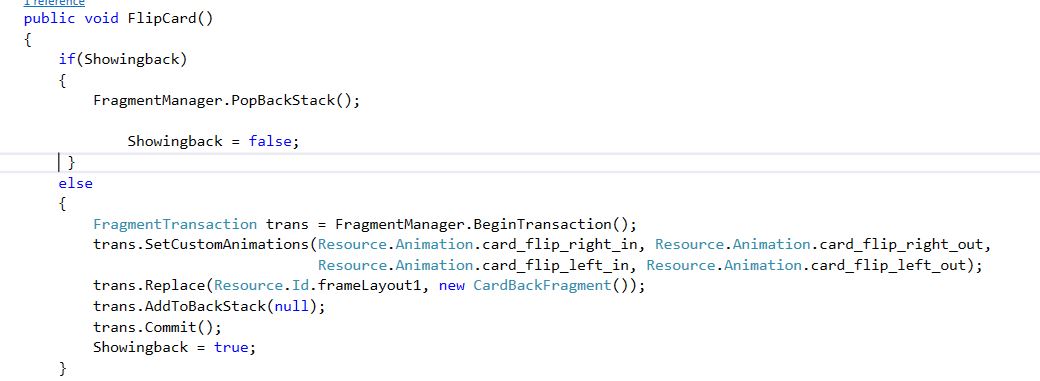
C# Code:
 public void FlipCard()
 {
 if (Showingback) {
 FragmentManager.PopBackStack();
 Showingback = false;
 } else {
 FragmentTransaction trans = FragmentManager.BeginTransaction();
 trans.SetCustomAnimations(Resource.Animation.card_flip_right_in, Resource.Animation.card_flip_right_out, Resource.Animation.card_flip_left_in, Resource.Animation.card_flip_left_out);
 trans.Replace(Resource.Id.frameLayout1, new CardBackFragment());
 trans.AddToBackStack(null);
 trans.Commit();
 Showingback = true;
 }
 }
Step 14: Define Back_card function to create new class fragment.
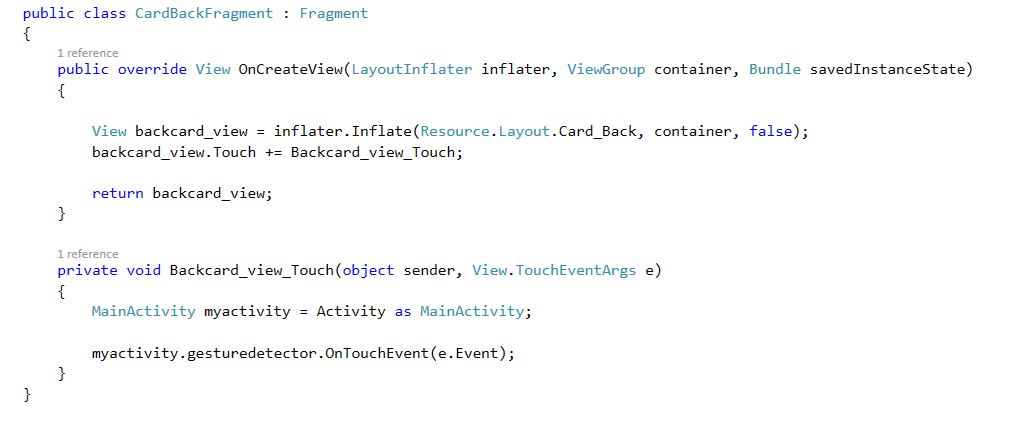
C# Code :
 public class CardBackFragment: Fragment
 {
 public override View OnCreateView(LayoutInflater inflater, ViewGroup container, Bundle savedInstanceState) {
 View backcard_view = inflater.Inflate(Resource.Layout.Card_Back, container, false);
 backcard_view.Touch += Backcard_view_Touch;
 return backcard_view;
 }
 private void Backcard_view_Touch(object sender, View.TouchEventArgs e) {
 MainActivity myactivity = Activity as MainActivity;
 myactivity.gesturedetector.OnTouchEvent(e.Event);
 }
 }
Step 15: Open MyGestureListener and add the code, given below,
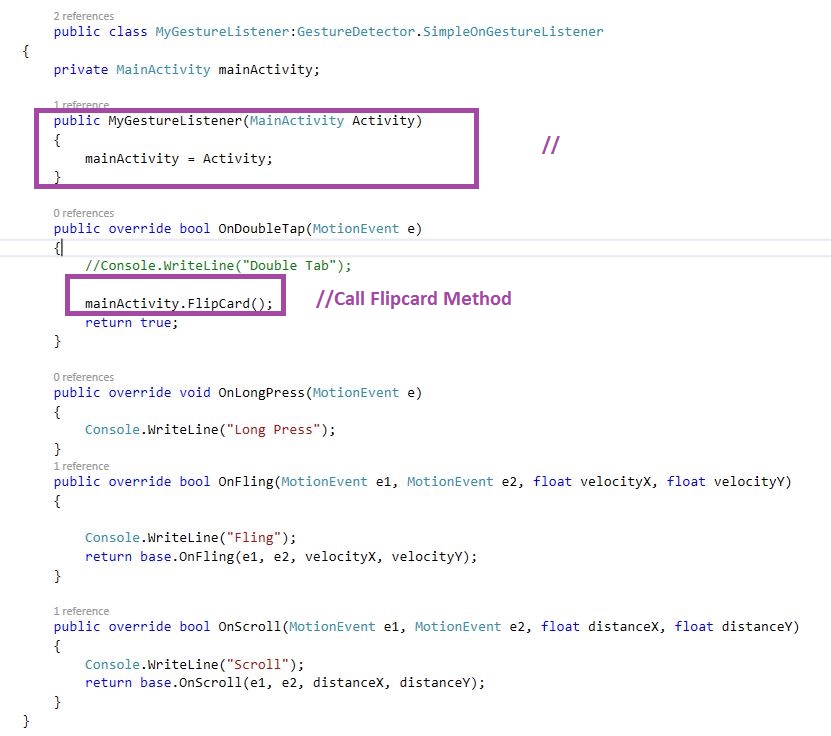
C# Code:
public class MyGestureListener: GestureDetector.SimpleOnGestureListener
{
 private MainActivity mainActivity;
 public MyGestureListener(MainActivity Activity) {
 mainActivity = Activity;
 }
 public override bool OnDoubleTap(MotionEvent e) {
 //Console.WriteLine("Double Tab");
 mainActivity.FlipCard();
 return true;
 }
 public override void OnLongPress(MotionEvent e) {
 Console.WriteLine("Long Press");
 }
 public override bool OnFling(MotionEvent e1, MotionEvent e2, float velocityX, float velocityY) {
 Console.WriteLine("Fling");
 return base.OnFling(e1, e2, velocityX, velocityY);
 }
 public override bool OnScroll(MotionEvent e1, MotionEvent e2, float distanceX, float distanceY) {
 Console.WriteLine("Scroll");
 return base.OnScroll(e1, e2, distanceX, distanceY);
 }
}
Step 16: Debug and run the app.

Download Source Code Here..
Finally, we successfully created Xamarin Android flip card animation between the fragments, using Gesture event.

Anbu Mani(Microsoft MVP) is working Software Engineer in Changepond Technologies, Chennai, Tamilnadu, India. Having 4+ years of experience and his area of interest is C#, ASP.NET, SQL Server, Xamarin and Xamarin Forms,Azure…etc