
Xamarin Forms- Listview with CheckBox
Introduction
In this article we are going to learn how we can add Check Box in listview without creating any custom render. It is very easy to implement with less coding part. Check box give a facility to select multiple value at a time. This kind of control is not available in Xamarin forms but with the help of small trick we can easily achieved.
Part I
First of all, we need to create project for creating open your visual studio and follow my instruction.
In this screen you need to create new project for creating new project you need to Click on File–> New –>Project. After that you will get following screen.
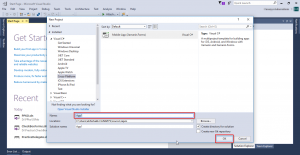
In this screen you need select Mobile App then you need to give project name in Name section After that you need to click on OK Button. After clicking on Ok you will get following screen.
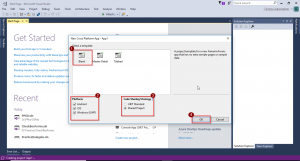
In this screen you need to select Template which I have marked as no-1, then you need to select Platform as it is marked as no-2, then you need to select your Code Sharing Strategy I have taken Shared Project you can chose based on your requirement. And in the end you need to click on OK Button which I have marked as no-4. Now your project is created. You will get following screen.
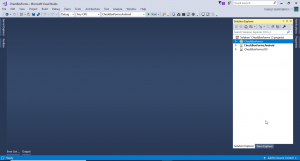
In this screen you can see your project structure. Here I have Unload my Windows project that’s why it is not showing.
PART -II
Our project has been created now, we are going in to implementation part.Here I am not going to use any sdk nor custom render.
In the Main page we have to write UI code as i have written.
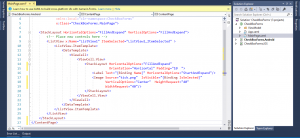
In UI portion I have taken one ListView, Image and one label.Here image I have taken one check symbole, this image I am going to use as a check box.
Check following code.
<?xml version="1.0" encoding="utf-8" ?>
<ContentPage xmlns="http://xamarin.com/schemas/2014/forms"
xmlns:x="http://schemas.microsoft.com/winfx/2009/xaml"
xmlns:local="clr-namespace:CheckBoxForms"
x:Class="CheckBoxForms.MainPage">
<StackLayout HorizontalOptions="FillAndExpand" VerticalOptions="FillAndExpand">
<!-- Place new controls here -->
<ListView x:Name="ListView1" ItemSelected="ListView1_ItemSelected" >
<ListView.ItemTemplate>
<DataTemplate>
<ViewCell>
<ViewCell.View>
<StackLayout HorizontalOptions="FillAndExpand"
Orientation="Horizontal" Padding="10  ">
<Label Text="{Binding Name}" HorizontalOptions="StartAndExpand"/>
<Image Source="tick.png"  IsVisible="{Binding IsSelected}"
VerticalOptions="Center"  HeightRequest="40"
WidthRequest="40"/>
</StackLayout>
</ViewCell.View>
</ViewCell>
</DataTemplate>
</ListView.ItemTemplate>
</ListView>
</StackLayout>
</ContentPage>
In the next step we need to create one class. Where I can create some property for binding my UI. For creating class you need to Right click on Shared/pcl a AddClass. I have create with the name of HelperModel.
After that you need to write following code as I have written.

Following code we have to write.
using System;
using System.Collections.Generic;
using System.ComponentModel;
using System.Runtime.CompilerServices;
using System.Text;
namespace CheckBoxForms.ViewModel
{
public class HelperModel : INotifyPropertyChanged
{
public event PropertyChangedEventHandler PropertyChanged;
private bool isSelected = false;
public string Name { get; set; }
public bool IsSelected
{
get { return isSelected; }
set
{
isSelected = value;
OnPropertyChanged("IsSelected");
}
}
//OnProperty changed method
protected void OnPropertyChanged([CallerMemberName] string propertyName = null)
{
PropertyChanged?.Invoke(this, new PropertyChangedEventArgs(propertyName))
}
}
}
In HelperModel Class I have create two property one is the name of NAME and another is IsSelected both property I have bind with Main Page.
I have inherit INotifyPropertyChanged also created Property changed method.
Now, our ui and HelperModel class is ready now we are going to write some logic code behind of MainPage.xaml.cs
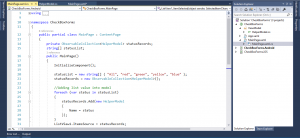
Following code we have to write.
using CheckBoxForms.ViewModel;
using System;
using System.Collections.Generic;
using System.Collections.ObjectModel;
using System.Linq;
using System.Text;
using System.Threading.Tasks;
using Xamarin.Forms;
namespace CheckBoxForms
{
public partial class MainPage : ContentPage
{
private ObservableCollection<HelperModel> statusRecords;
string[] statusList;
public MainPage()
{
InitializeComponent();
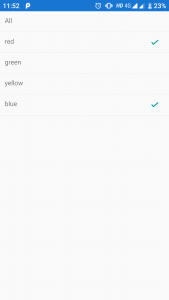
statusList = new string[] { "All", "red", "green", "yellow", "blue" };
statusRecords = new ObservableCollection<HelperModel>();
//Adding list value into model
foreach (var status in statusList)
{
statusRecords.Add(new HelperModel
{
Name = status
});
}
ListView1.ItemsSource = statusRecords;
}
private void ListView1_ItemSelected(object sender, SelectedItemChangedEventArgs e)
{
if (e.SelectedItem == null) return;
var statusData = e.SelectedItem as HelperModel;
((ListView)sender).SelectedItem = null;
if (statusData.Name == "All")
{
statusRecords.ToList().ForEach(x => x.IsSelected = false);
}
else
{
statusRecords[0].IsSelected = false;
}
var item = statusRecords.Where(x => x.Name == statusData.Name).FirstOrDefault();
if (item != null)
item.IsSelected = !item.IsSelected;
}
}
}
In this portion I have create one string array, and I am adding this string array to the list.
Also I have created one event for ListView1_ItemSelected here I have written my logic you can see in the code part.
Our work is done now, we need to Build and Deploy to our Simulator.
Output:

I am Software Engineer in Canary’s Automation Pvt Ltd. I worked as Xamarin and Mobile DevOps Consultant. experience in Xamarin forms , .net ,Asp.net, C#, SqlServer, Html, javascript.