
Dependency Injection With Xamarin Forms
Introduction
Hello everyone, today we are going to learn about Dependency Injection. And how we can implement it in our Xamarin Forms project. So in this article I try to explain you in basic manner so everyone can get easily.
What is Dependency Injection?
Dependency injection helps to inject dependent object in to your classes, thus making your architecture more loosely coupled.
We can tell like that for implementation of IoC (Inversion of Control) in our project we need to use Dependency Injection.
Pattern of Dependency Injection
In this pattern there is three type of classes.
- Client Class
- Service Class
- Injector Class
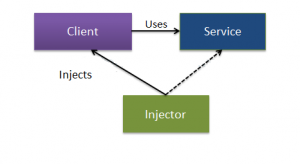
Client class is nothing it is dependent class which depend on Service class.
Service class will provide service to the client class.
Injector works It inject service class object into the client class.
Types of Dependency Injection
- Constructor Injection
- Method Injection
- Property Injection
Now, we got to know basic information about Dependency Injection. I am going to show you how we can implement it in our Xamrin Forms Project.
Step-I
Create new Xamarin Forms project in your visual studio Windows/Mac.
I have created with the name of DISampleDemo you can create based on your choise.in the following image you can see the folder structure of my project.
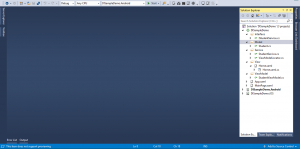
As you can see it in my shared project I have created some folder like Interface, Model, Service, View & ViewModel. This folder structure we have created by our self.so for understanding purpose I am suggesting to create same folder structure in your project.
Step-II
Now we are moving to implementation part.
Firste of Write click on your Interface folder and add one interface with the name of IStudentService.
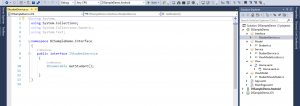
As you can see this image I have create one method into the IStudentService interface.
CODE
namespace DISampleDemo.Interface
{
public interface IStudentService
{
IEnumerable GetStudent();
}
}
Now, in Model folder we need to create one Model class. Like that following image.
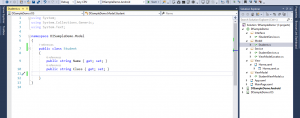
In this image I have created one model class with the name of Student. Inside that class I have create two property only Name and Class.
CODE
namespace DISampleDemo.Model
{
public class Student
{
public string Name { get; set; }
public string Class { get; set; }
}
}
In next step we need to add a class in Service Folder I have added with the name of StudentService
As you can see in the following image.
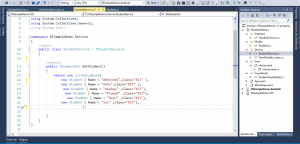
In this class I have inherit IStudentService Interface class. And crating definition of the GetStudent() method which I have created in Interface class.
CODE
namespace DISampleDemo.Service
{
public class StudentService : IStudentService
{
public IEnumerable GetStudent()
{
return new List<Student>{
new Student { Name = "Abhishek",Class="XII" },
new Student { Name = "Anbu",Class="XII" },
new Student { Name = "Akshay" ,Class="XII"},
new Student { Name = "Pramod" ,Class="XII"},
new Student { Name = "Raju" ,Class="XII"},
new Student { Name = "Sai" ,Class="XII"},
};
}
}
}
Now we are going to create VIEW. For creating view we need to write click on View Folder ADD–>NEW ITEM.
We need to select Content page for our view. I have create view with the name of Home. You can see in the following image.
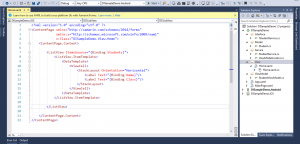
In this image you can see I have created one view and in that view I have added one list view.
CODE
<ContentPage.Content>
<ListView ItemsSource="{Binding Students}">
<ListView.ItemTemplate>
<DataTemplate>
<ViewCell>
<StackLayout Orientation="Horizontal">
<Label Text="{Binding Name}"/>
<Label Text="{Binding Class}"/>
</StackLayout>
</ViewCell>
</DataTemplate>
</ListView.ItemTemplate>
</ListView>
</ContentPage.Content>
As you can see I taken one listView and that source I have bind with Students Property which I will create in ViewModel class.
Now we have crated almost everything. Because we are following MVVM pattern I need to crate one ViewModel class. And need to bind. But before that we need to do something so we can achived Dependency Injection.
STEP-III
For achieving Dependency Injection we need to add UNITY library in our project. So for that we need to write click on solution–>Manage Nuget Packages for solution.
After that we need to search for unity as I have shown in the following picture.
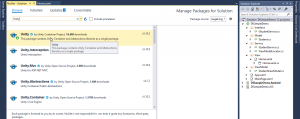
This unity NuGet package we need to install in our all project. Why we are using this package, because with the help of Unity we can create Container. Which helps to register our service class in that.
Now we need to create one class in our ViewModel folder. This class would be our ViewModel. I have created with the name of StudentViewModel. You can see in the following screen.

In this ViewModel as you can see I am using Constructor Injection. Rest thing is normal property which I have create.
CODE
namespace DISampleDemo.ViewModel
{
public class StudentViewModel
{
private readonly IStudentService _istudentservice;
public IEnumerable Students { get; set; }
//Constructor injection
public StudentViewModel(IStudentService isutedeservice)
{
_istudentservice = isutedeservice;
Students = _istudentservice.GetStudent();
}
}
}
Now, main work of this topic we need to do. So for that we need to create one class in Service folder with the name of ViewModelLocator. Similar to the following image.
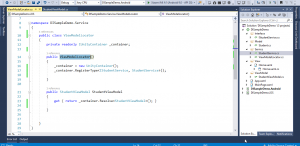
This is injector class which I have explain initially. In this class we need to create one Container and after that we need to register our client class and service class.
CODE
namespace DISampleDemo.Service
{
public class ViewModelLocator
{
private readonly IUnityContainer _container;
public ViewModelLocator()
{
_container = new UnityContainer();
_container.RegisterType<IStudentService, StudentService>();
}
public StudentViewModel StudentViewModel
{
get { return _container.Resolve<StudentViewModel>(); }
}
}
}
Now our Registry and container is ready to use. In the next step we nee to go our Start-up class. Here in Xamarin Forms App.xaml.cs is start-up class. And need to create one property into that class similar to the following image.
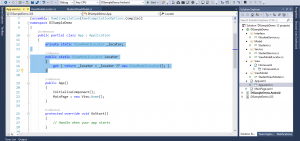
In this class I have create one static ViewModelLocator property and inside that creating instance of that class.
CODE
private static ViewModelLocator _locator;
public static ViewModelLocator Locator
{
get { return _locator = _locator ?? new ViewModelLocator(); }
}
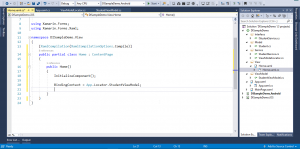
Now, everything is done just we need to perform Binding. For binding again we need to go back our View Folder where we have created UI.
So for that we need to open Home.xaml.cs Class similar to the following image.
CODE
public partial class Home : ContentPage
{
public Home()
{
InitializeComponent();
BindingContext = App.Locator.StudentViewModel;
}
}
As you can see in BindingContext I am just assigning the Locator property. I am not creating any Instance of class.
Now build your project and Deploy it on your simulator. You can put the breakpoint for better understanding of flow.
Output

Conclusion
With the help of Dependency Injection design we can write loosely coupled code in our project which helps to make our code maintainable, it also reduce to hard coded dependency , increase code reuse.
Thank You

I am Software Engineer in Canary’s Automation Pvt Ltd. I worked as Xamarin and Mobile DevOps Consultant. experience in Xamarin forms , .net ,Asp.net, C#, SqlServer, Html, javascript.