
Xamarin Forms – Card View
Introduction
In this Article we are going to learn how to create an attractive Card View UI in Xamarin forms list. Card view help us to design attractive cell of list. It add attraction in list.
In this article I am getting data from sample api and populating attractive list.
Step I Create Project
First of all we need to create one Xamarin Forms project in Visual Studio Mac/Windows.
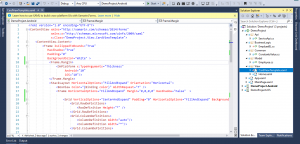
I have created with the name of DemoProject you can create based on your convenience. Also I have created some folder structure so I could manage my 3tier architecture. It is not required but if you want you can create.
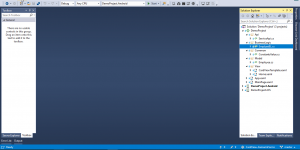
In this image you can see my folder structure which we mostly use in our development. Folders which I have created View, Model, Api, Business Logic, Common. In this folder I will add class according to them.
Step II Implementation
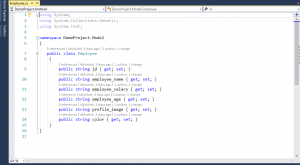
We are going to make api call so we need to create one model class in Model folder. Write click on Model->Add->Class. Give this class name Employee.cs and write property as I have written. In following image.
C# CODE
public class Employee
{
public string id { get; set; }
public string employee_name { get; set; }
public string employee_salary { get; set; }
public string employee_age { get; set; }
public string profile_image { get; set; }
public string color { get; set; }
}
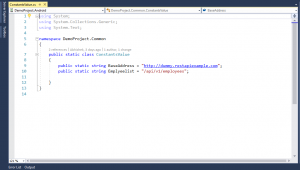
We have created our model property against of json. In next step we are going to add one class in COMMON Folder with the name of ConstantsValue.cs. Write click on Common folder ->ADD->Class. in this class we are going keep our api base address and api url so we can use it in your all application. For that we need to follow following screen and code.
C# CODE
public static class ConstantsValue
{
public static string BaseAddress = "http://dummy.restapiexample.com";
public static string Emplyeelist = "/api/v1/employees";
}
This class is static so we can call it without creating instance of that class.
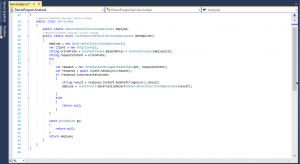
Now, we are going to make api call for that we need to write method so same way add one class with the name of ServiceApi in Api Folder. And write Get method for api call. As I have written in the following image.
C# CODE
public class ServiceApi
{
public static ObservableCollection<Employee> emplyee;
public static async Task<ObservableCollection<Employee>> GetEmplyee()
{
emplyee = new ObservableCollection<Employee>();
var client = new HttpClient();
string urlFomrate = ConstantsValue.BaseAddress + ConstantsValue.Emplyeelist;
string requestContent = urlFomrate;
try
{
var request = new HttpRequestMessage(HttpMethod.Get, requestContent);
var response = await client.SendAsync(request);
if (response.IsSuccessStatusCode)
{
string result = response.Content.ReadAsStringAsync().Result;
emplyee = JsonConvert.DeserializeObject<ObservableCollection<Employee>>(result);
}
else
{
return null;
}
}
catch (Exception ex)
{
return null;
}
return emplyee;
}
}
Note :- For writing Api method you need to include Newtonsoft.Json, HttpClient library form Nuget Package.
Now, we have written our api call method in next step we are going to add one Class with the name of EmployeeBL in BusinessLogic folder. Here we will write our logic and we will make api call. Similar to the following image.
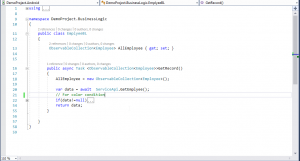
C# CODE
public class EmplyeeBL
{
ObservableCollection<Employee> AllEmployee { get; set; }
public async Task <ObservableCollection<Employee>>GetRecord()
{
AllEmployee = new ObservableCollection<Employee>();
var data = await  ServiceApi.GetEmplyee();
// For color condition
if(data!=null)
{
try
{
foreach (var a in data)
{
int _age = Int32.Parse(a.employee_age);
if (_age <= 10)
{
a.color = "green";
}
else if(_age <=20)
{
a.color = "yellow";

}

else if(_age<=30)
{
a.color = "blue";
}
else
{
a.color = "violet ";
}
AllEmployee.Add(a);
}
}
catch(Exception ex)
{
}
}
return data;
}
}
In this class we have made api call and also add some condition for color which I am going to add on card view in listview.
Step III Design Card View
Now, We are going to design our card view . for that we need add one ContentView . In this content view we will design our layout and after that we are going to call it on our ContentPage. I have created with the name of CardViewTemplate as you can see in the following image.
XAML CODE
<ContentView.Content>
<Frame IsClippedToBounds="True"
HasShadow="True"
Padding="0"
BackgroundColor="White" >
<Frame.Margin>
<OnPlatform x:TypeArguments="Thickness"
Android="10"
iOS="10"/>
</Frame.Margin>
<StackLayout HorizontalOptions="FillAndExpand" Orientation="Horizontal">
<BoxView Color="{Binding color}" WidthRequest="7" />
<Frame HorizontalOptions="FillAndExpand" Margin="0,0,0,0" HasShadow="False"  >
<Grid VerticalOptions="CenterAndExpand" Padding="0" HorizontalOptions="FillAndExpand" BackgroundColor="Transparent">
<Grid.RowDefinitions>
<RowDefinition Height="*" />
</Grid.RowDefinitions>
<Grid.ColumnDefinitions>
<ColumnDefinition Width="auto"/>
<ColumnDefinition Width="*"/>
</Grid.ColumnDefinitions>
<StackLayout Grid.Row="0" Grid.Column="0" >
<Frame>
<Image  Source="xam.jpeg" HeightRequest="50" />
</Frame>
</StackLayout>
<StackLayout Grid.Row="0" Grid.Column="1"  Orientation="Vertical">
<StackLayout Orientation="Horizontal">
<Label Text="Name :"/>
<Label Text="{Binding employee_name}"/>
</StackLayout>
<StackLayout Orientation="Horizontal">
<Label Text="Age :"/>
<Label Text="{Binding employee_age}"/>
</StackLayout>
<StackLayout Orientation="Horizontal">
<Label Text="Salary :"/>
<Label Text="{Binding employee_salary}"/>
</StackLayout>
</StackLayout>
</Grid>
</Frame>
</StackLayout>
</Frame>
</ContentView.Content>
In this ContentView I have take basic Image and Label Control and design it as my requirement. With the help of frame and grid. You can see it in code I am Binding model property which I need to populate with data. Image I have taken static. Same way you also need to do.
Now, we are going to call this View in ListView. For that we need to add one ContentPage with the name of Home in same View Folder. Similar to the following image.
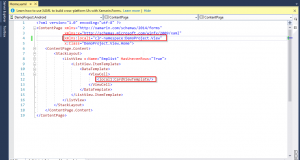
XAML CODE
<ContentPage xmlns="http://xamarin.com/schemas/2014/forms"
xmlns:x="http://schemas.microsoft.com/winfx/2009/xaml"
xmlns:local1="clr-namespace:DemoProject.View"
x:Class="DemoProject.View.Home">
<ContentPage.Content>
<StackLayout>
<ListView x:Name="Emplist" HasUnevenRows="True">
<ListView.ItemTemplate>
<DataTemplate>
<ViewCell>
<local1:CardViewTemplate/>
</ViewCell>
</DataTemplate>
</ListView.ItemTemplate>
</ListView>
</StackLayout>
</ContentPage.Content>
</ContentPage>
In this page I have taken one ListView, in that in ViewCell I am passing CardViewTemplate Which I have create in ContentView.
Now, Open Home.xaml.cs File and add following code. Similar to the following image.
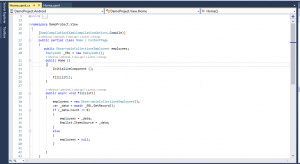
C# CODE
public partial class Home : ContentPage
{
public ObservableCollection<Employee> employees;
EmplyeeBL _EBL = new EmplyeeBL();
public Home ()
{
InitializeComponent ();
FillList();
}
public async void FillList()
{
employees = new ObservableCollection<Employee>();
var _data = await _EBL.GetRecord();
if (_data.Count != 0)
{
employees = _data;
Emplist.ItemsSource = _data;
}
else
{
employees = null;
}
}
}
In this section I have create one Method with the name of FillList() in this method I am passing data into list.
Step III Build & Deploy
Now, you need to Build your project and deploy it on your device or Emulator.
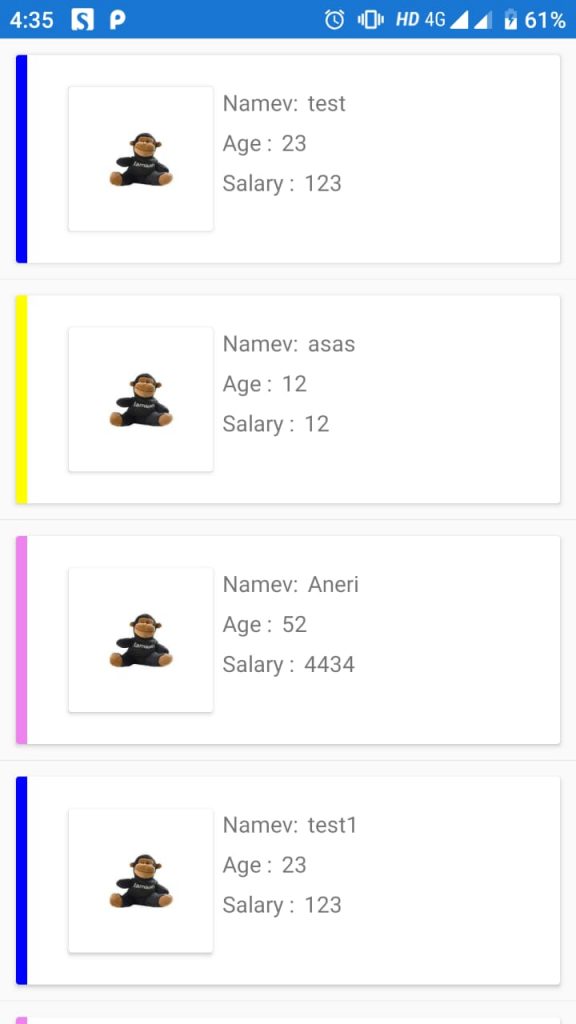
OUTPUT
Download Soruce Code Click Here
Summary
We have successfully learn to create card View in our Xamarin forms App, with api call and populate data into list.

I am Software Engineer in Canary’s Automation Pvt Ltd. I worked as Xamarin and Mobile DevOps Consultant. experience in Xamarin forms , .net ,Asp.net, C#, SqlServer, Html, javascript.